Show Posts

This section allows you to view all posts made by this member. Note that you can only see posts made in areas you currently have access to.


Messages - Rancid Crabtree

Pages: 1 ... 21 22 [23] 24 25 26
331
Archery / Homemade leather hip quiver
« on: October 24, 2007, 06:11:17 AM »
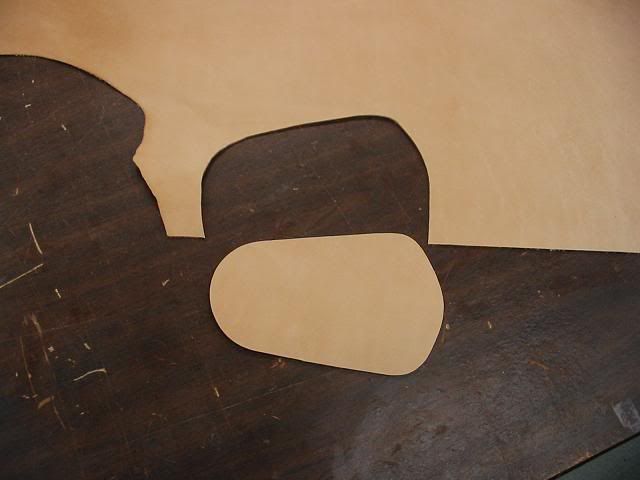
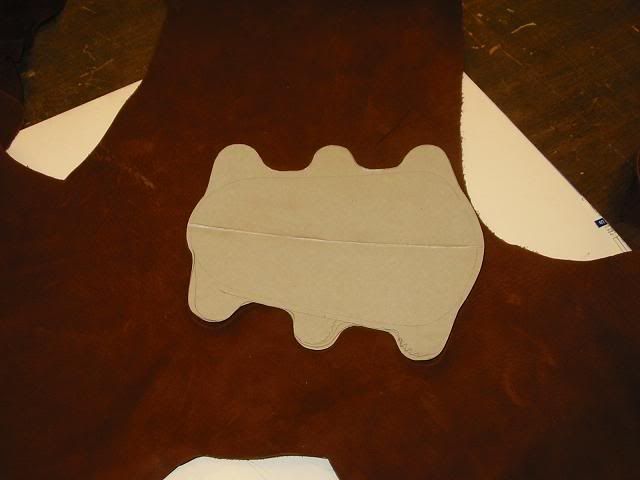
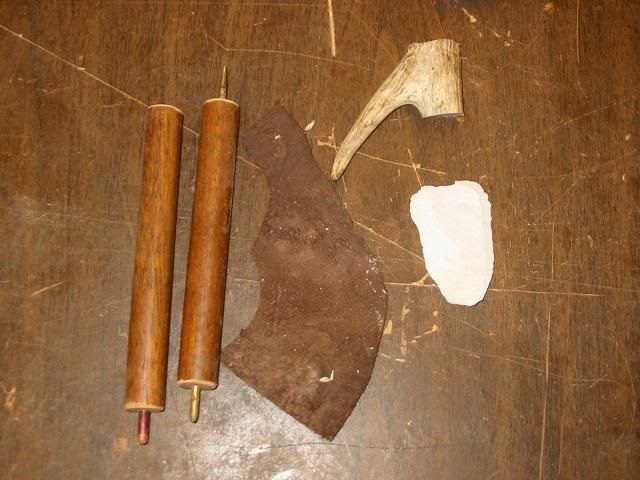
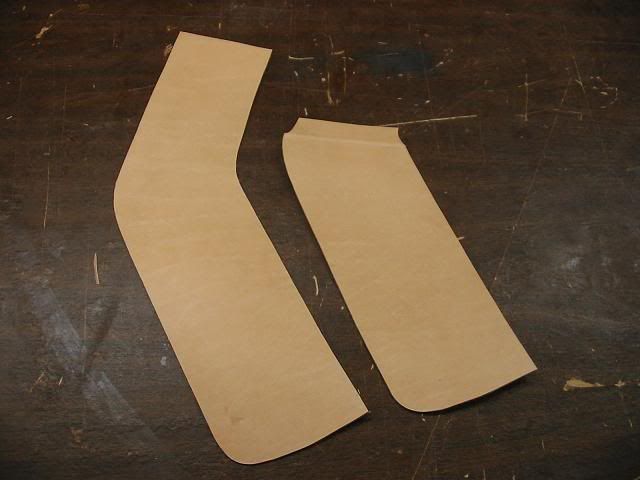
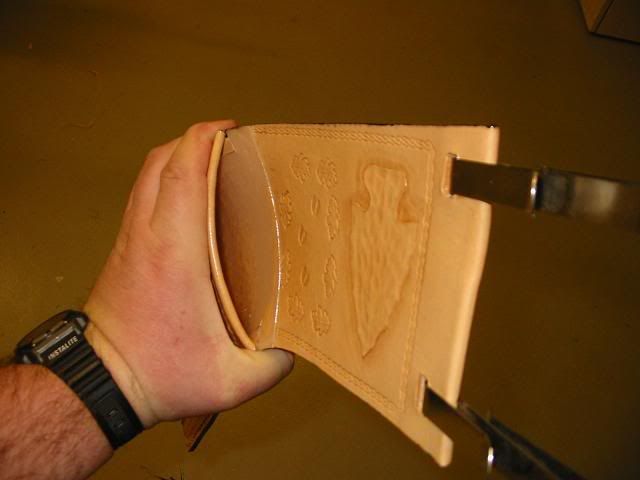
After searching for the hip quiver design that I want, I started the project. I used cardboard to make a template for the back of the quiver.


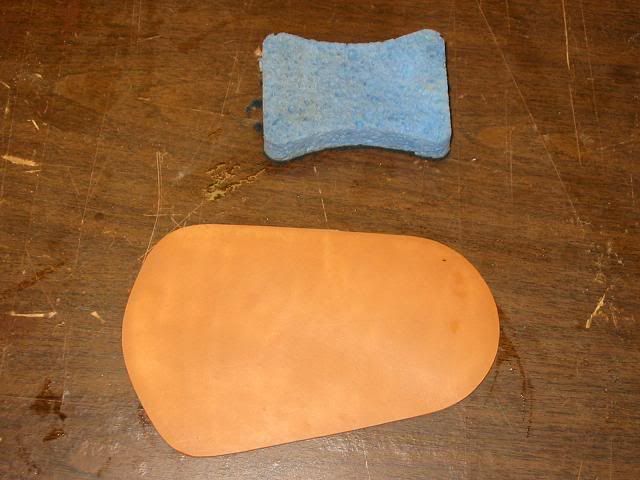
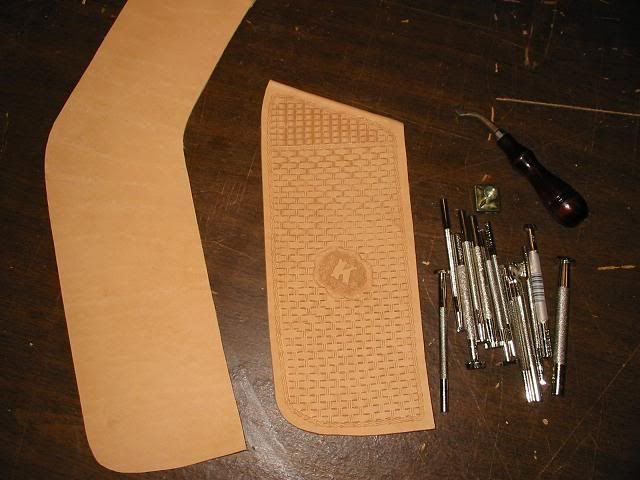
Then cut the quiver face.


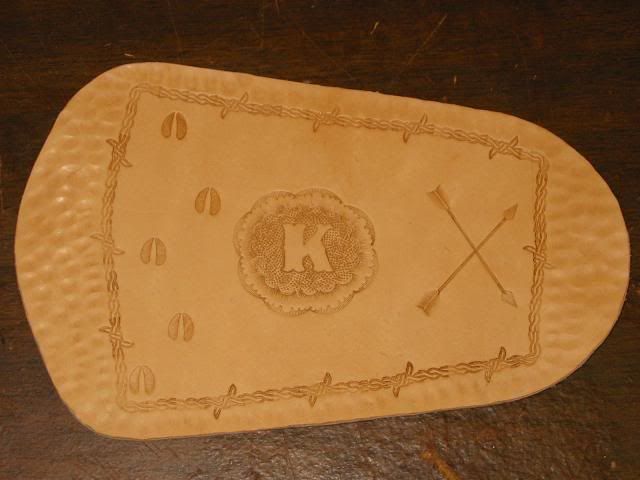
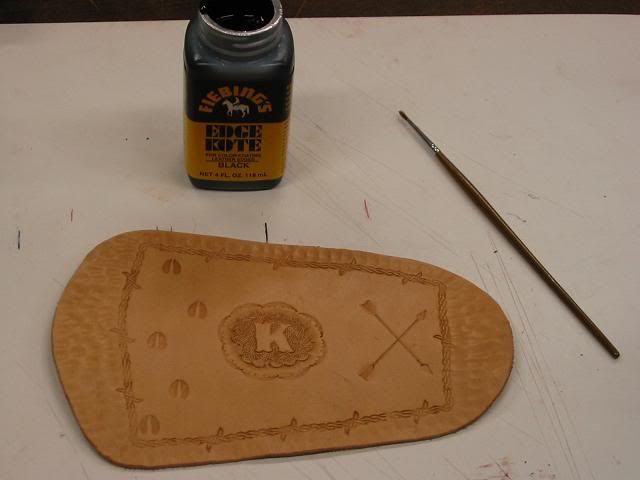
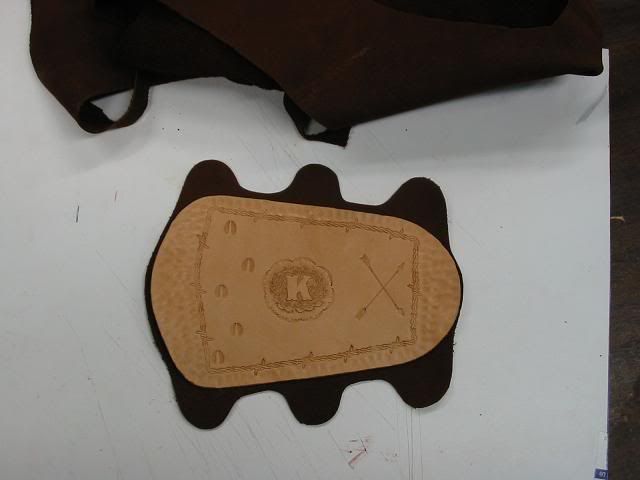
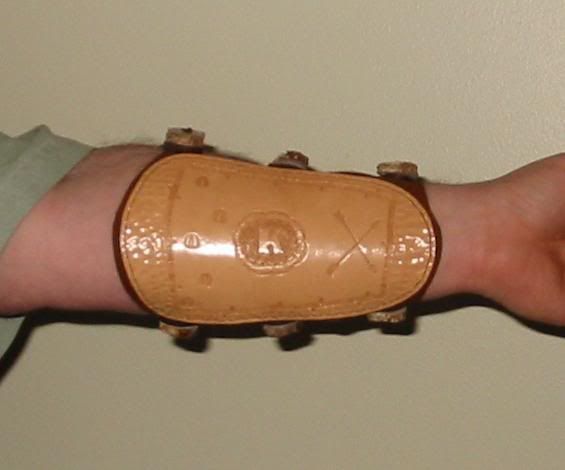
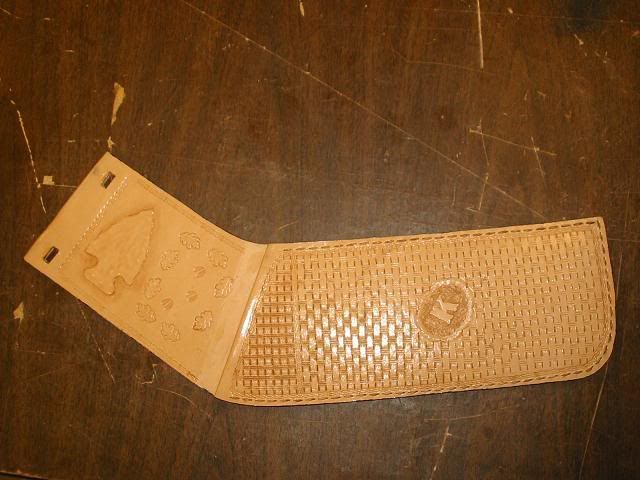
I wet the leather of the quiver face and spent some time tooling it. I added the "K" so it matches the arm guard.


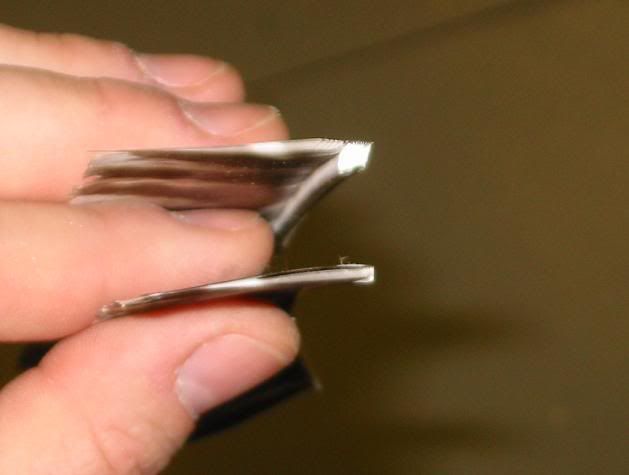
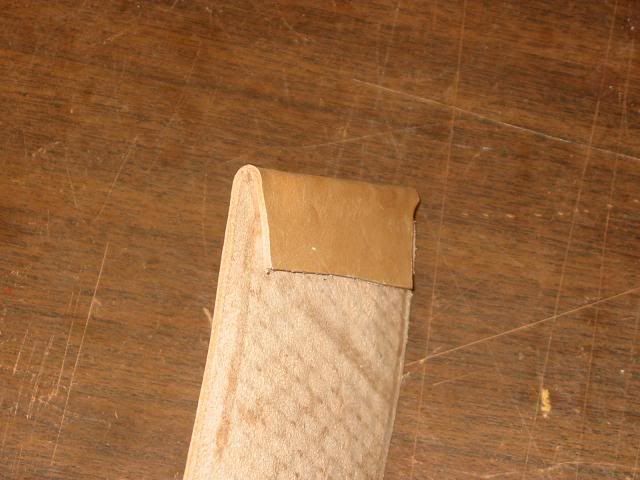
As long as I had the leather wet. I creased and folded the top of the face (where the arrows will slide in) to keep it from swelling and getting fuzzy from the field points hitting it.


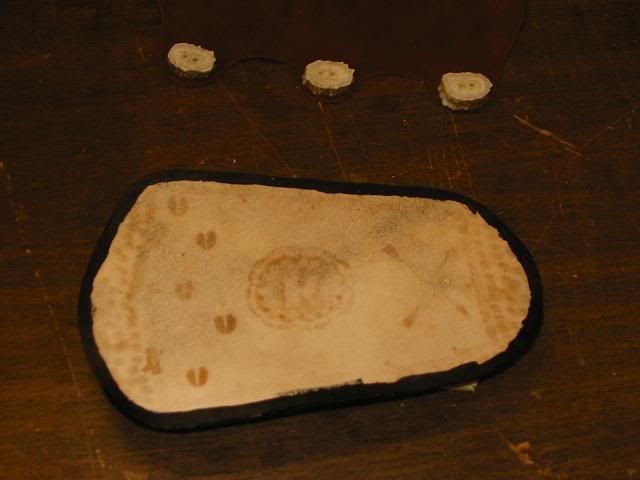
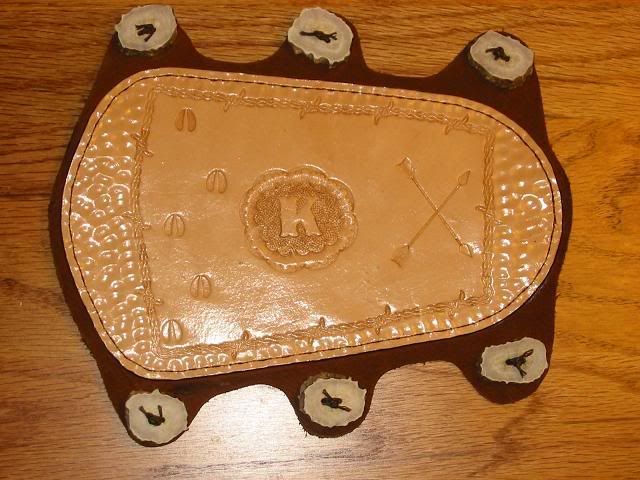
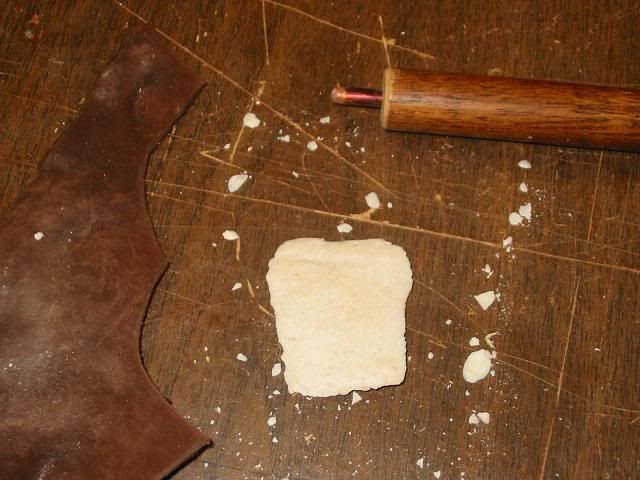
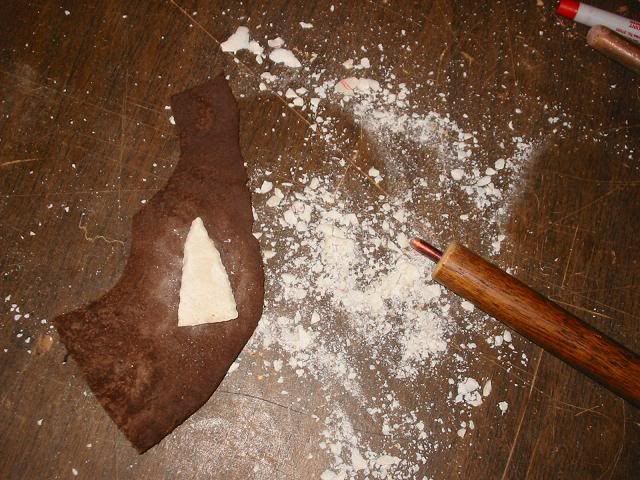
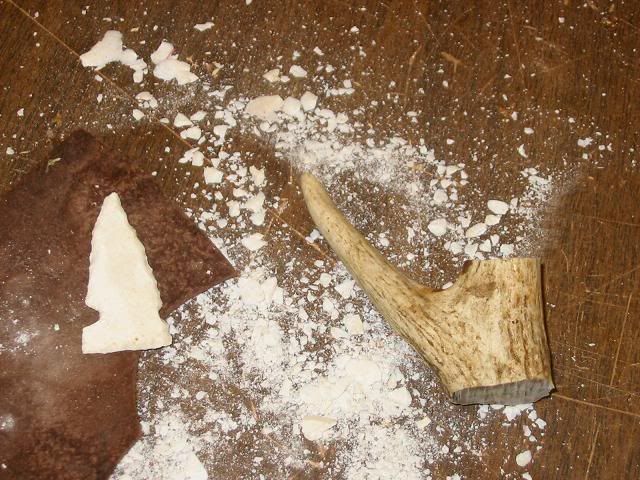
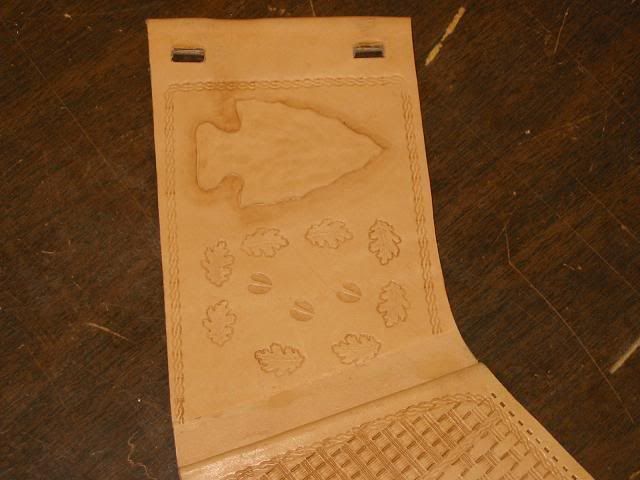
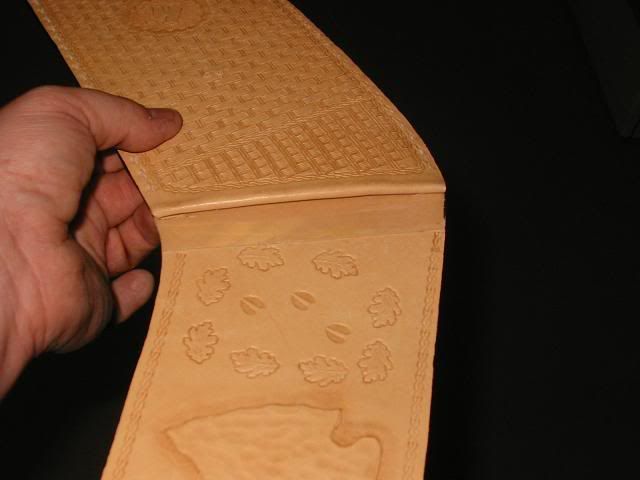
I stamped the upper/back portion of the hip quiver with a pattern I sketched on the leather. The deer hoof and the oak leaves were stamps. I framed it with a rope stamp. I also cut two holes for the belt clips.


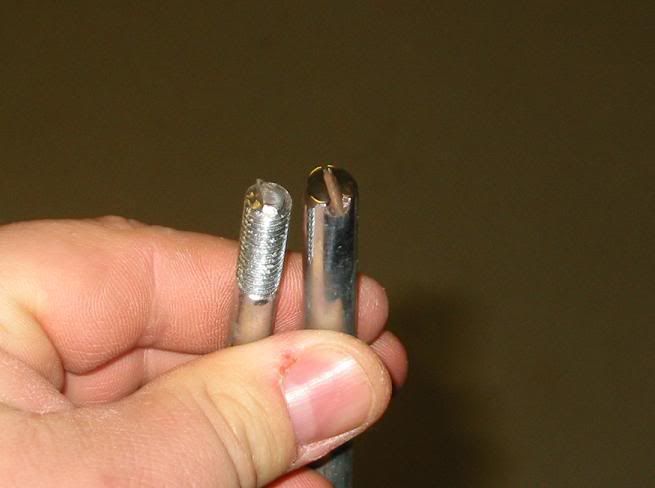
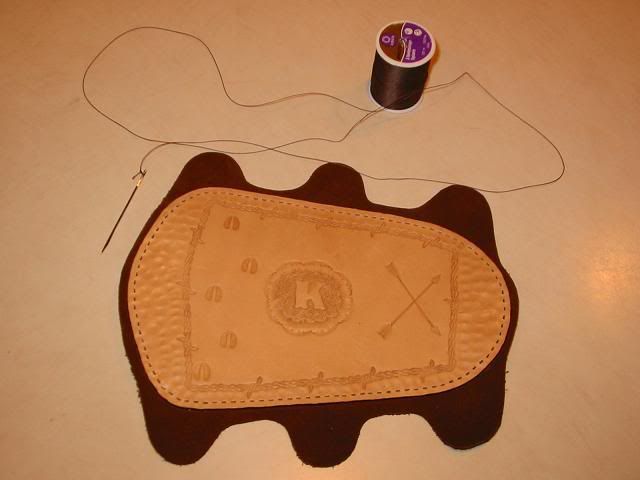
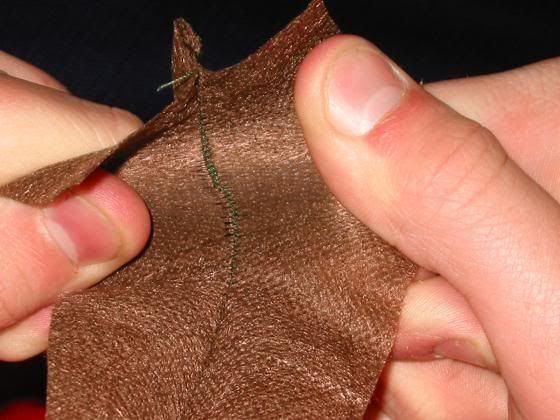
I used the forked punch for the stitching holes and used a 2 mm leather thong for sewing the two halves together.


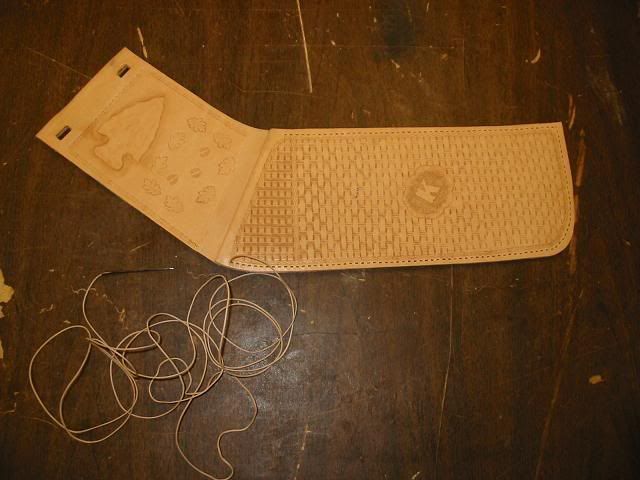
I was great to sew with and it is very strong.


I forgot to take pics of one step. I cut up a very thin plastic cutting board and used rubber cement to attach them to the inside faces of the quiver. This will allow the arrows to slide in and out of the quiver without wearing it down and it added some stiffness. I left a short amount it sticking out on the back face to act as a buffer for when I am inserting arrows.


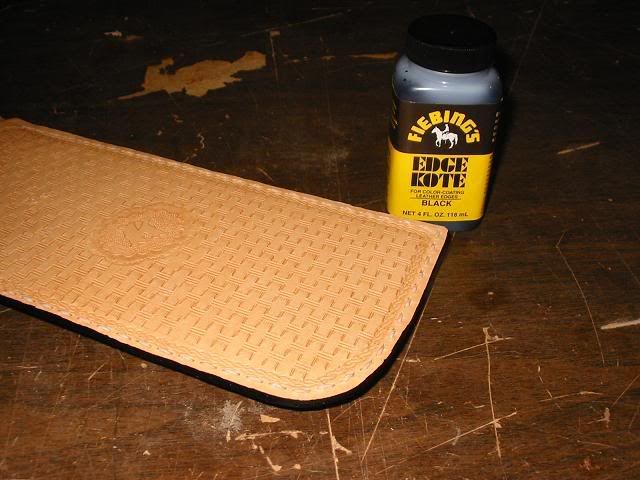
After stitching both halves, I trimmed then with a razor knife so both edges were even. I then used edge kote to seal and waterproof the end grain so it will not swell or get fuzzy.


I then gave the outer surfaces two coats of super sheen to seal and waterproof the leather as well as give it a nice shine.


I'm guessing that over time, the quiver will get flexible or loose and the arrows won't be held as tightly as they are when it's new.


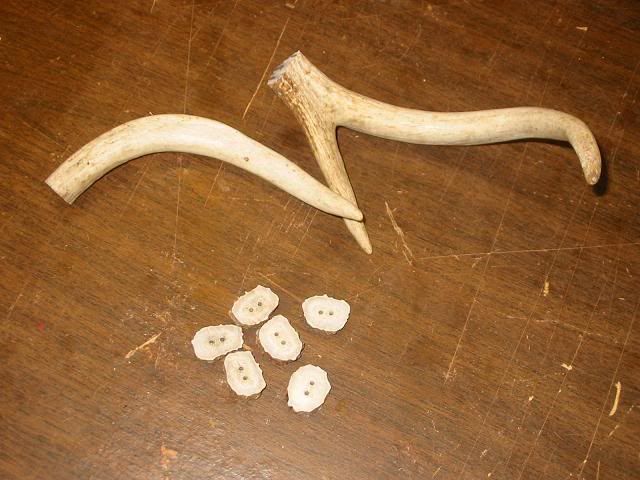
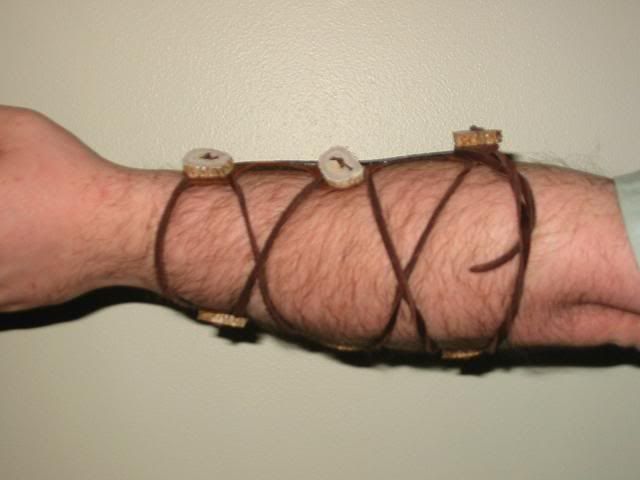
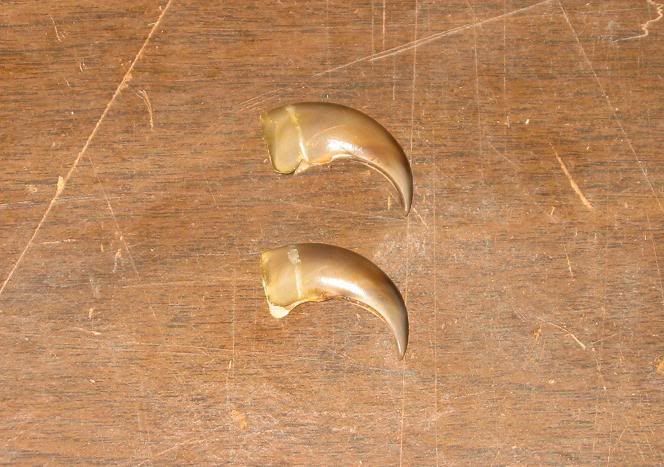
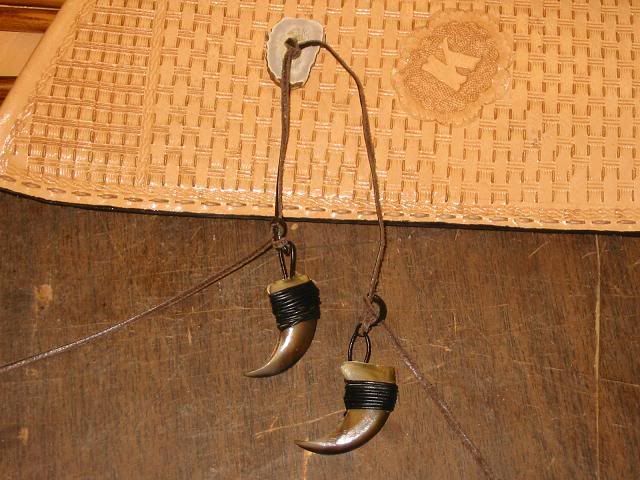
to cure this, I punched two holes through both sides of the quiver so that I can tie it closed with a leather thong. To dress up this feature I cut an antler button and then decided to add some bear claws to the ends of the thong. I have a few bear claws packed away in salt and borax.


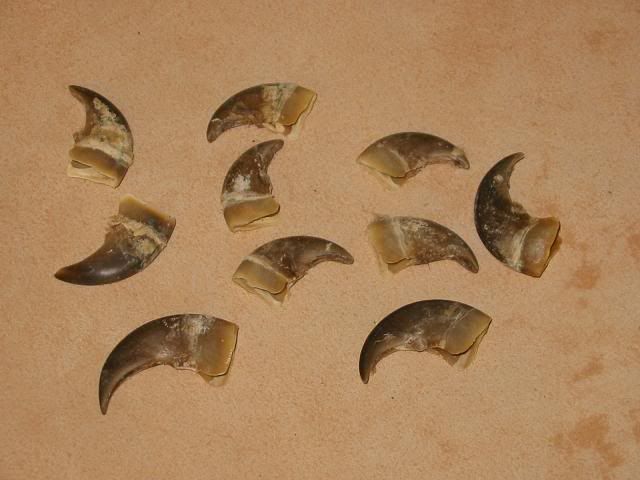
After cleaning off the toe jam and giving them a coat of polyurethane. I had done my first bear manicure.


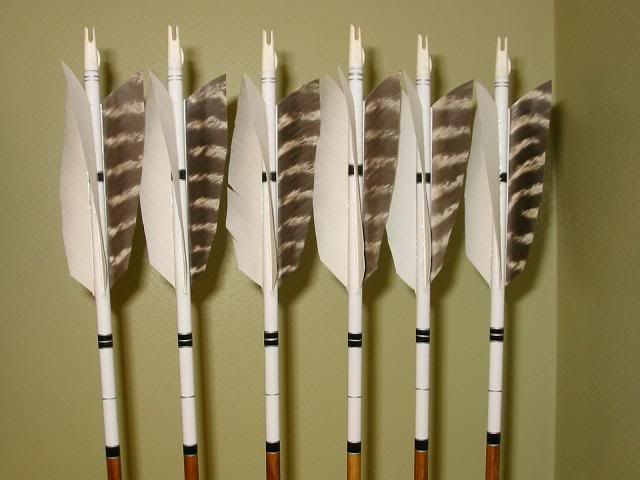
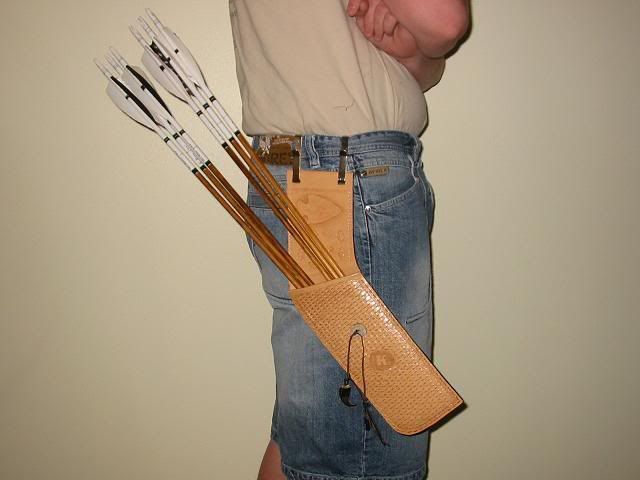
I had my son model the quiver for me. I used two belt clips to hold it in place. It holds 6 arrows very well.


332
Archery / Homemade leather armguard
« on: October 24, 2007, 06:09:52 AM »
I needed an arm guard for this years trad hunt so I set out to make my own. I used a piece of 5 Oz. tooling leather because it can be stamped easily.


In order to do the tooling, I needed to wet the leather.


I used some standard leather tools but I had to make the deer's foot and the arrowhead stamp. I used a bolt and a pin to make them


The tooling part is done and I still need to make the leather backing and the antler buttons.


With the leather completely dry, I added some edge kote to the cut end of the arm guard. This will water proof and seal the edge and keep it from swelling and getting fuzzy over time.


Next I made the antler buttons by cutting them with a hack saw. and then drilling holes for lacing.


Next I made a cardboard template for the soft leather backing and cut the backing out of a very soft glove leather.


I used some rubber cement to join the two pieces of leather and then used a forked punch to make the holes for the stitching. I used a heavy upholsters thread and double stitched it by hand.


Next, I attached the deer antler buttons using a braided waxed thread/cord and applied Super Sheen to the face of the leather to waterproof it and give it a nice shine.


I then cut a leather thong from a circle of soft buffalo hide for lacing.


Finished.


333
Archery / Homemade camo
« on: October 24, 2007, 06:08:04 AM »
I have made guillie suits before and found them to be heavy and hot to wear. I wanted one that is lightweight and of course cheap.  I made this jacket from Landscaping fabric. It is inexpensive and easy to obtain. The 15 and 20 year types are the strongest.


It is very strong. I could not rip the sewn seam


I used several colors of spray paint to put a camo pattern on the fabric


I used an old flannel jacket as a pattern to cut the pieces from


I added a leafy pattern by sewing stips of "leaves" to the jacket. I plan to use this jacket for bow hunting so I did not put leaves on the upper left chest area.


I used velcro as the closure because a 36 inch zipper is expensive. (did I mention I an cheap) It was adhesive backed but GOOP is a great glue and I trust it more that sticky tape. GOOP is one of the best glues known to man. I swear you can stick an ice cube to a stick of butter with this stuff. I also added velcro to the cuffs so they can be tightened


The finished coat weighs in at only 5 Oz. and is breathable.
Here is the hat and pants that I made to go with the new homemade jacket.


I made some leaves from some canvas I saved from an 70's vintage Boy Scout tents (canvas) and a green sharpie.


I took the finished suit outside and had my oldest son Jake stand for a few pics. He is 6'- 3 inches tall so the pants were kind of short for him. (and to big in the waist as well so he held them up with suspenders. This turned out to be a very enjoyable project and very cost effective (since I work for myself for free)


Here is my last guillie suit.


334
Archery / Homemade broadheads
« on: October 24, 2007, 06:04:59 AM »
Since attending the big Trad shoot in Michigan (Compton) left me without any broadheads for this years hunt, I needed to make more.

I use 125 grain field points and reshape them to remove the shoulders. this step may not be necessary buy It looks nice.
   
the blades are cut from a .039 thick bandsaw blade.


the jig for slotting the field point is made of steel and clamps the point while the spacer (piece of hacksaw blade) Leaves room for the saw to pass between the two halves to cut the slot.


I then polish the two pieces and make sure I have a good fit up.


Next I braze the two parts together although I think solder or even J.B. Weld would suffice. I may try this on the next batch because brazing is messy and I have to quench afterward to make sure the heads are hard.


After cleaning and polishing again, I use a cold bluing to protect the heads and then a light coat of oil.
 

Finished weight, 165 grains. about 1 inch wide (15/16) and 1 1/4 long.


Next, I tried a single bevel design. It makes a lot os sense.


In the end. I changed my thinking and went with a longer blade design for my heads. I still use the single bevel but liked the longer design for increased penetration. I added a pinned arragement for added strength.


335
Archery / The frontal archery shot
« on: October 24, 2007, 05:53:15 AM »
I do a lot of custom butchering for folks and I tend to take a lot of pics along the way.

I post these pictures in an attempt to show what the target opening looks like from both front and rear. This opening on this small deer was 1 3/4 inch across. I am only guessing that it would be about 2 1/2 inches on a large adult deer. As you can see. The sternum at the bottom is a large bony mass that if hit with an arrow will not offer much penetration. On either side of the opening the ribs (viewed from the front) make an solid all of bones that are curved and are at a glancing angle. If you did go through the ribs on either side of this small opening, you would hit only one lung. If you miss the opening and shoot high, you do have a chance to hit the spine if you shot does not hit right or left. The spine is a cord that is smaller than an index finger as you can see in the pics. While it possible to make this shot and bring a deer down it does require the highest degree of accuracy to ensure a quick kill. Again. Take from these pics what you will. This is what your target area looks like

From the front. Neck high, sternum low and rib on both sides


From the inside looking out.


The spinal cord in the neck, near the frontal opening. It is very small and well guarded.


A cross section view. The cord is enclosed in solid bone.


I do not mean to tell you how to hunt or tell you which shot angles to take. I post this only to let you know that a frontal archery shot is a low percentage shot for a quick and clean kill and isn't that what we are all after?

336
Archery / Upgrading a fiber optic bow sight
« on: October 24, 2007, 05:51:38 AM »
I don't like the blue light that most sights offer to illuminate your pins in low light conditions so I decided to make my own improvements. I ordered some fiber optic material online.
 
I thought I was getting 4 pieces that were 3 feet long, instead it came in 12 foot lengths. I was planning on putting 3 feet of fiber in each pin but I now changed that to 6 feet of fiber in each pin.


While I was waiting for the fiber to arrive, I painted the outside of the sight ring with glow in the dark paint so that during low light conditions, not only would the fibers gather light from the sky but the glowing paint would supply light from the under side. In some 3d Shoots, during the summer, the heavy canopy of leaves can make the woods pretty dark.


The paint worked far better than I thought it would.


In order to protect the thin fibers, I use some clear flexible tubing.


In this image (before I secured the clear tube) I took a pic of the first completed sight pin. The top pin has 72 inches of fiber. The middle pin has the inch of fiber that came with the sight. The bottom pin has no fiber at all. I was liking what I was seeing


After doing the 20 and 30 yard pin. The clear tube was full of 12 feet of fiber. I had to add a second clear tube just for the 40 yard pin.


I used small cable ties to hold the clear tube and the fibers in place.


I am very pleased with the light gathering ability of this much fiber. I think I can get rid of the battery powered blue light.

337
Archery / Arrow Cresting on the cheap
« on: October 24, 2007, 05:49:43 AM »
I use this method to cap and crest my hunting arrows. First I stain them and apply a coat of lacquer.


While the white lacquer was drying, I built a makeshift cresting machine using my cordless drill.


These arrows will have cresting that was white, black and silver.


I start with the black stripes.


And then the silver bands.


Wraps are nice and easy but for a more custom look, I like to do it this way.


338
Archery / Making a stone arrow point
« on: October 24, 2007, 05:48:46 AM »
I was asked by a friend to make a replica arrow for is den. I was at the WI deer and turkey expo last weekend and picked up some chert stone flakes that will work great for this project.


I used a nice, thin, white piece for the arrowhead.


I made some wood and cooper tools and an antler brow tine to flake away the stone. The leather is to protect my hand as I press the coper tool against the chert. The flakes are sharp.


I started by squaring off the bottom of the flake and then chipped the head to shape.


Lastly I added the grooves to each side that will be used to tie the head to the shaft. This is where I make the most mistakes and break the head.


Next, I used a knife to cut a groove in the end of a wood shaft to accept the stone head.


I will trim away the extra wood after I tie the head on.


To tie the head to the shaft, I use the sinew I save from the loins/backstraps from my deer.


It separates into nice thin threads.


I soaked the sinew threads in cold water to soften and stretch them.  While waiting, I stained the wood shaft. The sinew does not really get tied onto the shaft. It is more like wrapping a wet noodle around the shaft. After I put on a few layers, I dried it with a blow dryer (just like I'm sure the early people did). This makes it shrink tight. I then rub the sinew with a block of bees wax to waterproof it so it won't get wet and loosen up.


For the fletching, I went back to the turkey feathers and tied them on.


339
Archery / The Quest for a homemade deer
« on: October 24, 2007, 05:47:50 AM »
I would like to harvest a deer with all homemade archery equipment. I have harvested 37 deer with a bow but all have been with modern equipment. This year I will up the challenge a bit and try to do it with a

Homemade bow. I made an English longbow with a walnut riser, leather grip and a flemish string, I made string silencers from a tanned raccoon tail. It is tillered to be 45 pounds at 28 inches.


The bow case I sewed from a piece of denim.


The arrows are cedar. I crested them and fletched them with the feather from a turkey I shot.


I made the broadheads from field points and band saw blade material.


I used leather to make a finger tab, arm guard and field quiver. I decorated them with leather tooling and antler buttons and bear claws.


My camo is homemade as I posted in the "homemade camo" thread.

I made my own portable climbing stand and ladder stand.


I made the safety harness from seat belt material and metal buckles.


The hunting knife is made from an old sawsall blade and a deer antler with deer rawhide.


I get the rawhide from working the hides of the deer I shoot.


I practice into a homemade target.


I would love to sleep in my homemade Tipi the night before the hunt.


If I am successful, I will turn my deer into homemade sausage and jerky.


340
Archery / Blood Trail spray
« on: October 24, 2007, 05:44:36 AM »
I had heard about using peroxide and food coloring as a way to find blood when tracking a deer. I mixed up a little and put it in a spray bottle. I did not have it with me when I shot my last deer but when I got home I sprayed some on my bloody arrow. It was 18 hours later and he blood on the arrows was dry. (Sorry for the poor picture quality) I used yellow food coloring but I think blue would also shot up well/

The bloody dry arrow


I sprayed the arrow and it was soon covered in yellow foam. Blood does not show up very well on a black carbon arrow but it sure did when I sprayed it.


You will still need a good light if using this at night and a light mist is all that is needed. Too much and it does not foam as much. Give it a try. When you have lost the blood trail and you are at your wits end, it might just find that spot of blood that will lead you to your animal.

341
Archery / Shooting through the mesh windows of a pop up blind
« on: October 24, 2007, 05:43:34 AM »
I hunt with bot Traditional archery gear and modern equipment. My longbow is too big for the pop up but my BowTech fits nicely. I was concerned about shooting through the mesh windows so I gave it a try in the back yard. I bought a Hunter's View(tm) pop up blind. The model I bought is called the Hunters Den http://www.huntersview.com/hb060.asp I paid $60. I also bought a "All Terrain Seat. for it at the Deer and Turkey Expo in Madison. http://www.all-terrainseat.com/ to use in the blind. I bought the "Bull" model because I am a big guy. I set it up in the back yard, 30 yards from my target.

The seat in the carry position. (6 pounds)


The seat in the lowest position.


The seat in the tallest position (8 inches taller)


The seat has a very soft pad and an extreamly quiet swivel.

The Hunters Den blind weighs 15 pounds and comes in a carry bag with back pack straps. (I look like a Ninja Turtle)


It is very comfortable to wear and keeps your hands free.
(here I am sucking in my gut)


It took me 3 1/2 minutes to set up the blind (including staking it down)


It comes with four blaze orange squares that are covered when you don't want them seen.


It has a very large door.


Each of the four walls has two zippered windows. there is a small window that can be covered with shoot thru mesh and a large window without mesh.


THe blind is 5 feet 7 inches tall and has a foot print of 5 feet by 5 feet.

The view of the target from 30 yards. (this pic does not do the screen justice. It is much more clear than it looks in the pic.)


Here is the hole my 4 blade Muzzy Phantom made in the screen. It made no noise when I shot through it and it didn't effect the shot at all


The hole from the outside.


The shot


I shot 6 shots through the mesh and it had no effect on any of them.
Because the inside of the blind is flat black, it is very dark inside. I don't think the mesh would even be nessesary if you only had one window open. The window is positioned so that only your head would be visible any way.

342
Archery / How to recycle a turkey
« on: October 24, 2007, 05:37:18 AM »
I Use the feathers from the birds we harvest to make arrow fletchings.


I  like to use whole uncut white feathers for the two hen feathers and one homemade c0ck feather. I found 7 good looking specimens (one is a spare)


Next I split them to get rid of the side that I won’t need.


Then I found the best section in the middle of the length and cut off the ends. These are longer than I need but I will trim them later


Because the split base is way to thick I need to thin them down.


I use a belt sander with a fine grit belt because the bases are pretty soft. I finish them with a sanding block


The thined feather is a lot less beefy.


Next I cut them to their finished length. 


The next step is to cut down the height a little so they fit in the fletching jig.


After fletching, I use a feather burner to give them their shape.


343
Wanted Misc. / Broadheads
« on: October 24, 2007, 05:32:12 AM »
My 14 year old son has started a broadhead collection. He has a few that I have given him. I have tried so many heads over the years only to switch back to my old favorites. If you have heads that you are not going to use, and would consider donating one to his collection, let me know. His budget is small but he could help cover postage.

Here is Josh's collection so far. Send a private message if you can help. Thanks


344
Whitetail Deer / Notes from the 4th CWD meeting
« on: October 22, 2007, 02:26:18 PM »
Sat. Oct. 20th, DNR Fisheries building, Fitchburg. The fourth meting of the CWD Stakeholders Advisory Group saw 4 presentations. The first was a review of research on deer dispersal and home ranges of deer in the CWD endemic core area. Seth Magle shared the work of the UW's Nancy Mathew's team. The group captured and monitored 114 deer for this study. 41 fawns, 12 yearlings, 56 adults and 6 deer of unknowns age or sex (he could not explain how 6 deer were unidentified) Tonsil biopsies were done and no deer showed detectable signs of infection of CWD but their tests were not as rigorous as postmortem brain biopsies. They monitored these deer weekly for 4 years and identified 19 social/family groups. The deer were located both day and night during all times of the year.


During this research, 65 of the original 114 deer died from a variety of causes. 3 were killed by cars, 6 mistakenly shot by sharpshooters, 8 were killed by coyotes, 35 hunter harvested and the remainder of unknown causes. All deer were sampled for CWD. 8 positives were found (roughly 12%).


During the study, the group created plots depicting the travel routs and home ranges of all the deer and since these deer were from 19 different family/social groups they assumed those deer had the same range. There findings showed females, both yearling and adult had very small home ranges on average of .25 square miles or 160 acres. Males had a larger home range with both adults and yearlings being .58 Square miles or 370 acres.


The study also showed that some deer will expand their range briefly only to return to their home range. around 30% of females would make exploratory trips of 7-8 miles lasting upwards of 5 days compared to around 50% of males making similar trips. The difference between the males and the females is that Yearling males may not return to their home range as they are kicked out of family groups to prevent inbreeding. It is these yearling males that establish new home ranges which explains bachelor groups of summer males.


There research is ongoing but some of the results shared so far were that deer have very small home ranges and that CWD is not spreading within family groups and they are not seeing disease clustering even when a known member of a family/social group has CWD. Constant social interaction such as grooming, feeding, bedding show no evidence of rapid transmission or clustering of the disease. Secondly, the only large scale movement across the landscape are due to yearling male dispersal. Finally, they left us with such questions as Are yearling males the primary source of the movement of CWD and are these males infected prior to dispersing or do they become infected after leaving their original home ranges???


The second presentation was from Paul Shelton, Forest Wildlife Program Manager, Illinois Department of Natural Resources and was titled "What is being done in Illinois? Paul's talk focused on the Illinois DNR's handling of CWD and admits that the Eastern DEZ most likely started in Illinois and not WI as the core area is just South of the WI border. The landscape in the Illinois endemic area is very different than the Western WI DEZ in that it is mostly prairie/ag and grasslands and subdivisions with woodlots only following river bottoms. The stats he used were 75%-94% crop/grasslands and 2%-9% forest. This is a very different picture than the Western DEZ in WI. He also mentioned that sharp shooting was widely used more so than hunter harvest due to the high population areas. Illinois has adopted a 2 prong approach to CWD, that being 1. Surveillance/monitoring and 2. Management to prevent the spread.


He shared that even though 75 percent of the deer tested across the state were hunter harvested that less than half of the positives came from hunters and that about 60% of all positives came from sharpshooters as sharpshooters were able to hunt the highest infected core areas that  hunters could not. Trained sharpshooters would work 4 days per week in an area from Mid January until the end of March. All deer removed were tested and those that tested negative were donated to food pantries. The numbers of infected deer is rather low compared to WI with only 42 positives in 2006. The highest number of positives in a single year was 51 and that is since they began testing in 2002. Illinois is focusing a lot of effort in their sharpshooter program. WI has ended it's sharpshooter program, listing lack of funding as the reason. It has also ended the food pantry donation for the same reason.


One interesting point Paul made was that it cost Illinois about $12 per deer to test for CWD. In WI, the cost is around $90. This is due in part to the fact that collection of samples is not done by Illinois DNR but rather hunters and meat processors. Paul left us with these closing points. Illinois' plan is to maintain a consistent management strategy (sharpshooters) for a 5 year period and then evaluate the results. They are 4 years into this plan. They will focus on lowering deer densities statewide.  He does not see the Illinois and Eastern WI CWD outbreaks as two separate or discrete events but rather one core area near the states borders and says that if one state is not successful is it's CWD plan, then the other state will also fail. Lastly, he stated that controlling this disease is a long term commitment.


The third presentation was made by one of our own panel members. Tom Givnish, Henry Allen Gleason Professor of Botany, University of Wisconsin - Madison. His talk was titled "Lessons learned from Managing Foot & Mouth in the UK" Tom is a non-hunter and was selected for the panel because of that. It was thought that getting input from the non-hunting community would give us more diverse ideas. Tom's talk focused on how the UK government was able to stamp out an outbreak of foot and mouth disease by drawing a circle around the core area and killing every cow, sheep, pig, horse and any other livestock susceptible to F&M disease within to stop the spread. In the end, tens of millions of animals were killed and burned and the disease was stopped only to reoccur as a separate incidence. His point was that killing, all the deer in both the Western and Eastern DEZ and HRZ was needed to stop CWD as quickly as possible. Along with killing all the deer, he suggested that all new deer inhabiting the area would have to be killed and this process would need to go on for at least a decade at which point, deer would be re-introduced to the area. He feels anything less than this strategy are really only half measures that will result in many more deer being killed over a longer period of time and at greater expense than to strike quickly and severely.


The last presentation of the day was from Julie Langenberg, Senior Veterinarian, Wisconsin Department of Natural Resources. Her's was titled "A review of Wisconsin’s approach to managing CWD  thus far" Julie listed the agency's efforts to date and discussed the many thing learned since the discovery in 2002. She also listed the shortcomings of the agency in dealing with hunters and landowners. The very unpopular idea of total eradication of all deer is now viewed as a mistake by the DNR and they have softened that stance to 5 deer per square mile but she assures that it is not due to pressures from the public but rather that the agency now feels that the disease can be stamped out through lowering the density to what essential amounts to 1/3 of a deer per 40 acres.


The DNR also plans to stand fast with the EAB program and feels it is a very valuable tool to get hunters to shoot more does. She also states that the sharpshooter program was very successful albeit very unpopular but she did show that sharpshooters were on average shooting 17% of the infected deer to the 1% that hunters were killing. she pondered as to what the infection rate would look like now if the DNR had done nothing over these last 5 years but failed to call their program a success. She mentioned that since 2002 that of the 600 deer and elk farms in WI that only 7 have been found to have had CWD. 99% of the farms are clean and being monitored regularly. She spent the rest of her time sharing the strategies use to increase hunter harvest and again stated that there is a threshold to the number of deer a hunter will take for personal use. The food pantry program is seen as important in increasing that threshold. She ended with stating that the DNR is doing more outreach and liaison work with the public and that more is needed.


The remainder of the day was spent formulating a set of working assumptions that the group has gathered since the beginning of our meetings so that we can all be in agreement as to the risks and threat levels based on differing levels of rigor in fighting CWD statewide. It was at this point that I asked the question about the statewide comment. I noted that I was under the impression that our work was to deal with CWD in the endemic area since the rest of the state was already free of CWD. I was informed that the recommendations of our panel and the work we are doing is on a state wide scale. I had suspected this all along and this was confirmed. As we discuss issues like crossbows, feeding/baiting. season structure, testing. It is on a state wide level for the next five years.


We are now finished with presentations and information gathering and will now proceed to discuss the strategies and the recommendations that we will forward onto the Secretary of the DNR. The next meeting is Nov. 10th.


345
Whitetail Deer / Re: Potential expansion of crossbows in WI
« on: October 16, 2007, 05:48:39 AM »
Well the meeting took place on Saturday between the Wisconsin Bear hunters Assoc, The WI NWTF, the WI Hunters Rights Coalition and the WI bowhunters Assoc. In the end, they agreed to pursue language that is similar to that of some states out West and that is that hunters may use a lesser weapon than what the season allows. If the season allows the use of a gun such as bear and turkey hunting, one would be able to use a crossbow and is already able to use a vertical bow. This would then hold true for the Firearms season and muzzleloader season for deer. This strategy would protect the archery season from crossbows. I think this was a good compromise and satisfies all concerned.

Pages: 1 ... 21 22 [23] 24 25 26
Google
Web http://www.wisconsinoutdoor.com