Show Posts

This section allows you to view all posts made by this member. Note that you can only see posts made in areas you currently have access to.


Topics - Rancid Crabtree

Pages: 1 ... 6 7 [8] 9 10 ... 13
106
 CWD Advisory Board reject WDNR's 10 year plan
The vast majority of the CWD Advisory Board commissioned by the state of WI to formulate recommendations for a management plan to deal with CWD in the deer herd has come out in opposition to the DNR's 10 year plan. more than 75% (12 of the 15 active members) who attended the required meetings drafted a letter to the Secretary of the DNR, rejecting their plan. This letter was also forwarded onto the Governor, Members of the legislature and the Natural resources Board.

The CWD Advisory Board was made up of a varied cross section of members representing a variety stakeholders with an interest in formulating solutions to the CWD issue.

The group rejects the DNR's CWD plan for a variety of issues contained in a 14 page document delivered on Jan. 21st. The document is viewable below

http://www.wisconsinoutdoor.com/cwdreport.htm


107
Whitetail Deer / Frustrated WI deer hunters
« on: February 04, 2009, 04:42:24 PM »
 You guys know me. I would like to think I am not full of BS and that I care a great deal for deer hunting. The guys here that live and hunt in WI understand what going on in our state with the deer population and deer management. I am not here to as a spokesman for this group but I wanted the frustrated WI hunters to be aware that this group exists. They do NOT want your money. There is NO COST involved. This not a weapon specific group but rather a deer hunting group.

Here is the link to the orgs home page.

www.wihuntersunited.org

I read on hunting forums all the time about how we are not being listened to and "What can I do? The DNR won't listen to me. and I'm only one hunter,"

Here is your chance to do something. Join your name and voice to being part of deer management in WI.

108
Archery / Thank you Horicon Marsh Bowmen
« on: February 02, 2009, 05:40:02 AM »
I started another new knife and thought I show some of the steps involved in making it. I am donating this knife to the Horicon Marsh Bowmen. Each year, they hold a Wisconsin Bowhunters Association banquet with the proceeds going to the WBH. This one club donates tens of thousands of dollars to the WBH annually and this banquet is a big part of where those dollars come from. They invited me to attend this year's event but do not know about this knife. Since I can't sing for my supper, I thought I'd give in another way.

I went back to the good folks at Two Finger Knife LLC and bought another forged Damascus Steel blank made from 1095 and 15N20 steels.


I also bought a set of Amboyna burl knife scales because of their beauty and the numerous, captivating swirls.

Amboyna Burl wood is extracted from the jungles of Southeast Asia  and often transported (at least initially) via elephant. It is a favored wood used by folks that make knife handles and pens or bowls. It starts out reddish in color and over time and exposure to light, it turns a warm brown/red. The photo below gives a false impression of the color and exaggerates the red.


I won't use just Amboyna for the handle. I want to dress up this handle with a few different woods.


The woods I'm using are

1. South African, Bloodwood
2. South American, Cocobolo
3. Good old Wisconsin, Hard rock Maple
4. Sotheast Asian, Amboyna

This knife handle will have an impressive global pedigree


After laying out the pattern I wanted, I cut the pieces to size and rinsed 1, 2 and 4 in Acetone to remove the oils so the epoxy would give a better hold. Here they are waiting for the slow cure epoxy to do it's thing.


I am also making the pins from a variety of materials such as aluminum, brass, copper and maple. They will also be held together with epoxy.


Once all the components have time to cure, I will assemble the parts and shape the wood into what is hopefully a comfortable and attractive grip.

After the epoxy cured, I use the blade as the pattern to outline the shape of the handle and then cut it to size leaving a little extra material all the way around for cleanup. I also decided to add 1/16 thick Cocobolo spacers.


The spacers go against the metal of the handle and give another layer of color. Here it is assembled for a dry fit-up test.


Fast forward past sanding and applying 8 coats of super glue as the finish and this is what you have.


I think the cocobolo spacers give a great look to the handle.


Since the center of the pins is maple, prior to applying the finish, I held a red Sharpie marker against the wood and let it soak up the red ink.


Fast forward a little more and I have a sheath.


Flash forward again and you see the display base I made from bubinga.  I used the same red/brown stain that I used to die the leather for the sheath to make the wood a little more red. I added a small antler and a WBH lapel pin and a gloss lacquer finish. I hope this knife helps in their fund raising effort.


109
Archery / Wisconsin Bowhunters Custom knife
« on: December 28, 2008, 10:53:34 PM »
I have not posted a new knife project here for some time so I thought I would share this work in progress. I'm making a custom knife and sheath as a donation to the Wisconsin Bowhunters (WBH)  to be used at the annual convention in March.

I thought I would share the steps that go into the making of this custom knife as sort of a build along.

The blade is a drop point hunter and is forged Damascus Steel made from 1095 and 15N20 steels. I did not make the blank but rather purchased it as I do not have the tools or capabilities to make Damascus. I could have made the blank myself from O1 steel like I have in the past but I wanted this knife to unique and special so I went with a Damascus blade with a lot of character. Every Damascus blade is a one-of-a-kind.

The blank is a hefty 1/8 inch thick with a 3 1/2 inch blade and a 4 1/2 inch handle. The blank is mar-quenched and tempered to a Rockwell hardness of 57. This knife is sure to have great edge holding ability.


For the scales of the knife (sides of the handle) I wanted to keep the whole idea of the swirling pattern in the blade and in keeping with the one-of-a-kind idea so I am using hard rock maple burl died green (WBH color) and stabilized which will prevent the normal swelling and shrinking that happens to wood.


Normally, swelling and shrinking is not a problem with this sort of handle but I want to make extra sure the wood is stabilized because I am going to be inlaying metal and enamel WBH logos into the handle and I don't want the future owner to feel a line where the medallions and the wood meet and I want to make sure the medallions stay put for the life of the knife.


In keeping with uniqueness, I want all the little things to have detail. Rather than using a single material pin such as brass or copper or silver nickle or even aluminum I am making custom pins for the joint between the scales and the blade blank. I am making mosaic pins with an aluminum outer sleeve followed by a brass sleeve and then 3 aluminum pins inside the brass tube. All the parts of the mosaic pins will be held in place with J.B. Weld because I want the black background to contrast with the shiny aluminum just like the black and sliver lines in the blade.


Here they are after the epoxy is set and I ground the end flat on a belt sander.


And a close up.


Next up is fitting and attaching the scales..................

110
Whitetail Deer / Hunters harvest 22% fewer deer on the opening weekend
« on: November 25, 2008, 06:32:36 AM »
Hunters harvest 22% fewer deer on the opening weekend as compared to last year.

http://www.dnr.wi.gov/news/BreakingNews_Lookup.asp?id=1041


After a little time with the handy dandy calculator:

Of the 5 areas of the state, the Northern region saw the biggest one year decline in harvest at -34%. These are the counties of Ashland, Barron, Bayfield, Burnett, Douglas, Florence, Forest, Iron, Langlade, Lincoln, Oneida, Polk, Price, rusk, Sawyer, Taylor, Vilas and Washburn. In that area, Bayfield saw the biggest decline in harvest at 57% and Washburn saw the smallest decrease in harvest at 22%. Every County in that region was down. All of these Counties saw a decline in the harvest of both bucks and does.

The Northeastern region saw a 25% decline in harvest. These are the Counties of Brown, Calumet, Door, Fond du lac, Green Lake, Kewaunee, Manitowoc, Marinette, Marquette, Oconto, Outagamie, Shawano, Waupaca, Waushara and Winnebago. In that region, Marinette saw the largest decline in harvest at -34% and the lease decline was in Green Lake at -8%. Every County in that region was down. All of these Counties saw a decline in the harvest of both bucks and does.

The West Central region saw a 18% decline in harvest. These are the Counties of, Adams, Buffalo, Chippewa, Clack, Crawford, Dunn, Eau Claire, Jackson, Juneau, La Crosse, Marathon, Monroe, Pepin, Pierce, Portage, St. Croix, Trempealeau, Vernon and Wood. In that region, Dunn saw the worst harvest decline not only for the region but the whole State. -72%. 7 of those regions Counties saw a harvest increase with Pepin showing a 65% increase in harvest The counties that showed a harvest increase were Eau Claire +19%, Juneau +22%, La Crosse +47%, Pierce +39%, Portage, +5%, St. Croix +36%. Some of these Counties saw increases in either buck or doe harvest and 5 of them saw an increase in both.

The Southeast region saw a 12% decline in harvest. These are the Counties of Kenosha, Ozaukee, Racine, Sheboygan, Walworth, Washington and Waukesha. In that region, Washington saw the largest decrease at 28%. 2 of the 7 Counties saw a harvest increase. Of those, Walworth saw the largest increase at 7%. Some of these Counties saw increases in either buck or doe harvest and only Walworth saw an increase in both.

The South Central region saw the smallest harvest decrease at 9%. These are the Counties of Columbia, Dane, Dodge, Grant, Green, Iowa, Jefferson, Lafeyette, Richland, Rock and Sauk (basically the Western CWDMZ) Of these 11 counties, all but 2 saw a harvest decrease with Green County seeing the largest decline at -24%. Jefferson and Rock both had a harvest increase of 7 and 8% respectively. Some of these Counties saw increases in either buck or doe harvest and only Jefferson saw an increase in both.

I can only imagine how bad this would have been if the opener was one with poor weather conditions. It is clear that EAB is a strong tool and we will forever see it used as a way to quickly reduce the herd. I am really interested in seeing what the DNR herd estimate will be for next year.

I see it like this, There will be a segment of the hunting population that will drop out after this year out of frustration (they may have been looking for a reason to quit anyway)If the DNR declares that the 2009 pre-hunt population is at (guess) 1.4 million, then more folks will drop out saying that if they did not see a deer in 08 when the herd was at 1.7M then why bother in 09 when it's only at 1.4M. Reducing the herd will also reduce the number of hunters that have grown accustomed to big and easy harvests. This is a reason I think the DNR artificially inflates herd size estimates and has for some time. Either that or they really got the estimate wrong in in 2000 and the herd was at 2.3M.

This may be why we never got a look at the numbers for the Oct. T-zone or the Early bow season (as compared to last year) I believe these numbers will also be down and they didn't want those poor results being a downer prior to the gun opener.

111
Archery / My quest for a homemade deer is realized
« on: November 11, 2008, 09:53:45 PM »
I set as a goal for myself the task of taking a deer with all homemade archery gear. As described here on this site.

Over the winter I built a new 68 inch longbow that pulls 48 pounds at 29 inches. I then made a dozen arrows that I crested and fletched. Then I made a half dozen homemade broadheads (212 grain, single bevel) I also made a leather finger tab and homemade camo as other homemade items for this hunt.

I set up a ladder stand last week and sat in it for the first time on Saturday afternoon (Nov. 8th.) I got to the stand at 2:30 pm and hung 4 small sponges soaked in Tinks 69 upwind of my location and then climbed into the stand. It was COLD with a slight rain snow mix and hard Northwest winds. The soggy river bottom and the rain made it almost impossible to hear anything approaching so I sat tight with my hood pulled up to keep me dry.

At 3:30 I heard a noise to my left (down wind side) and turned to see a buck at 10 yards. He didn't smell me but I think he was focused on the Tinks sponges. I was busted sitting. I have never harvested a deer from a seated position but there was no chance in standing up with the buck so close. He took a few more steps towards the sponges and stopped with his head and part of his front shoulder blocked by a big cedar tree. I took the longbow that was resting on my lap and moved it to the vertical position. and got ready for him to step forward but he just stood there. I leaned back and could see the hair line on the back edge of the front leg so I figured I would take the shot.

I took the below picture the next morning to show where he was standing and made a poor attempt at sketching where he stood.


I had plenty of time to tell myself to pick a spot and to take a good aim and then release. The arrow hit a bit high and the deer lurched forward and turned to run back on the trail he came from. About half of my 29 inch arrows was still visible as he ran off. I gave 3 loud blows on my grunt tube and he stopped for a moment and then walked off.

I knew I had hit him high but I was not too far back so I was sure I had hit him in the lungs. I decided to sit for 20 minutes but waited 45 instead since he took off with my arrow. At 4:15 I got down and collected my sponges and went to where he stood to take up the trail. There was no blood to be found but the black muddy kicked up tracks made the trail easy to follow.

After tracking about 40 yards, I spotted a shed antler in the wet leaves.


A few feet further I found my broken arrow. the first 6 inches were missing


The first 5 inches of the arrow broke off after passing through the buck.


After going another 20 yards I found the only blood that I would find while tracking this deer.


It was getting dark as I kept following the muddy trail along the river. It took me all the way to my other ladder stand so I decided to walk out to my truck to drop off the bow and quiver and take up a path that would lead me back to the stand but would parallel the trail that I had just followed about 40 yards closer to the field edge. As I approached my truck, I jumped a deer and my heart sank. I never got a good look at the deer because it was too dark but I still took up the trail back to my stand and if I came up empty I would come back in the morning and take up the trail again.

As I re-entered the river bottom to walk through the tall grass, I stumbled upon my buck. It was just dumb luck to walk into the woods where I did but I will take a bit of good fortune anywhere I can find it.


I learned the next morning that the trail I was following branched off and he died about 30 yards past the branch on the other trail.

Then it was time to get to work. I dragged the deer out to the field and backed my truck into position to take a few pics with the self timer.


I then drove into Rosholt to register him and then back to the farm to gut and hang him. It was great to be back home and share the story of the event with my 73 year old Father.


After gutting I examined the deer to find that I had gone through both sides even though the arrow stayed with the deer. I expected to find the front half of the arrow and my homemade broadhead inside the deer but it no resides somewhere along the trail of his final steps. I had hit the top of the near lung and the upper third of the far side lung. He traveled less than 100 yards brfore it expired.

Exit side hole


I couldn't be more pleased with my good fortune. My goal was to take a deer with homemade gear and I was able to realize that goal in the same woods that I was brought up in. It doesn't get any better than this.  I feel very fortunate to have achieved this goal.

112
Real Estate / 20 acres of hunting land in Portage County.
« on: September 29, 2008, 12:23:50 PM »
located in Portage County, WI


It is in located 10 miles East of Stevens Point.  In the Town of New Hope. Section 18.


It is set in the midst of the Richard Hemp Fisheries Area and is connected by the Northeast corner. The Richard Hemp Area is Hundreds of acres of hunting land and streams. You can buy 20 acres and have walk-in access to hundereds more from the back side since the parking areas are on the outer perimeter. The nearest parking area is a mile away as the crow flies.


The parcel is surrounded by farm country and includes the easement. I drove into the property to check it out and it is very accessible. This is a slightly rolling, high ground parcel made up of mature red Oak (75%) with the remainder being a mix of Maple, Ash with a small amount of mature Pines along the South edge. The poplars were logged off 10 years ago but the hardwoods have not been logged in about 40 years. Was planning to log it next year but the another parcel camp up for sale and decided to purchase that one instead so there is timber revenue that can be gotten from this 20 arces. Asking $84,000. If your interested, send me a PM.


113
Come on out and enjoy this great Broadhead event. As a Director for the WBH, I will be there all three days working the event. You would need to Join the WBH to shoot the event ($20)
Click HERE for info
http://www.wbhassoc.com/State%20Broadhead.htm
For lodging Click HERE
http://www.wisconsinoutdoor.com/hotels/us-wi-new-lisbon.html


114
Whitetail Deer / Processing a Deer, a Step by Step Pictorial
« on: August 04, 2008, 05:33:25 AM »
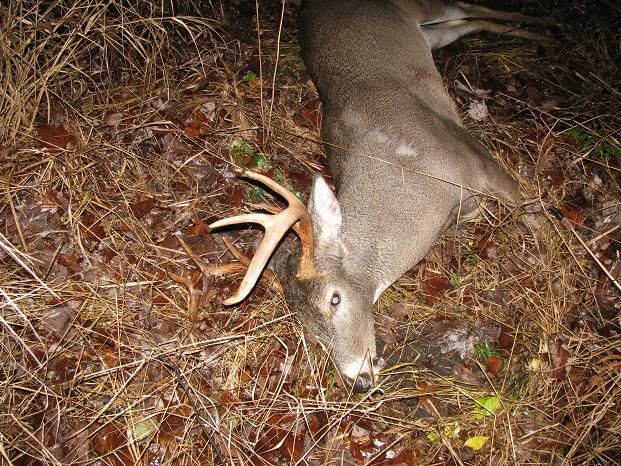
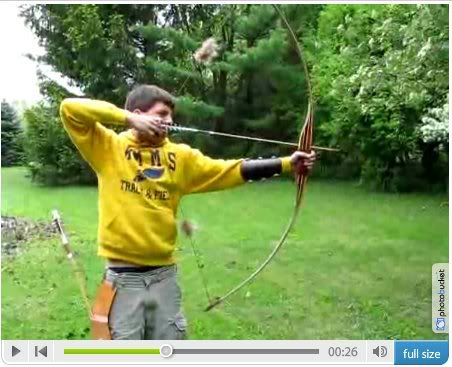
Step 1. Harvest a nice fat deer with your bow.


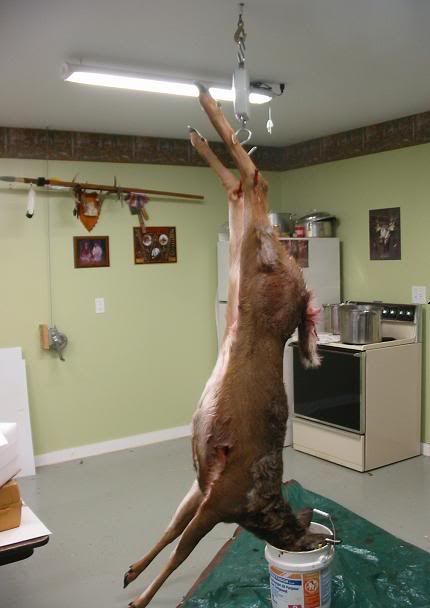
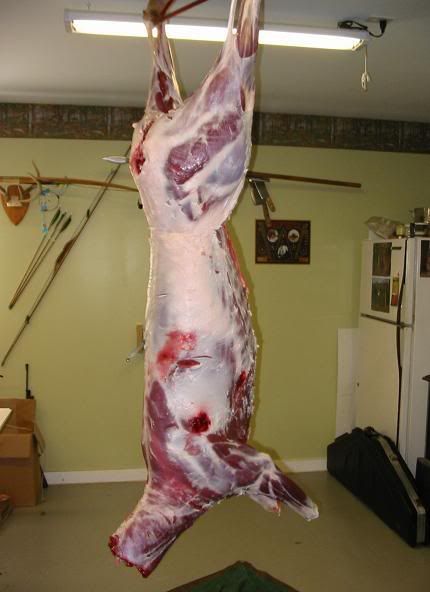
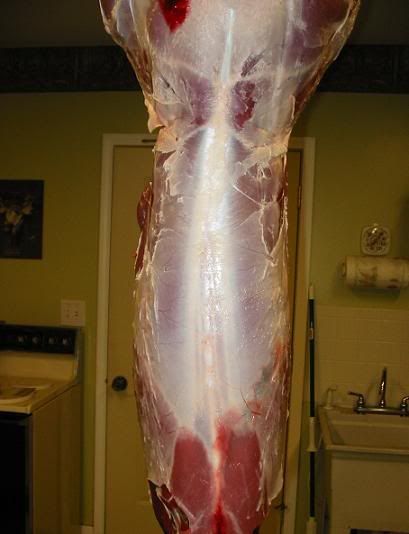
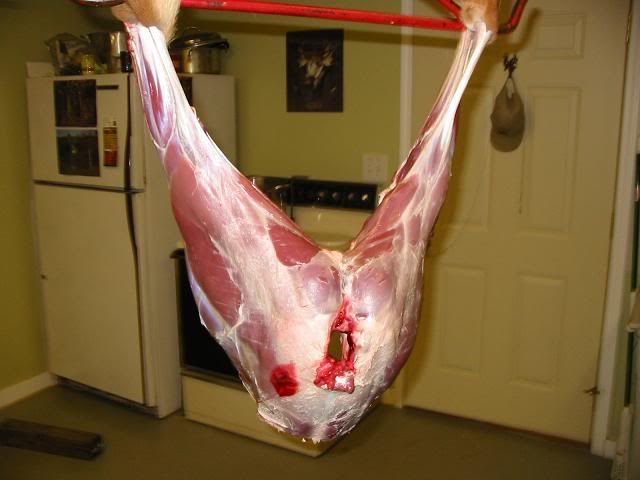
Step 2. Gut it out and hang it. I like to hang them from the hind legs because I find they skin easier for me. How long you hang it depends on hot warm it is where you live.


Step 3. Tell your Son you want to do a pictorial on deer processing and that he "Gets" to process a deer so you can take the pictures. Tell him to cut the hide around the hind legs and start to peel downward.


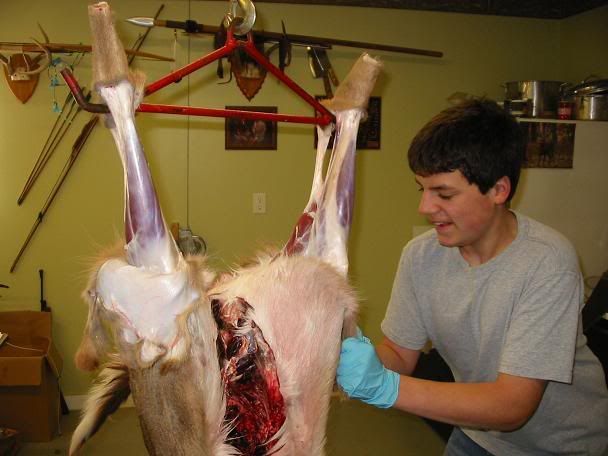
Step 4. Tell him to do more pulling than using the knife so that he doesn't cut the hide because later, you want to teach him how to stretch that hide on a frame and make rawhide


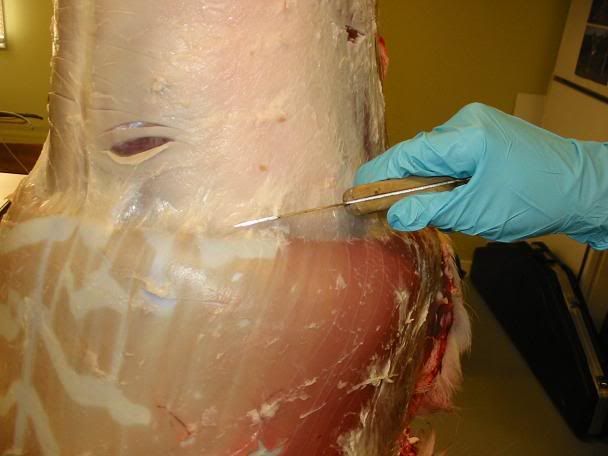
Step 5. Tell him that if he must use the knife, to pull on the hide and only cut the stretchy membrane that joins the hide to the meat.


Step 6. Before he gets to far along and covers the front legs with the hide he has peeled off the deer, tell him to cut the hide around the front leg joints and to split the hide upwards, towards the brisket.


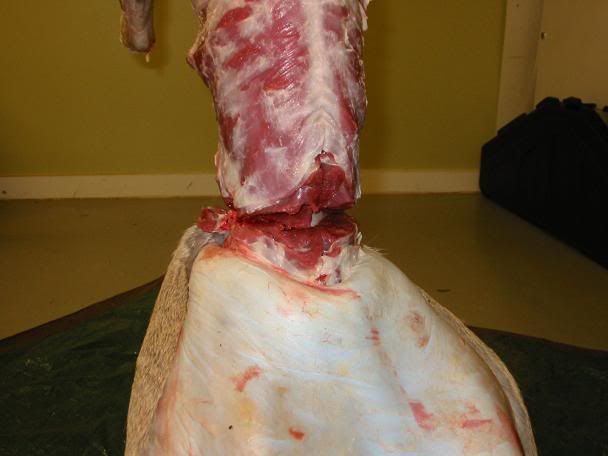
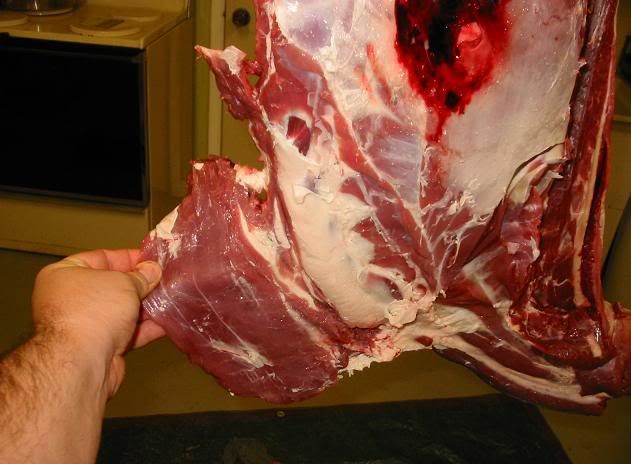
step 7. Once finished with the front legs, tell him to continue pulling down on the hide while he skins out the neck. When he starts to whine about how hard it is to skin the neck, tell him that the next deer will be easier.


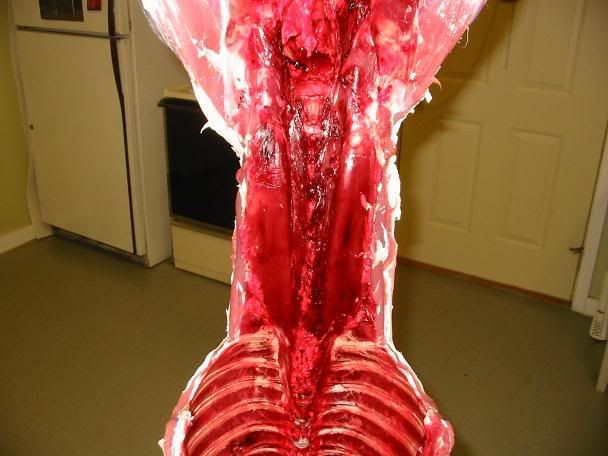
Step 8. Tell him to skin the deer up to the back of the head so as not to waste any of the good neck meat. When he has gone far enough, tell him to cut the neck all the way around until he hits bone.


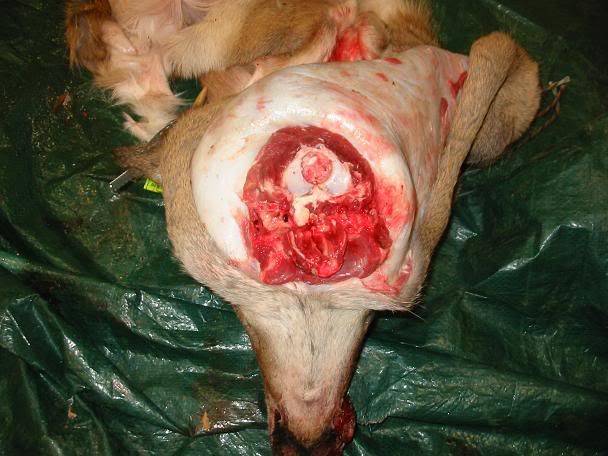
Step 8. When he asks where the saw is, tell him that he can simply cut between the neck bones to separate the head from the carcass. Remind him that he is getting all sorts of lessons in deer anatomy that will make him a better hunter


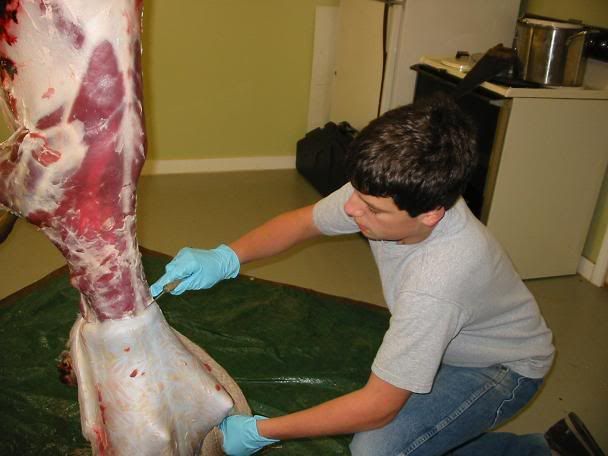
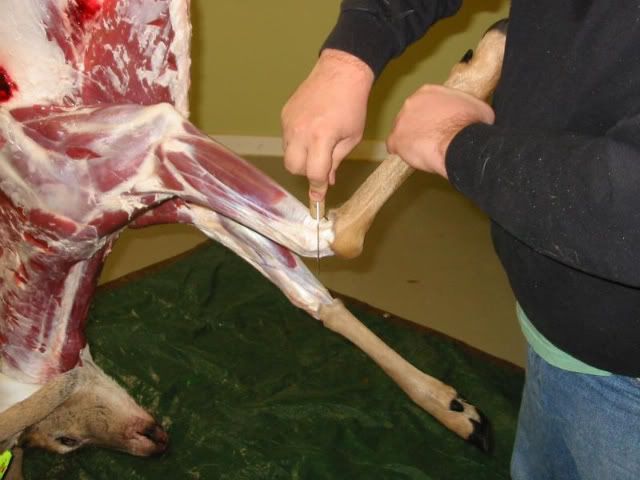
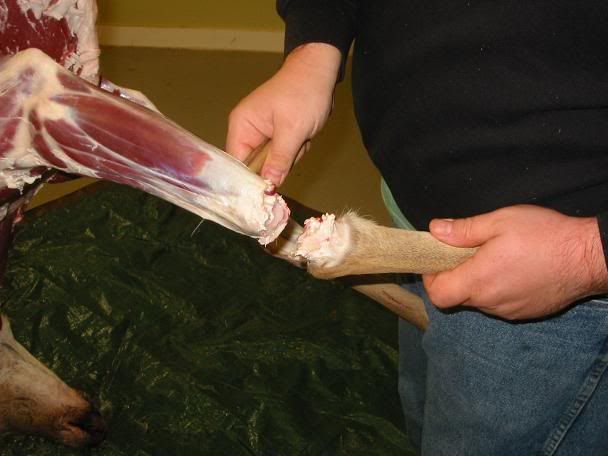
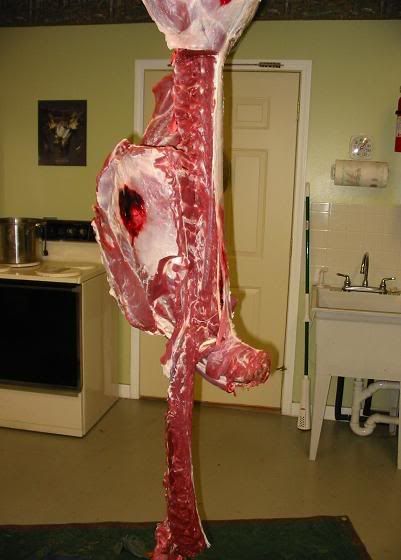
Step 9. Give him a break and let him take a few pictures while you show him how you don't need a saw to remove the front legs because you can simply use a knife and cut through the knee joint.


Step 10. Tell him to change the pair of rubber gloves he was wearing to remove the hide and get a fresh pair for working with the meat. Allow him to stand back and enjoy the fruits of his labor.


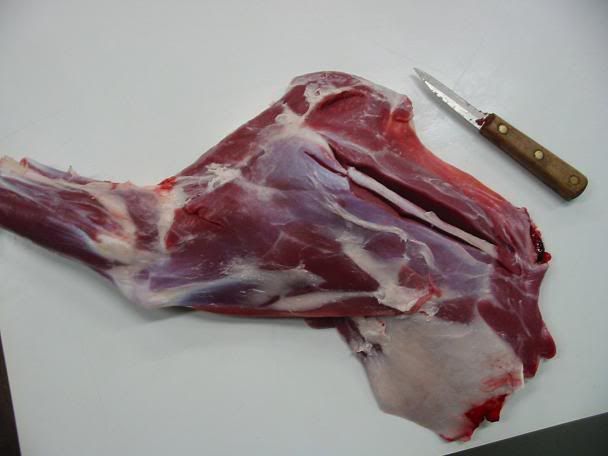
Step 11. Tell him that he still doesn't need the saw to remove the front shoulders because there is not boney joint and that the whole thing is held together by muscle. Then tell him he gets a second chance for more practice on the other front shoulder.


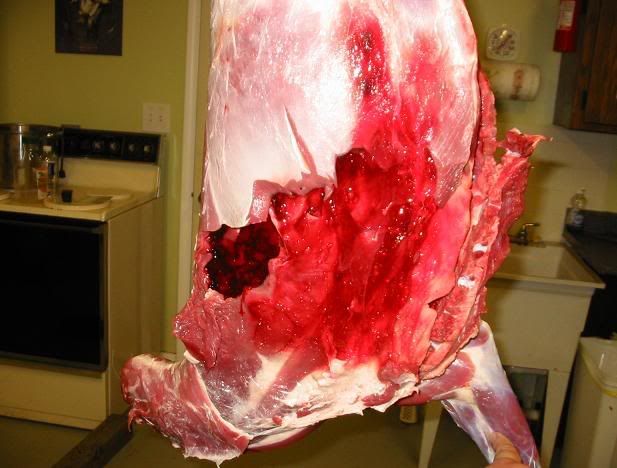
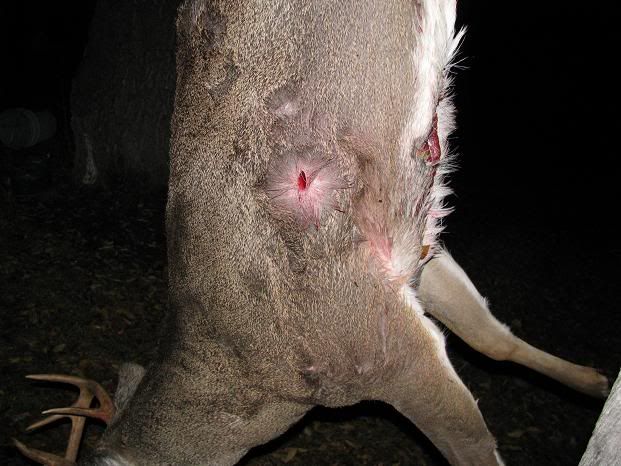
Take the time to discuss arrow placement as you look at the front shoulder.


Step 12. Remind him how much he enjoys things like jerky and snack sticks so that he does not waste any of the trim meat on the brisket.


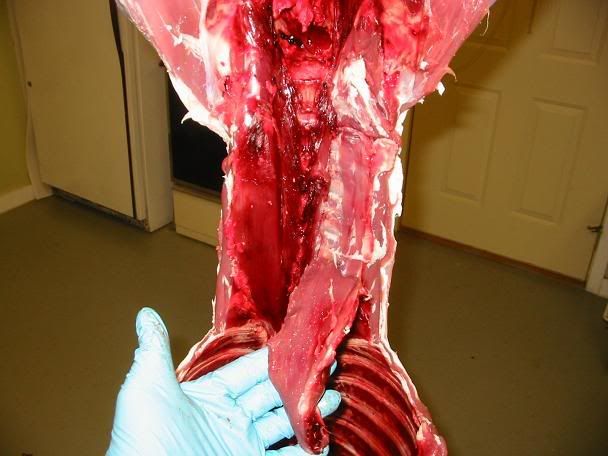
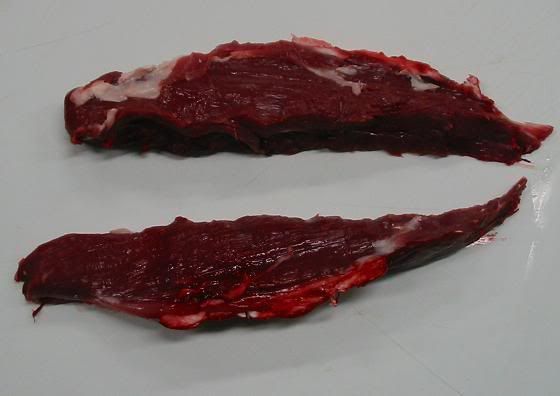
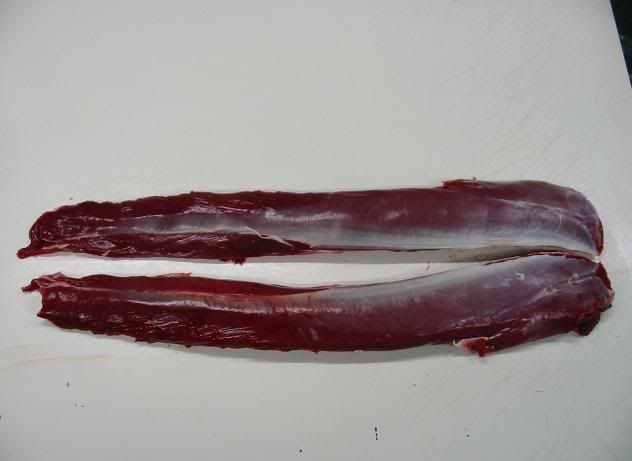
Step 13. Tell him all about the best and most tender part of the deer and why it is called: "The Tender Loin" Explain that there are two of them and that he need only make a cut at the top of the tenderloin and that he can remove them by simply pulling them off the side of the rib cage.


Show him what they look like after being removed. Remove any white fat before cooking. I prefer to remove them when I am gutting the deer  (or very soon afterwards) If you don't get them out soon, the exposed areas will turn dark red/black due to drying out. If that happens, soak them in cold (ice) water and scrub them lightly to wash away any blood. DO NOT freeze tenderloins!! these are to be enjoyed as soon as possible. Freezing will make them less than tender-loins. Tell him yo cook them until slightly pink in the center with onions and mushrooms.


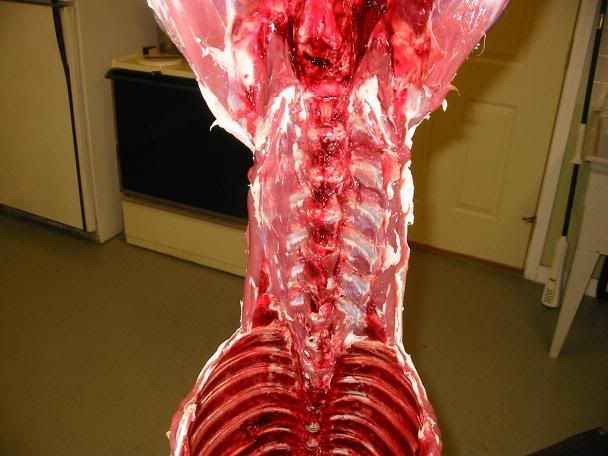
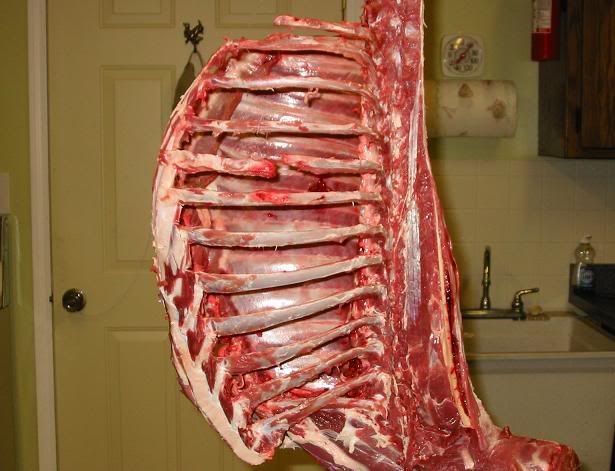
Step 14. Tell him that next to the tenderloins that the loins are the next best cut of meat on a deer. Remind him that those tasty grilled loin chops that he likes so much come from the back of the deer and that there are two of them. One on each side of the backbone. Tell him to feel for the hip bone and cut just below it and the to run his knife right along the backbone until he hears the tip of the blade clicking as it passes over each rib. He can then massage the loins off the back with very little knife work..


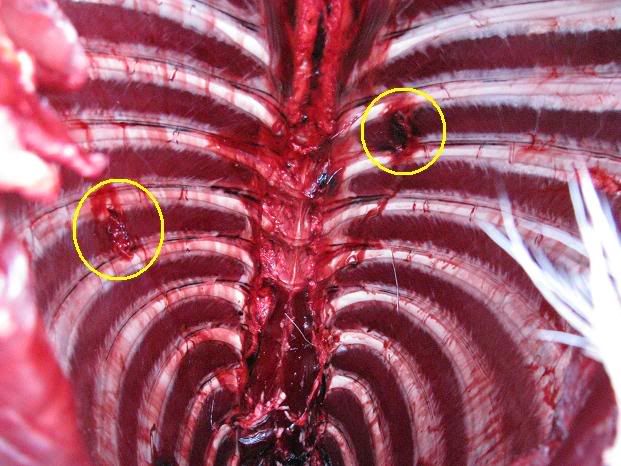
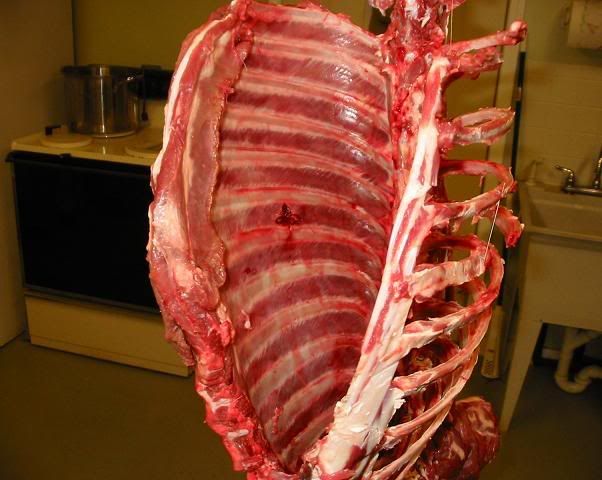
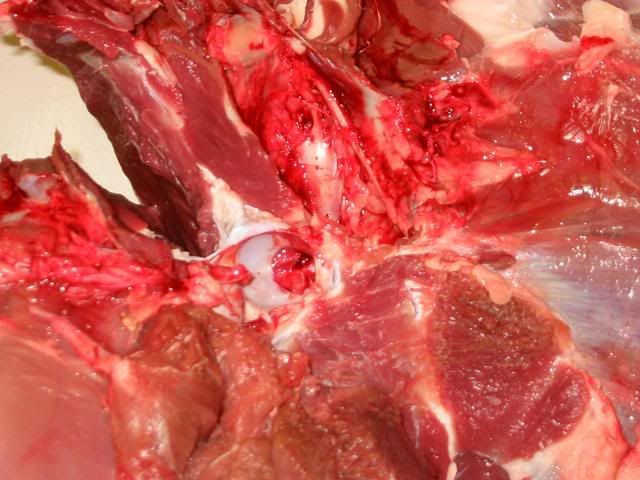
Step 15. With one loin removed, Explain shots taken from high in a treestand and what the bones look like. Show him the short ribs.


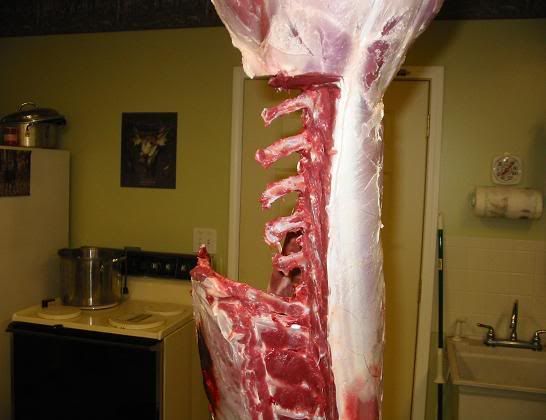
Step 16. With both loins removed, lay them out and explain how it's best to leave the loins in large hunks when freezing to avoid freezer burn and that he can slice up steak after he thaws the large pieces. Tell him that leaving the silver skin on the loins will also protect them from freezer burn and it too can be removed before cooking.


Step 17. When he starts to complain about getting all the meat off from between the ribs, remind him again about the summer sausage and breakfast sausage and ask him where he thinks all that meat comes from. Kids love it when you do that.


Again, take the time to discuss anatomy and shot placement until he is thoroughly sick of hearing about it. A tip off will be when he says things like "Yeah! Ok I get it already"


Step 18. With all the meat removed from the front half of the deer, remove the ribs and bag them for the garbage man. this leaves you with the hind quarters.


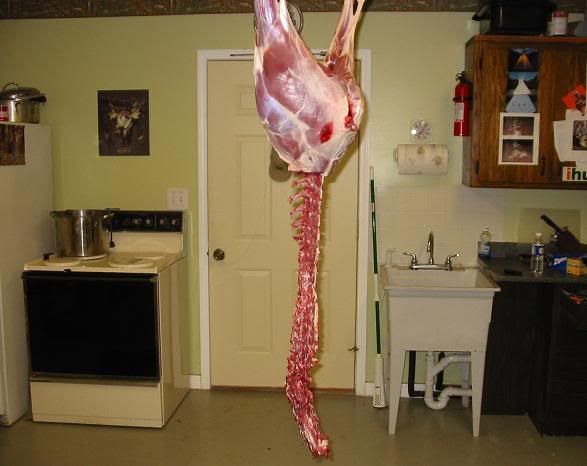
Tell him that if he really wants to use the saw that this might be a good time.


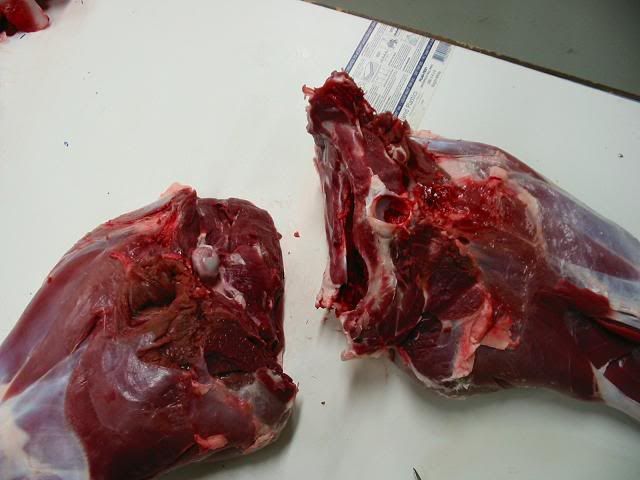
Step 19. Remove the hind quarters from the gambrel and have him separate the hinds from the pelvis. Then lay all the meat out from him to see. Tell him that this is where the fun part begins. Tell him that he gets to debone the front and hind shoulders.

Quiz him and see if he can tall you that the meat on the far left is the meat off the neck and that the meat in the bowl are the tenderloins and that the long, slender cuts of meat are the two loins. He will be able to tell you that the rest of the the meat are the front and rear legs.


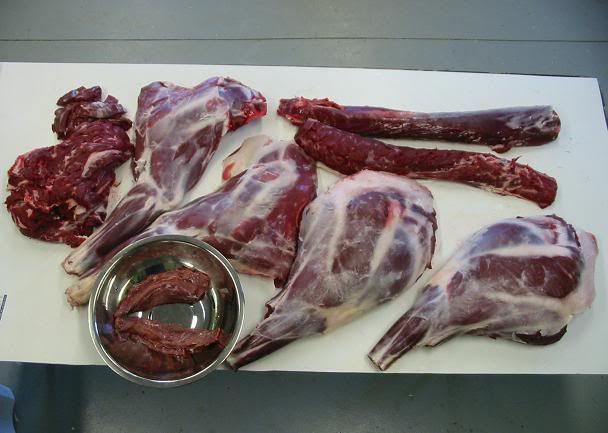
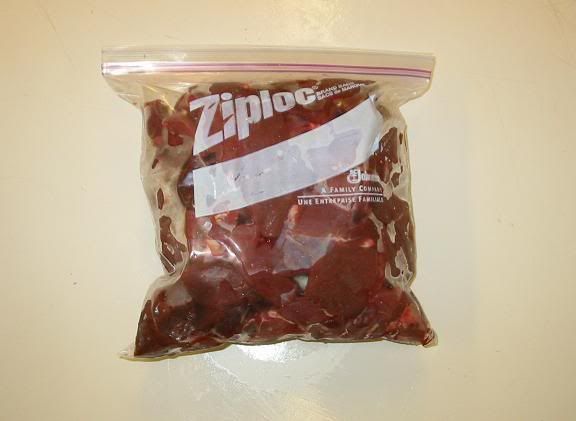
Tell him that he will get extra points for being able to identify all the trim pieces through the clear gallon sized Ziploc bags that you will be freezing them in.


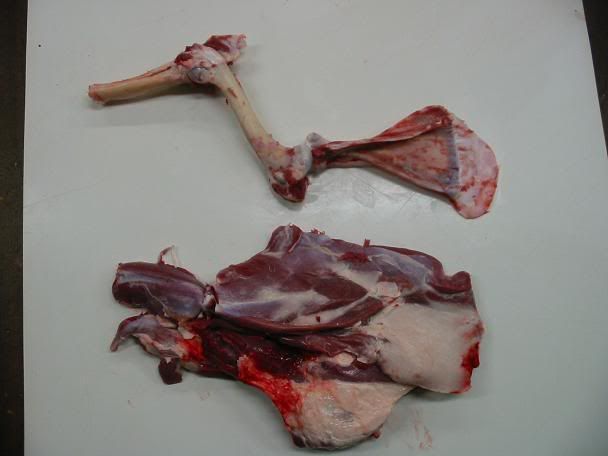
Step 20. Now that he is feeling confident in his knowledge of deer parts. Show him how the front legs work and what the bones look like. Tell him to look for the ridge bone that runs the length of the scapula.


And to run his knife on both sides of that bone.


Cut along the bone until you have exposed the entire scapula


Follow the leg bone and remove the rest of the meat. There is no wrong way to do this. This meat will end up in a grinder or made into stew or jerky. Tell him that this is a tough cut of meat as these muscles do a lot of work when he moves around too much in his stand or if the deer smell him.


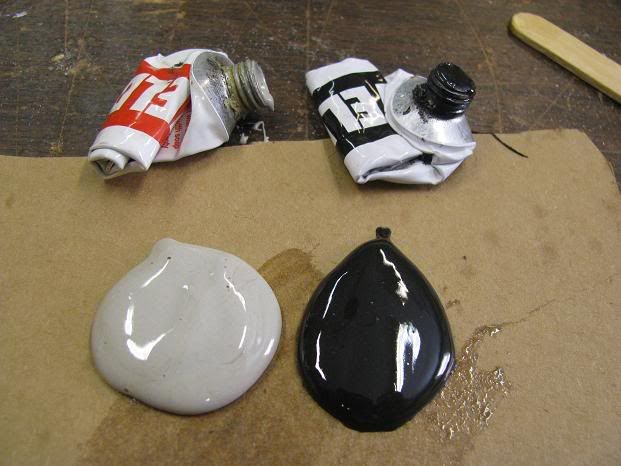
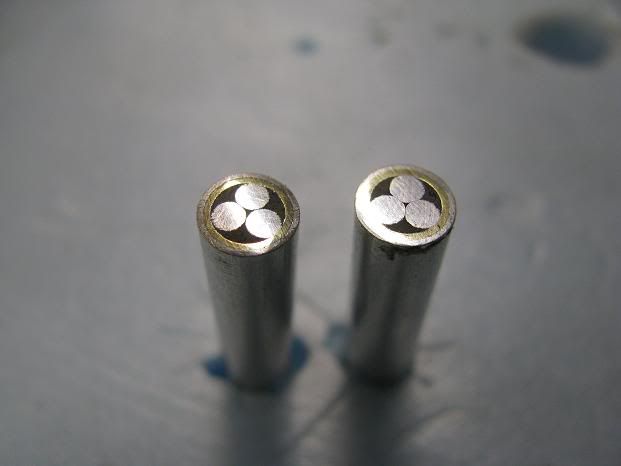
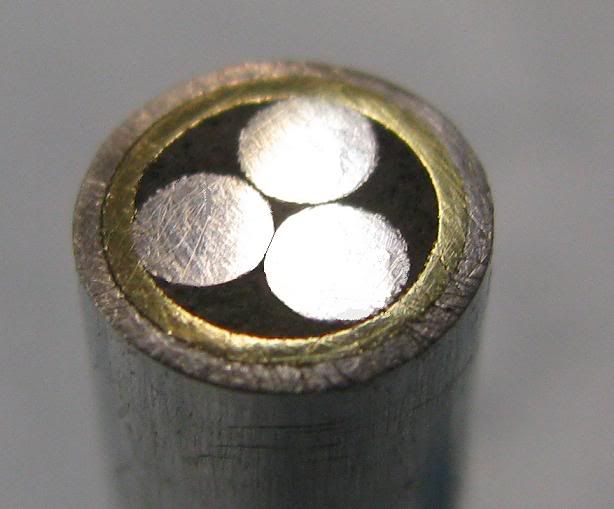
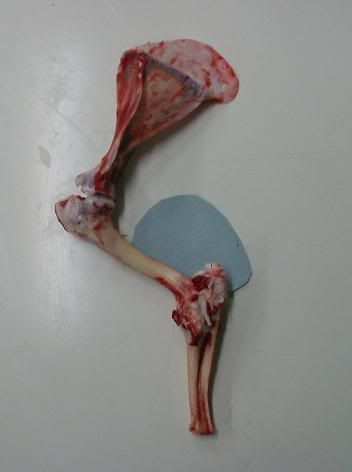
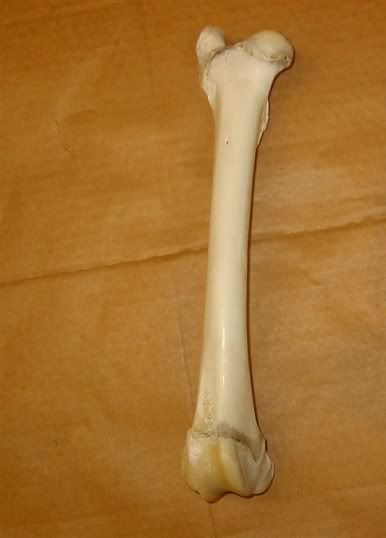
Show him the three bones of the front leg. The blue object is a crude depiction of the heart. Tell him that the the leg bones do a pretty good job of protecting the heart but it still can be gotten to by correct shot placement.  Tell him It is better to shoot a little high and he will still get both lungs and the top of the heart. Tell him that this is a deadly shot that will bring a deer down in very short order.


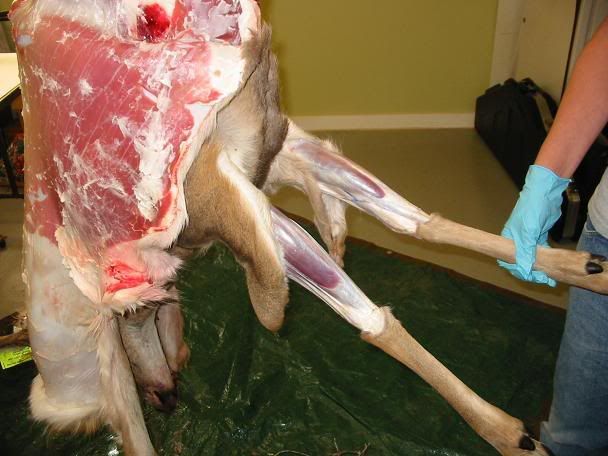
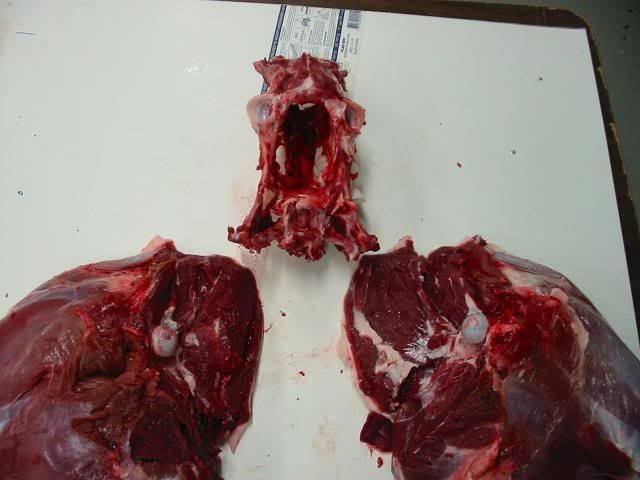
Step 21. Tell him that he is in the home stretch and that all that is left is the hind quarters. Tell him that the first thing to do is to lay the pair on the tail end and press on each hind quarter to see where the hip is. By spreading the hindquarters, he will see where to start. What he is looking for is the hip joint (ball and socket joint) No saws are needed for this operation and he only needs to cut the tendon in the ball joint to remove it from the pelvis.


Tell him to follow the seams in the meat and cut along the pelvis bone until one half is removed.


When he is done. he will have a de-boned pelvis with very little meat to trim off. Tell him that this trim will be used in those burgers or brats he enjoys on the grill.


On the inside of the thigh he will be able to feel the thigh bone (femur). Cut around and remove the bone. This is the bone he is removing. The ball joint is on the upper right.


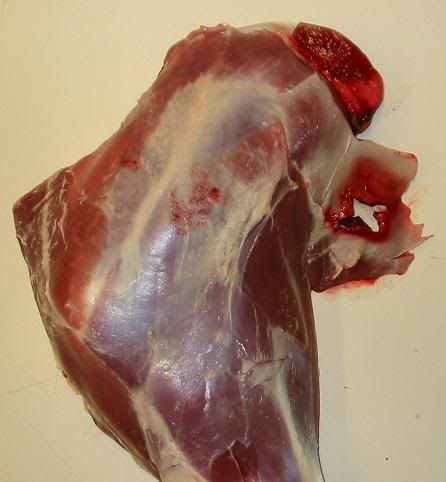
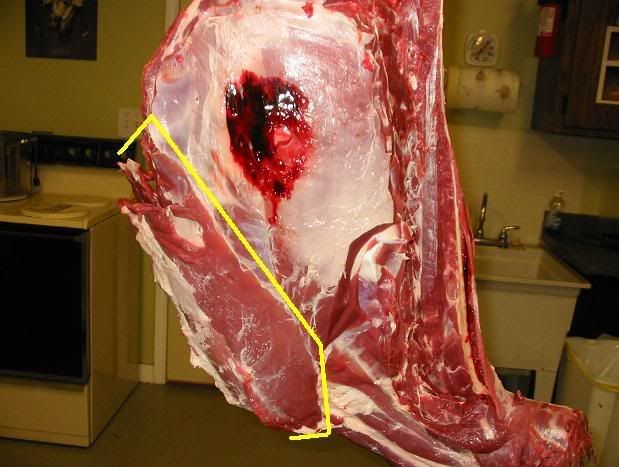
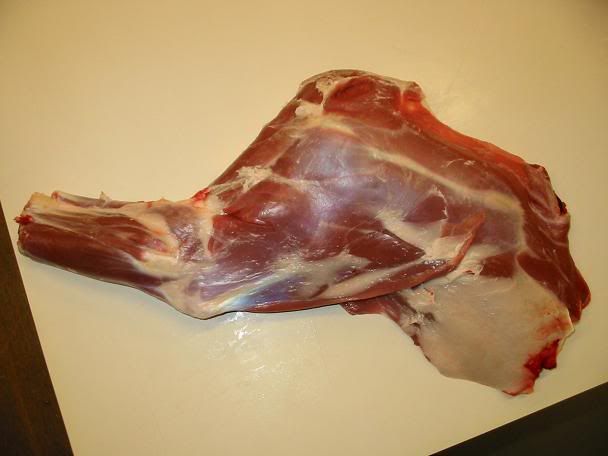
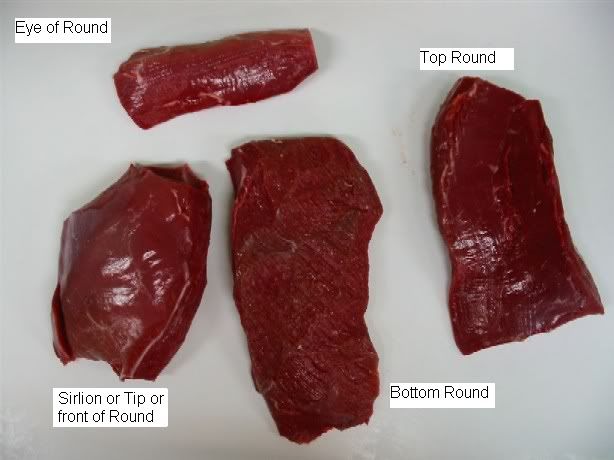
Once deboned his hind quarter will look like this. This view is from the outside or hide side of the leg. The lines show him the cuts of meat that are in the hind quarter. If he were to leave the bone in the leg and saw across the whole hind quarter, he would have a "Whole Round Steak" Most folks don't do this with a deer and it is seen less and less in beef as well


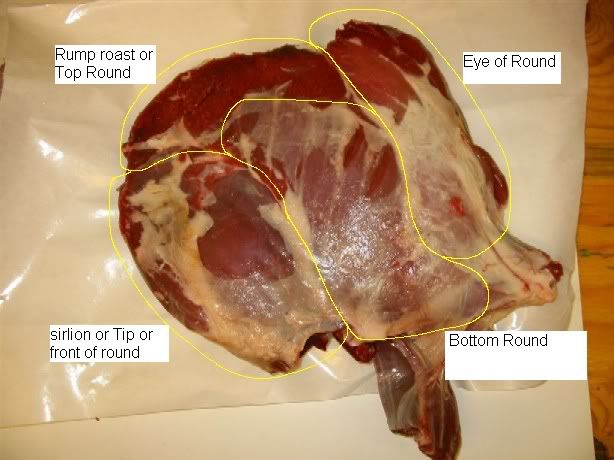
If he follows the natural seams in the muscle groups, he will be able to take each group out. Clean up any fat and he is left with cuts that can be sliced into steaks or used as roasts


Tell him that after he has gone through so much work to process this fresh venison, you he want to make sure it will taste good even after it sits in our freezer for several months. Remind him that no meat is ever improved by freezing but that he can make the best of it by protecting his venison from the effects of freezer burn.

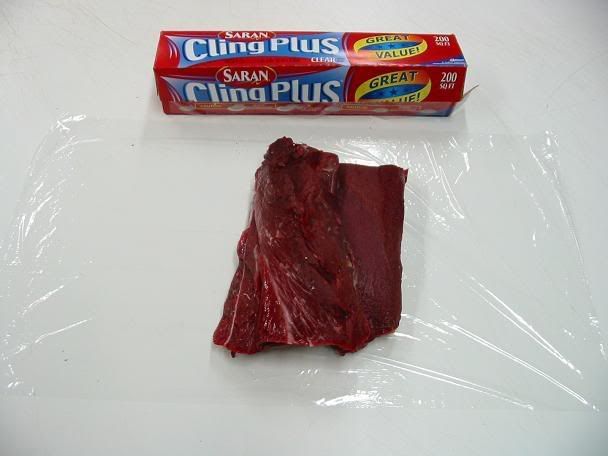
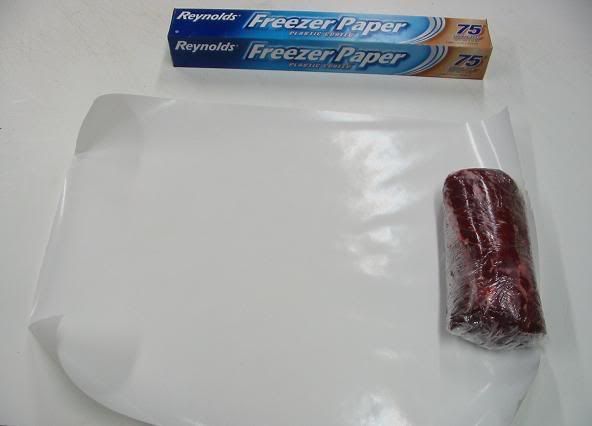
I prefer a vacuum sealer but not everybody has one. If you wrap your meat in butcher/freezer paper, it won't last long in your freezer. You need to use a heavy plastic wrap first. Wrap your meat in layers and press out as much air as you can. Start with a single layer of plastic wrap. Place the meat on the wrap and roll it up tightly. This will still leave the ends exposed it it is a large cut.


Next, wrap the meat in another layer of plastic wrap but this time, turn the meat and wrap in the other direction. Fold over the plastic wrap to protect the previously exposed ends.


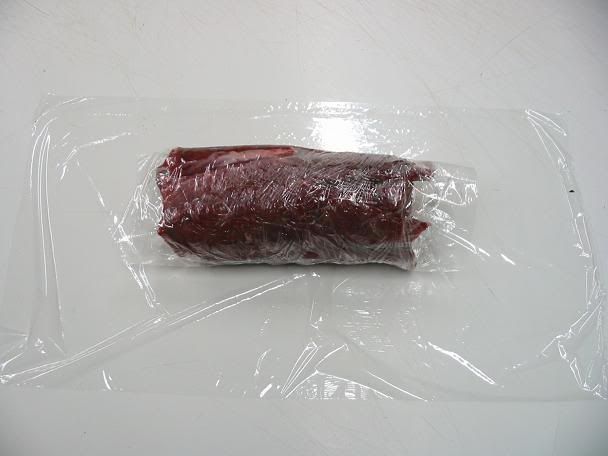
While wrapping, squeeze out as much air as you can. You do not want a layer of air next to the meat. The plastic wrap should be in contact with the meat.


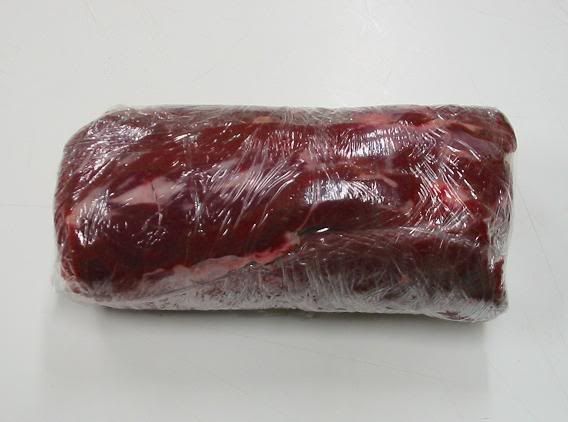
Now that you have two layers of plastic wrap over the meat. Wrap the meat again in a good quality freezer paper that has a plastic coating on one side. Use enough so that when you are finished, you will have two layers of paper over the plastic wrap.


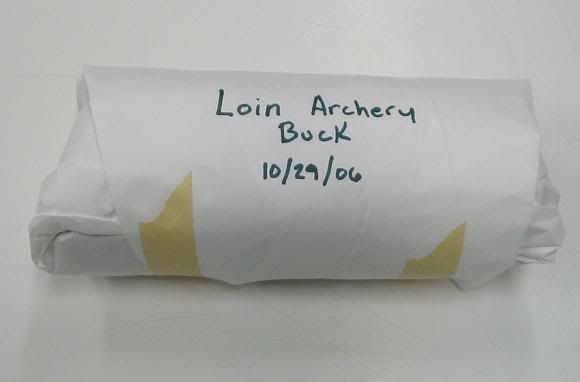
While rolling/wrapping, make sure to tuck in and fold the ends to make a good seal. Again, make sure to squeeze out as much air as possible. Seal the paper with tape, Identify the cuts and the date and this meat should last six months in your freezer. I have come across a lost package or two in the bottom of my freezer that were a year old and they were just as good as the day he wrapped them.


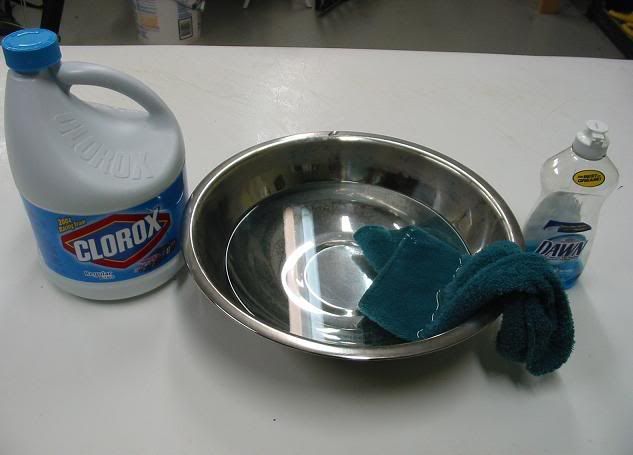
Now with all the work finished, do not wait for him to thank you for the life lesson. He will do that many years later and completely out of the blue. Instead, take the time to tell him all about bacteria and germs and how a clean butchering area is very important and how cleaning up after yourself is a noble trait.


115
Camping / How to make a Tipi
« on: July 23, 2008, 08:13:32 AM »
Here is how I built a Tipi for use on camping trips. I don't have pictures of the process of cutting, peeling and smoothing the poles. My two Son's and I harvested the 25 foot pines in a small stand in the middle of a cedar swamp. The pines were growing so thick that they only had branched near the tip. They all grew very straight and tall as they had to compete for the sun light. I think thinning them out did the remaining trees a favor. At least I hope so. Here are the poles right after peeling as I get ready to transport them from the family farm back to my place.


Here they are drying in the sun. Each day, I would give them a quarter turn as they dried. I had not yet smoothed the poles and removed the little branch stubs


During the drying time, I began to sew the part of the Tipi and the liner. This is the Tipi liner which I made from sewing together a bunch of canvas, painters drop cloths. each was cut into a sort of pie section and when laid flat on the grass it looks like the letter "C" Here it is installed.


The bottom flaps of the liner lay on the ground and are covered with whatever is used as a floor for the Tipi. It could be hides or canvas but this liner keeps the bugs and dust out as well as the wind during regular Tipi living. It also helps create the draft needed to allow for a small fire to be made in the Tipi. The top pf the liner is held in place with a rope that is tied around all the poles and the bottom in held by tying off to stakes in the ground.


I painted a scene on the liner. It is supposed to look like a painted hide but I did a rather poor job on the outline.


This Tipi is 14 feet across at the bottom and has 25 foot tall poles. I took 33 yards of Waterproofed and fireproofed cotton canvas to do the job.


In order to layout the pattern on the canvas, I first needed to join a few large sections of the canvas together. I used a 60's vintage Singer and at times had to go through up to 6 layers of the canvas.


Once sewn. I could mark out the pattern on the canvas and cut out the pattern.


Then it was back to the sewing machine to fold and hem all the cut edges to keep them from fraying. This included the opening for the door


The area for the lifting pole.


and the pockets for the smoke flap poles.


This is what it looks like on the ground.


Then it's time to put it up. Three poles are set and marked as the ones that will form the tripod. They are lashed together and set up and the rest of the poles are set in the "V" created by the intersecting poles. All work is done on the ground. No ladder is needed.


Then all the poles are held together by circling around and around and tying off the rope to one of the poles so the process can be reversed when taking the Tipi down.


The last pole is used to lift the canvas in place and is called the lifting pole. The canvas is tied to the lifting pole and then lifted and leaned against the rest of the poles.


Then the canvas is walked around the frame of poles.


While the canvas is still loose, the lacing pins are installed.


To tighten and stretch the canvas to give the tipi a full and tight look, all the bases of the poles are moved outwards. The canvas is held tight by tying it off to stakes. To keep the canvas from ripping, small stones are lashed into the canvas with ropes and it's those ropes that are used to tie it down. The outer Tipi does not go all the way to the ground. This creates an area for air to come up and in between the outer Tipi and the inner liner. As the air warms, it rises. It acts like the attic of your house and it's this circulation that carries the smoke up and out.


The next step is to insert the smoke poles. These poles are shorter than the other poles and allow for adjusting the smoke flaps based on wind direction and allows for closing them all together in case of rain.


The bottom of the smoke flaps are tied off to something to direct the wind or left untied in calm.


Here they are closed for the night and this picture reminds me that I forgot to mention painting the Tipi


I painted the Tipi with exterior house paint that was watered down. On the base, I painted bison along one side and wolves along the other and climbing from the base to the top I added wolf paws and a sun.


On the door, I added a bison skull and feathers.


It makes a great night light.


Here is your view as you wake up in the morning.


The entire process of erecting the Tipi takes an hour and a half and can be done alone and without a ladder. I have spent many nights in it and it sleeps 6 adults.

Tipis, Tepees, Teepees: History and Design of the Cloth Tipi
http://www.amazon.com/exec/obidos/ASIN/1586855115/mudbrookvalleyco

116
General Discussion / Bad WI Bowhunting Guide
« on: June 16, 2008, 11:07:52 AM »
First of all, I will apologize up front for the length of this tale but preface it with the fact that this tale is two and a half years in the making so it is the details that make the story a long one.


I feel compelled to share a story of how I got burned by a Wisconsin hunting guide after I bought a guided bow hunt for my then 70 year old  Father and myself. I do this for two reasons, first to express my frustrations with what happened in my case but also to alert you to this operation in hopes of sparring you from the same fate.


In Dec. of 2005 I bought a guided bow hunt on EBay ( but hold EBay harmless in this matter ) The guide service is TGIF outfitters based out of Onalaska WI. His ad read, "Come hunt the big boys in Buffalo County" After visiting his web site I noticed that he also stated that hunts could also take place in La Crosse, Vernon, Jackson and Trempealeau counties based on where his guides were seeing the most activity.  This was not spelled out in his EBay ad.
 

I bought the hunt and two additional days of hunting as a gift for my Father. Payment was sent and a hunting voucher was recieved in the mail that was good for either the 2006 or 2007 hunting season. After recieving a voucher for only a one day hunt, I contacted Bob Bott, the owner of TGIF Outfitters to tell him that I had paid for three days of hunting. He followed up by sending the vouchers for the other two days.


I later contacted Bob and selected a date for my Father and I hunt in the fall of 2006 . Shortly after I purchased my hunt, I told a friend about my plans and he too bought a bow hunt with TGIF for himself and his Father. This friend selected a date that was prior to my hunt so I was anxious to hear all about his trip upon his return. The story he told me was quite upsetting. The trip was a disaster, not because not a single deer was seen during the entire hunt but because of the manner in which the hunts were carried out. Never once did he take them to Buffalo county. He didn't even take them to private land, instead, he gave them a map of public land in Jackson County with directions on how to get to the parking area. The maps (that I now have) are labeled PH-1 and PH-2 The "P and H " stands for public hunting land.
 

There was no "guiding" taking place and the land that he sent them to is available to everybody at any time, free of charge. They were left to find their way around, unaided. They made the best of the day but expressed frustration with Bob at the end of the day. To make it up to them, Bob took them to a piece of private  land and told them that he was in the process of acquiring this land for future hunting. This land belonged to a church camp and is used for that purpose and as a retreat area. My friend sat with his Father and watched as people walked the mowed trails in this camp setting. At the end of their hunt, they let Bob know of their displeasure with the entire experience. To his credit, Bob offered a to let them come back and hunt the same areas for free at a later date. My friend told Bob that they could already hunt the land for free and that they were not interested in more of the same.


Upon hearing this, I contacted Bob at TGIF Outfitters and asked some questions about my upcoming hunt. At this point, Bob was not aware that I knew the Father and son team that he had just "Guided" I finally revealed to him that I was aware of the hunt that had just taken place and that I was not interested in hunting public land with my Father because he and I could already hunt those lands for free whenever we wanted to. I told him that I bought a hunt so that I could go after the "Big boys in Buffalo County" Bob then told me that he had not access in Buffalo county and that aside from the Church camp, he had no private lands at all. He was not happy that I had access to the PH-1 and PH-2 maps. I told him that I wanted to cancel the hunt and that I wanted a refund. I was told that TGIF Outfitters  had a "No Refund" policy. Despite my complaints that he was selling something that he was not able to deliver , he insisted that no refund was going to be issued.


To Bob's credit, he did offer a substitute activity. He offered a 3 day small game hunt or a 3 day waterfowl hunt as well as a three day fishing trip. I told him that I had purchased a deer hunt for my Father and that my Father (and I) were not interested in those other activities. I was not about to pay a guide to hunt small game or waterfowl in WI. He told me that this was the best he could do. I was pretty mad and told Bob that I would get back to him because I could see that I was getting no where.


Fast forward to this spring of 2007 . My friend, who had taken his Father on the failed Bow hunt with Bob had decided to get his monies worth on Bob's offer for 3 free days. He and his Father switched to a summer fishing trip with Bob and set up a one day trip. Without going into details, my friend relates that the fishing trip was as bad or worse than the hunting trip and will not be going back for the remaining two days of the offer. He told me that he is cutting his losses. Bob also changed his web site to say that TGIF Outfitters was discontinuing both archery and gun deer hunts and that people who held a voucher for those hunts were recommended to change to another activity that TGIF guides.


After hearing this, I contacted Bob to again ask for a refund. I was told the same story about his policy and that I can switch to another activity. I then told Bob that I would be going to be contacting EBay, The better Business bureau and the DNR. I then ended the call. The next day, I got an email from Bob that said:


"Please let me know how much your certificates cost you so I can see what we can do."


Finally!!. I thought I was going to get satisfaction. I replied to Bob and told him how much I had paid him for the 3 day hunt. The next day, I got another email from Bob that said:


"I will reimburse you but am not currently in a position to do it all at once.  What is acceptable to you?"


I replied to him that I was willing to work with him and that I was happy to take 3 payments over a 3 month period and I again supplied my mailing address. After a month had elapsed without a payment, I  emailed Bob and asked about the reimbursement. He replied that money was tight but he would be getting the first installment out to me. After another month passed, I again emailed Bob to ask about the reimbursement. He did not reply to that email. After yet another month passed, I contacted Bob again inquiring about the refund. I noted that two months had gone by without any contact from him at all. Bob replied with this email:


"I will send you the first of three payments next week.  Please resend your mailing address and I will get you a check out soon."


more than two weeks elapsed since that email and I had yet to have any contact or payment from Bob. I Sent another email that stated that if I did not receive a refund within 5 days, that I would be escalating this with several authorities. I checked the TGIF Outfitter website and saw  that he is again offering guided bow hunts but now states that he will be guiding a mix of State and Federal lands. 


 I checked  EBay and found that he has sold a good number of guided hunts and contacted EBay about Bob, EBay's policy says that you have to leave feedback within 90 days and this certainly worked to Bob's advantage as he would book hunts that would not take place until after the 90 days had elapsed which prevented folks from posting negative information about his operation. I have contacted a few hunters who have bought hunts from Bob and all were very angry with what they got and how they were tricked.
 

I sent Bob an email very Month that went by in 2007 and either got no reply or an excuse as to why I was not getting any payment. In November of 2007 ( a Year and 11 months, after this whole thing started), I again threatened Bob with legal action, I got a check for one third of the reimbursement. Things were starting to look up. I expected the 2nd and third payment in each of the next two months. That never happened. Instead, I ended up sending more emails each for the following months and again, got either no reply or an excuse.


In June of 2008, I sent Bob another email with a detailed explanation of the escalated actions that I was now going to take because of his failure to reimburse me and a demand that I have payment in hand by June 12. I also cc that email to what would appear to be an attorney (It was really just a friend with an email address that looked official) On June 13, I had still not received payment but I did get an email from Bob that read:


"Your check was sent out today (6/11/2008).  Thank you for your patience."


Patience!!!!! Give me a break! This goes beyond being patient. This whole process took 2 1/2 years to resolve. The check from Bob did not show up on the 12th as I had directed but it showed up on the 14th. I consider this matter closed with the exception of warning others.


I'm sorry this is such a long tail to tell but again, I don't want anybody else to get burned by TGIF Outfitters of Onalaska, WI because he is still offering guided fishing trips and waterfowl hunts on his web site.

117
Archery / Side Quiver Build Along
« on: May 31, 2008, 09:41:50 PM »
This Quiver is for my Son Josh. It goes with the Longbow I made for him. He does not like back quivers and thinks a hip quiver is ok but when I explained this quiver to him, he thought he would like it.

I made a pattern from a piece of padding from when I installed hardwood floors in my dinning room. It is about as thick as the leather I am using but a bit more flexible. It makes a good prototype material.


My biggest concern with having such a big opening in the side of the quiver is that, over time, as the leather softens, it will fold or collapse. I will reinforce the quiver to prevent that from happening.


I am making the quiver out of 8 Oz. tooling leather.


In order to stiffen the sides of the quiver, I stitched long strips of leather to the inside of the quiver.


I left one end open so I could insert 3/32 dia. music wire the entire length of the quiver.


the next step is to at a bit if stiffness and decoration to the opening.


I stitched this piece of 5 Oz. leather to the quiver while flat (before shaping.


The next step is to shape the quiver into it tubular shape. I wetted the leather to allow me to shape the quiver and then used a blow dryer to save a bit of time drying it off. I then marked an overlap and used rubber cement to join the to ends so that I could punch the stitching holes.


With the bottom stitched, I joined both sides of the quiver opening.


Then I cut a slot for the shoulder strap.


Next, I added a piece to the bottom of the quiver that I could attach the other end of the shoulder strap to.


And then gave it a bit of decoration and some stitching holes.


Stitching the already rolled tube proved to be a real pain.


For the bottom of the quiver, I used a piece of 3/4 inch thick pine.


And then added a layer of foam to reduce the noise.


The bottom is held in place with decorative nails.


I do not have a large enough piece of leather to make a continuous shoulder strap so I have to join a few strips together that I cut out of one of my bigger pieces.


As I make more progress, I will post more.


118
Archery / (video) Josh and his new homemade Longbow
« on: May 25, 2008, 05:07:56 PM »
After 7 years and at least 10 thousand pictures, the old Cannon A20 2 Mpixel camera died. I bought a new digital camera on Friday that will also shoot video so I used Josh as my Guinea Pig. I told him to shot 3 arrows into the target. I had him stand about 4 yards away because I was burning brush in our backyard fire pit and that was where we had to stand to stay out of the smoke.

I told him to shoot the 3 arrows and not to talk or look in the camera. His first shot was a dead center hit on the bullseye. The second shot cracked the nock of the first arrow and made it glance out. You can tell by the way he shakes his head that he wants to look at the camera and say something.

Here is my first ever video staring Josh and his homemade custom Longbow.

http://www.youtube.com/watch?v=wsU5S6fwV6g


119
Archery / Longbow Build along (Page 2) (Part 9-22)
« on: April 18, 2008, 06:57:06 PM »
So, enough waiting already. Time to glue this bow up. I promised a local grade school I would give them a few hours on Friday so I took the whole day off and worked on the bow in the afternoon.

I laid out everything I needed since the dry run a few days ago. Then I put both quart containers of the epoxy in a basin of hot water to warm them up a bit.


Next, I cleaned all the wood and glass surfaces and laid them in the order in which I would glue them.


1. is .050 clear glass

2. is .020 kingwood vernier

3. is .090 thick hard maple taper (two pieces glued together to make one long piece)

4 and 5.  is .065 thick hard maple taper (two pieces glued together to make one long piece)

6. is a piece of hard maple .060 parallel from the piece of wood my Dad cut. (two pieces glued together to make one long piece)

7. is .020 kingwood vernier

8. is .050 clear glass

Missing from the picture is the riser.


Fast forward to a completed glue up with the warmed epoxy. Due to the mess and the fact that I was working alone, I did not slip out of my sticky rubber gloves to take pictures along the way. What a slippery mess to work with. I used a combination of spring clamps and rubber inner tube strips to compress all the layers. I had more C-clamps at the center (on the riser) but I took them off once I realized that they stuck up higher than the sides of the box and the cover would not lay flat. So much for a complete dry run. I should have tried the lid of the box also. Oh well. live and learn.


Here is a close up of all the layers and all the extra glue that oozed out. I also learned that I used too much glue. I think I could have built two bows with what came out from between the seams. Once again. Live and learn. The gold colored layer on the top is a strip of aluminum that will help spread out the load from the clamps. I was the old track from a shower door that I cut into two strips for this project.


Here is the oven box doing it's job of keeping the bow at around 160F. I will unplug it before I go to bed and let it slowly cool down over night.


120
General Discussion / Raffle for the Wisconsin Bowhunters Museum
« on: April 11, 2008, 06:40:46 AM »
Please help out this worthy cause and be entered in the drawing for these great prizes.

Guided 5-Day Rut Bow hunt in Buffalo County

Mathews DXT Bow Donated by Wade Jeske/Lena Swamp Archery

Carved Moose Antler Donated by Gordy Bently

Heritage Arrow Created by Bill McCrary

Muskrat Fur "Stroller" Jacket Donated by Jodi & Greg Martin (size small)

To buy tickets, you can call Larry Wiffen at 414-771-6425 or Brian Tessmann at 262-544-6573 or the WBH office at 715-823-4670. Need not be present to win

This is the message from Stan and Carolyn. They are the ones who donated the hunt.

"We are donating a bow hunt on our farm in Buffalo County. for the 2008 or 2009 for the WBH heritage Fund. This is to keep the Bowhunting museum going. Its for 5 days, which includes meals and lodging. on our 240 acre Farm in Lower Buffalo Ct. between Fountain City and Arcadia in Cross township, We have taken quite a few P&Y bucks, The only drawback is we are in a earn a buck area, So you have to get your doe, before you shoot a buck. We have taken some l50s and lower bucks, Not a buck behind every tree but they are here. Its $5.00 per ticket or 3 for $10.00 The drawing is at the WBH Broadhead shoot in Sept. In New Lisbon"

Stan and Carolyn

http://www.wbhassoc.com/Museum.htm


Pages: 1 ... 6 7 [8] 9 10 ... 13
Google
Web http://www.wisconsinoutdoor.com