Show Posts

This section allows you to view all posts made by this member. Note that you can only see posts made in areas you currently have access to.


Messages - Rancid Crabtree

Pages: 1 ... 5 6 [7] 8 9 ... 26
91
Refinishing the barrel of this old gun was a chore. The rust had pitted the metal pretty deep. There's nothing really that I can do about it so I just have to deal with it. Here is the barrel after all the rust and blue was removed with navel jelly.


Then I went after it with 220,320,400 and finally 600 grit and then steel wool.


Then blued several times and buffed with steel wool.


With all parts refinished, it's time to reassemble this mess of parts. I hope I don't have left over items when finished.


The last thing I added to this gun was a new set of scope mounts and an old fixed 4 power scope. This will make it a good squirrel gun. I also added a white spacer between the butt plate and stock. I like how it dresses up the look of a gun.


Here it is all finished and ready for plinking and samll game. 


92
Not every restoration I do is a complete tear down of a hopeless case. This is a good example. I picked up this 1961 Ted Williams model 34 Sears and Roebuck, 22 semi auto at an estate sale for $40. It was a great find with the original sears scope and vintage case and looked like it hadn?t hardly ever been used in its 50+ years on the planet.


The gun has an aluminum receiver and like all aluminum parts, the anodized finish on the high spots or sharp edges has worn through to shiny aluminum. 


If you haven?t tried aluminum black, you should. Like gun bluing, it?s a wipe on, wipe off product that works very well.


Clean the areas with acetone or denatured alcohol and then with a swab, apply the black.


And this is what you end up with after 3 or 4 applications.


As long as I was at it I grabbed a piece of aluminum stock from the shop and gave it a brushed finish to show the coloring.


Like bluing, its good to polish the metal because aluminum black and gun bluing both etch the polished metal making the final finish less than polished when you are done. Since still photos make it hard to see the real effects of this etching, here is a video of how the gloss is etched away and you can compare the surface finish of the metal next to its polished self. The black makes the surface finsh more of a matte finish. When finished, apply paste wax and buff your gun to a shine. (this offers additional protection and makes the gun look great)

https://www.youtube.com/watch?v=-qYho4v4H4Q

Lastly since everyone will care about the durability of this finish I took steel wool to the sample and buffed the hell out of it in what would be considered outight abuse to a gun. Here is the result of that abrasion excersise.


Repair those glossed over edges. It couldn?t be easier.

There are a lot of uses for such a product. If your a bowhunter, lots of archery related parts are made of aluminum. Use your imagination. Sometimes the use might simply be "because I can" and thats ok too. Such as aluminum cartridge casings.


If you have aluminum you need to blacken, this product works great and is far better than a sharpie marker since it blends perfectly with anodized parts where as a sharpie leaves a shiny look that is too black and comes off far to easy.


93
With the first coats of spar on the stock its time to move onto metal parts. I started with the low hanging fruit. In this case the brass magazine tube.

To say it was tarnished is an understatement.


Brasso to the rescue. as well as rebluing the knurled tube end.


Then the outer tube was stripped, buffed and reblued.


I don't think this gun has ever been disassembled or cleaned and I found a lot of grit and grime impacted in all the crevices. Areas that I thought were solid metal were just hardened gunk and once I used solvents and a pick was able to get the parts clean. Only two pins hold the entire trigger mechanism in place.

The reason the action would not cycle was as I suspected. It was so impacted with crud that all the moving parts would not move.


the whole gun can be disassembled with a screwdriver and a pin punch.


There seems no end to the level of parts that this gun can be broken down into. The large round piece at the bottom is the safety. There was no bluing on it at all and the red (Fire) paint was gone
as well.


With a little TLC, it looks like new.


To remove the black anodizing from the aluminum, I used fine grit sandpaper and steel wool. I won't be able to remove a lot of the deep dings and scratches and I'm ok with that. It only has to be a functional working gun and not a show piece.


Here it is after the spray on gun coat was applied and baked.


And the re-assembled trigger mechanism is clean and lubed and all the parts move in proper order.


The rest of the steel parts will need the bluing removed and then I will re-blue and hit them with Barricade.

To be continued.......


94
This gun is a Remington Speedmaster .22 cal . This one was made in 1963. It is in far worse shape than the old Mossberg I recently restored. It has a lot more rust and the stock is broken. It is also a semi-auto so there are far more pieces to deal with. Like the last gun, this one is also in throw-away condition except that the bore is clean and without rust. the receiver is aluminum and a lot of the finish is gone and there are deep scratches and some deep dents in the metal. This gun is a real disaster. The action does not cycle but I suspect that is just due to crud and dirt. Its been in my shop for a while while I worked on other gun allowing me to order a replacement stock

Here is the announcement (in 1961) for the release of the model 552 in a carbine.


I thought this ad funny and still true today.


Here are some pics of the gun in the condition it arrived at my door.


It has a tubular magazine that is also pretty rusty and the brass rod is gunked up with patina..


Lots of deep scratches and deep dents in the aluminum receiver. Some of the dents are over a 1/16 of an inch deep. This gun was abused.


The stock is broken where it meets the receiver.


As well as having a broken butt plate and missing pieces of wood.


I wonder if this is how Remington built the gun 56 years ago?


This one is going to be a real challenge but it can be saved. Once again the work begins with the wood.

As soon as I took possession of this gun, I did a search for replacement parts for the wooden stock because I knew I couldn't fix what I had. I went online to Remington's website and they had both pieces of wood (without the butt plate) for $180. (3 times as much as this gun cost new) and since I can buy a new .22 for that much, I looked elsewhere. Boyds wanted almost $100 with shipping. The gun sat in my shop until I could find a stock at a better price.

As luck would have it, I found not only both pieces of wood but also the butt plate being sold on EBay with only one day left in the auction. It was listed as a buy it now for $25 so I did. The wood was in good shape except for some scratches and finish missing so I stripped and sanded and found that it was made from hard rock Maple.


The wood will be stained with a dark American walnut stain and be given several coats of spar urethane  (semi gloss). I always start with the wood because of the days of dry time.

Thi gun requires detailed inspection to see if any replacement parts need to be ordered because the action does not cycle.

To be continued??

95
We have all seen it. An old shotgun with a missing bead. I have a very old shotgun with a damaged barrel. The barrel had been cut off by a prior owner who took off about an inch for some unknown reason. This left no bead nor tapped hole where the bead should be. On top of that the barrel has a rather bad bulge about 6 inches from the end. The goal here is to cut down the barrel and add back the missing bead.

While a hacksaw works (and even coined the phrase "sawed off shotgun", a pipe cutter leaves a straighter edge that is easier to clean up.


A little filing and fine sandpaper cleans up the cut nicely. Next the barrel is tapped 3/8 to ? inch from the muzzle.


The bead that I will be making is threaded #4-40 tpi so I tap the barrel accordingly.


To make a bead I start with a #4-40 brass screw. I wrap the threads with tape to protect them. Then I mount the screw in the chuck of a hand drill so I can spin it creating a sort of mini metal lathe.


Using a small file and fine sandpaper I reshape the head of the screw into a ball shape.


Here is a before and after.


The bead can then be threaded into the barrel to mark where it needs to be cut off.


Holding such a small part for the cut-off can be tough unless you have a proper sized nut to thread onto the screw.


The finished bead installed.


Dont let that old shotgun suffer the indignity of being beadless.


96
The Hamilton Boys rifle restoration is complete.


Despite the 15 F degree temp this morning I went out and test fired it. Here is a short video.

https://www.youtube.com/watch?v=NUHhAiPOrt4

97
All the metal parts are buffed with steel wool and degreased in preparation for bluing.


The receiver is the first part blued and buffed with 0000 steel wool.


Then the lettering is filled with white nail polish.


After drying its wiped down with non-acetone nail polish remover.


All the rest of the metal is blued several times, buffed and then sprayed down with Birchwood Casey Barricade rust preventor.


The barrel is the last part to be blued.


Then the replica sight is attached to the barrel. I was able to locate a 8-36 fine thread screw buy purchasing a set of scope mount bases that use that screw size.


Now the metal parts can be reassembled back into a gun.


I need to test fire a primer to see if the old gun will work so I removed the lead and poured out the powder from a round to see if the repaired firing pin would work.

It works.


Here is a video of the primer test firing. If you are expecting a bang from a rimfire primer discharge you are going to be disappointed. The hammer smack is louder than the primer .

http://youtu.be/AjNVpEBLy5M

Attaching the finished stock pieces is the next step but I need to allow the final coat to dry and then wax it before attaching it to the frame.

To be continued....

98
The butt stock was not so stained but it does have some issues such as cracks and slopped out holes where the mounting hardware goes. I made the repairs and sanded off the old finish.


Then stained it.


Both pieces of wood will be protected with several coats of Hellsman spar urethane in gloss. (it is a boys gun after all. Gloss seems like the logical choice)

With the wood in progress its time to turn to the metal parts. That means cleaning and rust/blue removal and lots of naval jelly.


Step one complete. This was a roughly made gun 100 years ago so it would not have been highly polished so I will not go beyond steel wool to shine up the metal.


I also repaired the bent firing pin. I suspect it got bent from trying to close the action while a shell was still protruding. There is no spring in the action to force the firing pin to back out.


I also got the bore clean and 22 cartridges now fit (including long rifle even though LR wont be used in this gun). It was just so fouled and dirty that a shell would not fit. Lots of solvent and elbow grease revealed there is still rifling left in the brass barrel liner.


The last major hurdle is addressing the missing rear sight. I want the sight I make to be as close as possible to the original sight for this model. Web searches provided enough pictures to show me what I need to make. I was able to scale the images to come up with the sizes from web images like these.


I used all the web images to help me make the replica sight drawing (including material thickness).


The back of the sight (nearest the sight notch) has a clearance hole for a screw. The problem is the gun is tapped 8-36 (fine thread) 8-32 (course thread) is pretty common but 8-36 is not easily available. I exhausted every local avenue trying to find a store that would carry an 8-36 screw. Online sources (and there are not many) want me to buy a min of 100 pieces.


The small hole at the front of the sight is a pivot. The original sight had a dimple stamped into the metal and that dimple fit in the hole to allow the sight to be adjusted at the rear but keeps the sight from spinning all the way around. I don?t have the tools to create the dimple but I need a pin or detent to serve the same purpose. I will drill and tap the sight 4-40 and cut off a screw to act as the pivot.


The semi-completed sight before bending.


Then blued.


The 4-40 pivot is then treaded in place with epoxy to keep it where I want it.


Now all the metal parts need a final cleaning and bluing.

To be continued????

99
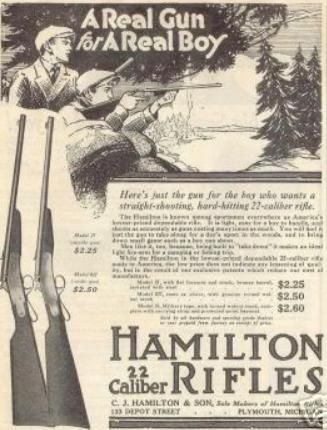
So you want to be a ?Real Boy??? That was the ad campaign and selling feature over 100 years ago for this unique firearm.

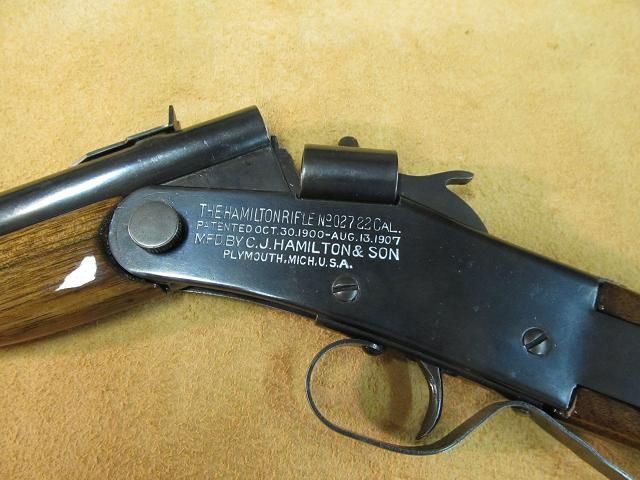
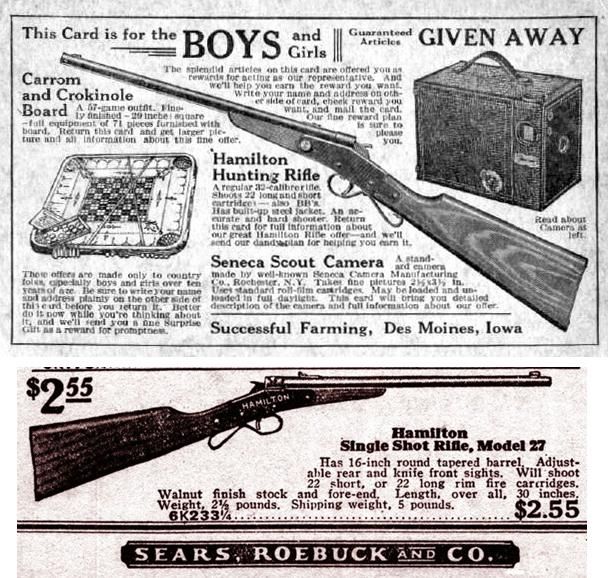
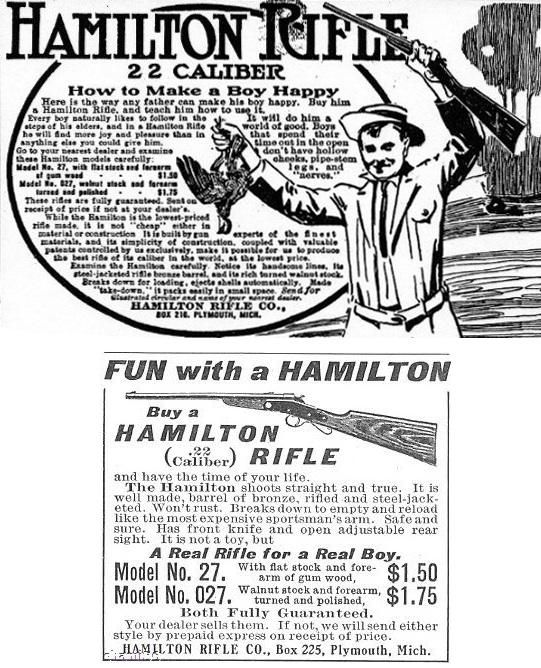
In 1882 Clarence Hamilton, along with other investors, started the Plymouth Iron Windmill Company. Along with a friend, he started producing an all-metal rifle to be given as a bonus to those purchasing an iron windmill. By 1895, more rifles were being produced than windmills. From 1898 to 1945, the Hamilton Rifle Company of Plymouth MI produced the model 27 and 027 These guns were often given as prizes to young entrepreneurs that sold salve, or seeds and was heavily marketed in the back pages of comic books of the time. This was known as a bicycle gun or boys gun.

Retail Company?s who sold products such as magazines, costume Jewelry, etc. door to door would use the Hamilton rifle as a promotion, offering a free rifle to those who made their quota. Feed Companies promoting their products would randomly place a rifle in feed sacks. If you where lucky enough to buy the right sack of feed, you got a free Hamilton rifle hidden indide (kind of like Crackerjacks with the toy premiun inside). They were the happy meal toy of the time and was a brilliant marketing scheme to get these guns into the hands of as many young boys as possible (My how times have changed. Can you imagine a company offering this premium today??) About a half million of these guns were made.

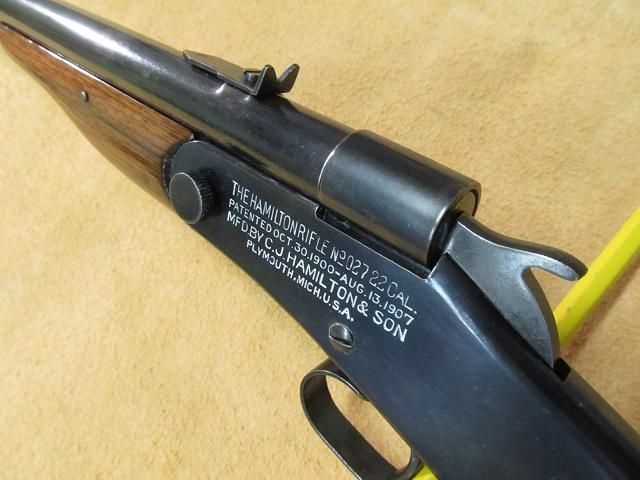
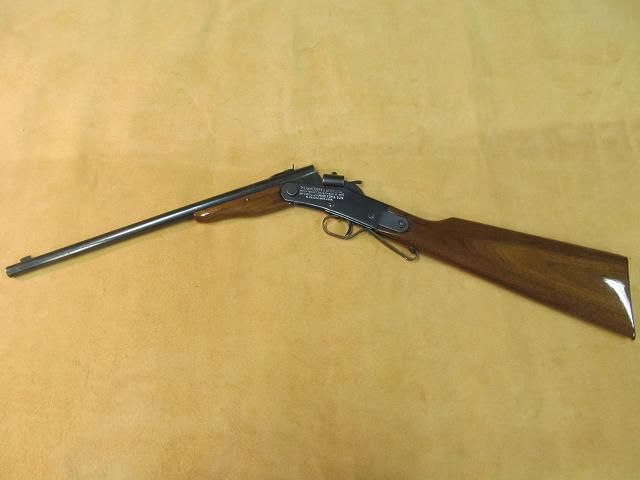
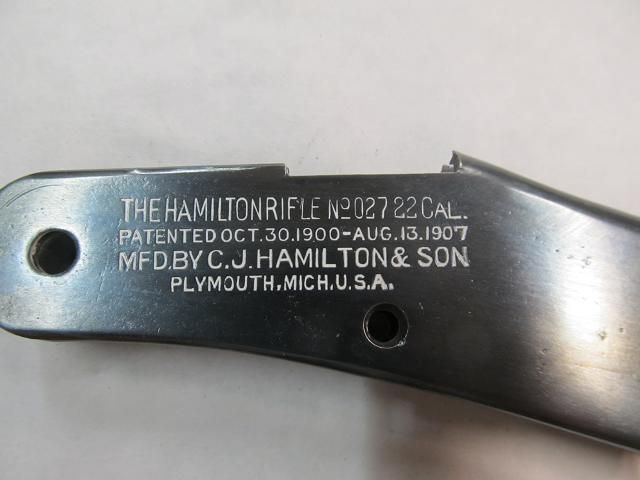
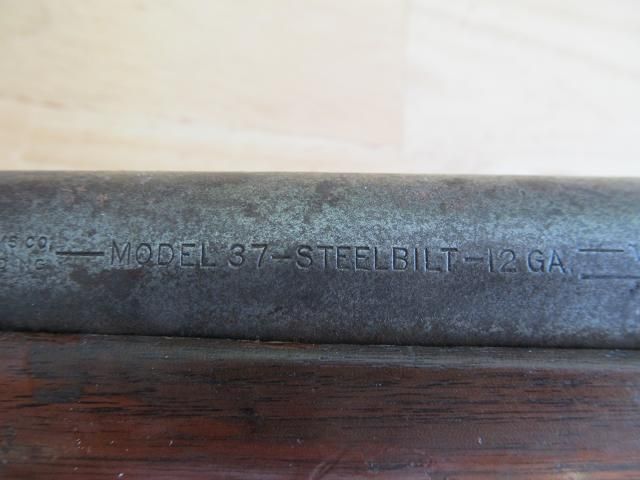
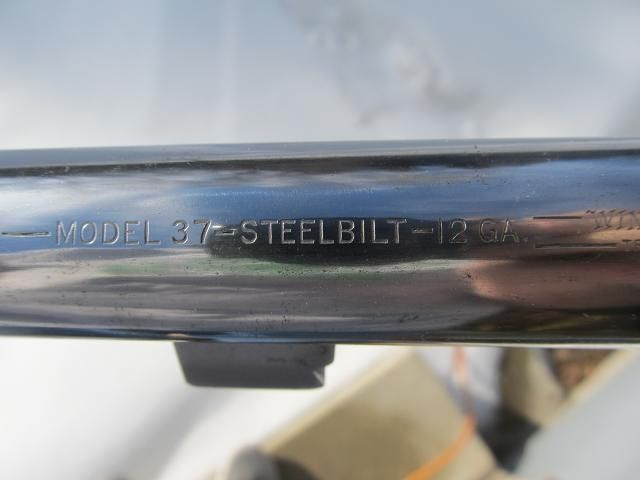
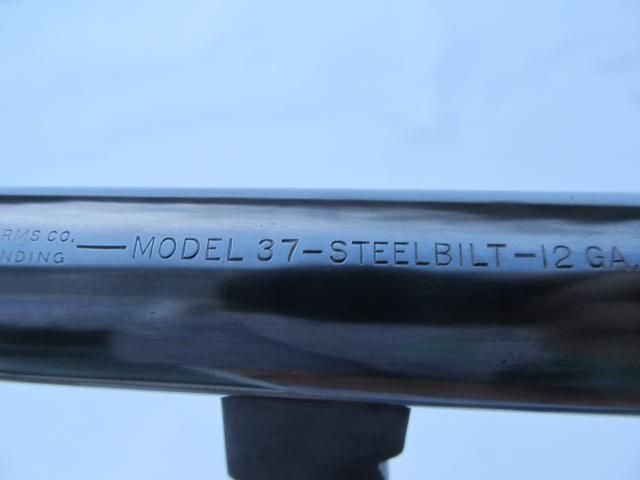
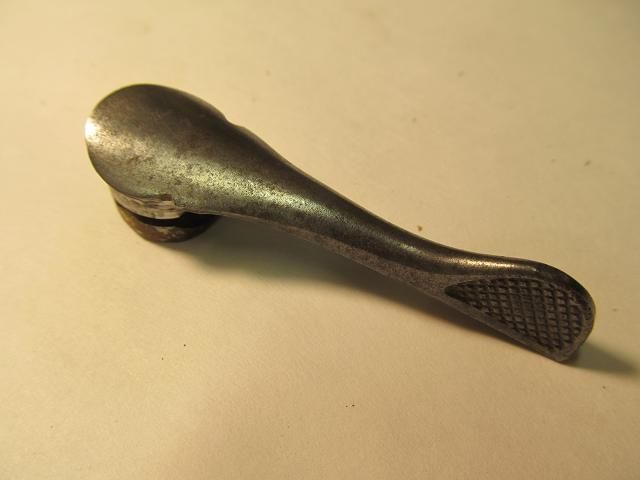
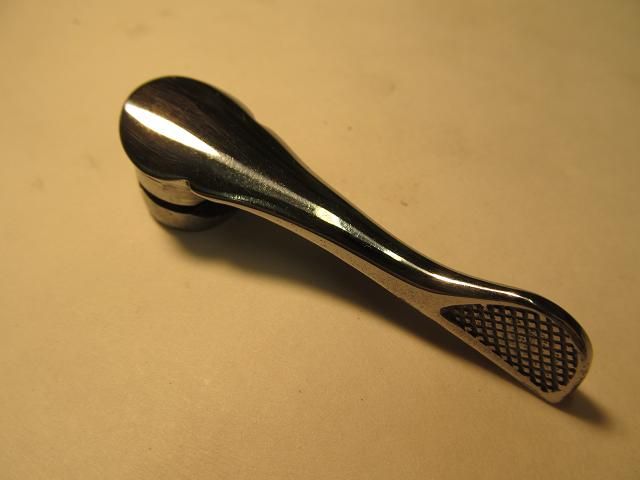
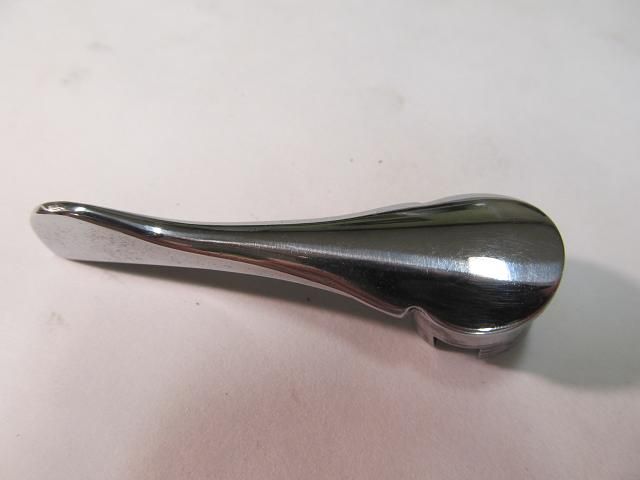
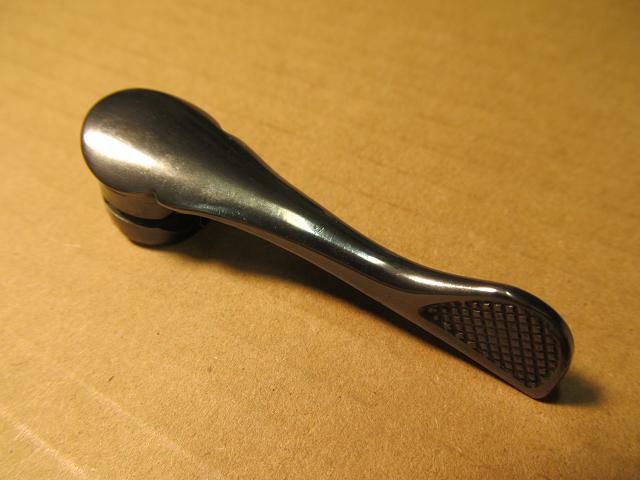
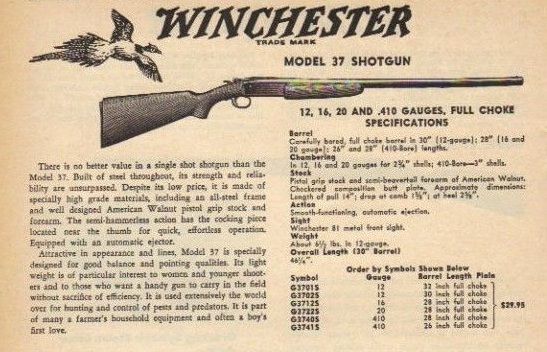
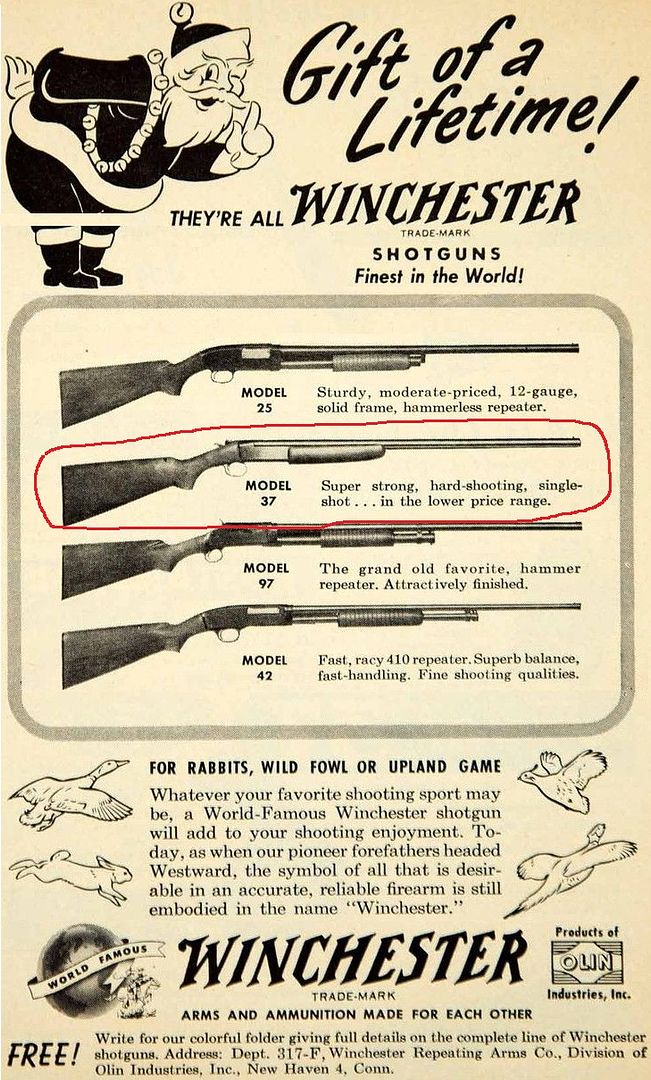
This Hamilton model was made in 2 versions (model  27 and 027) They were the same except the 027 featured real walnut and a sheetmetal butt plate on the stock The difference in price was .25 cents. Here are some ads from the past.


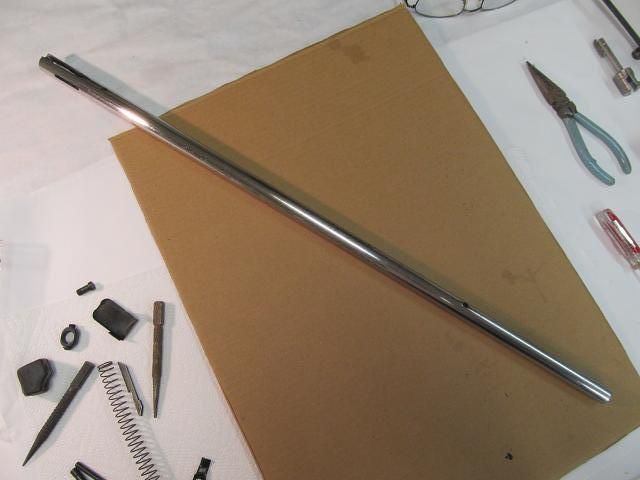
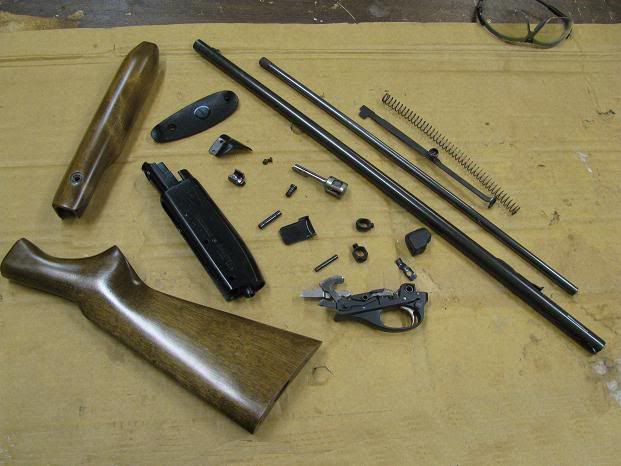
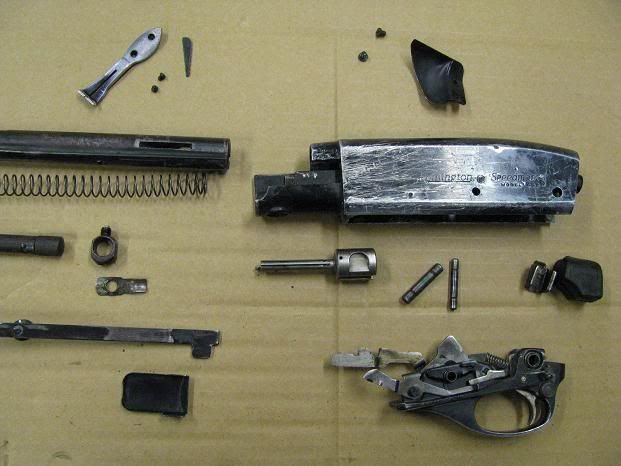
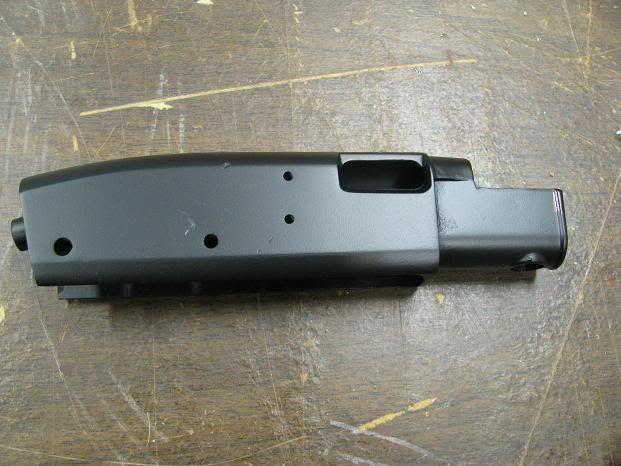
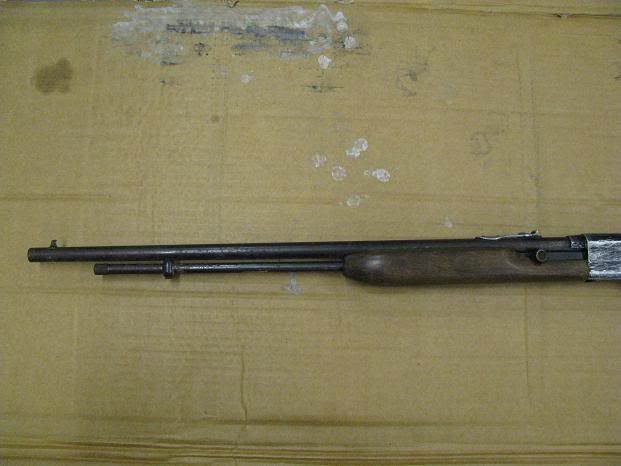
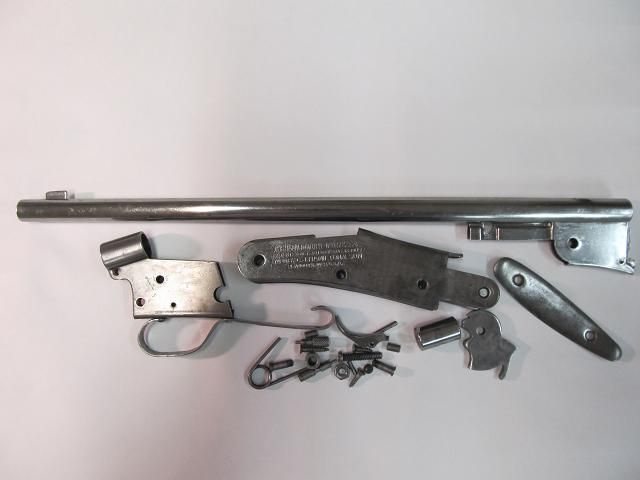
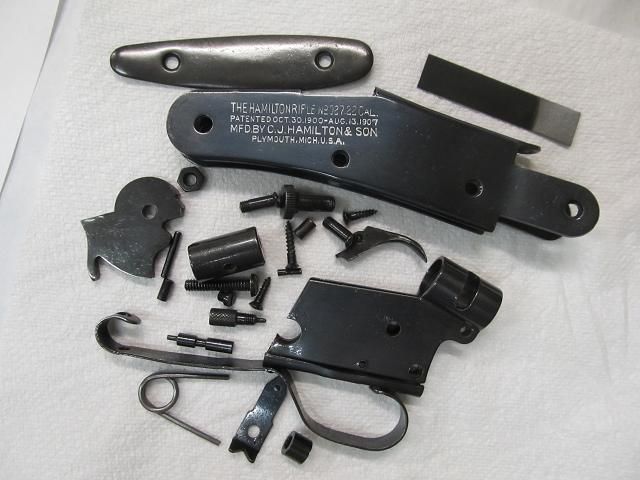
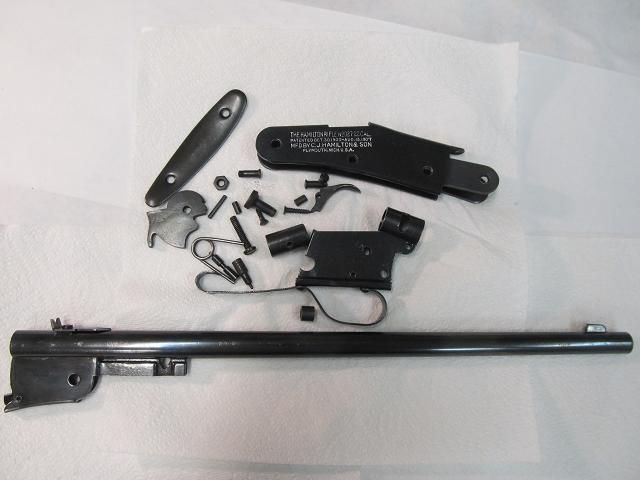
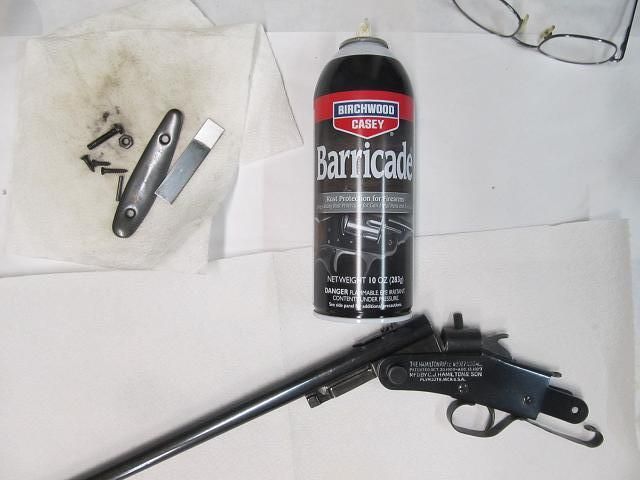
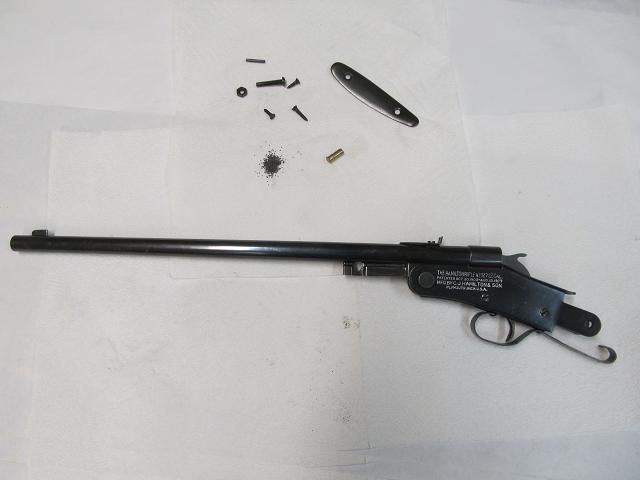
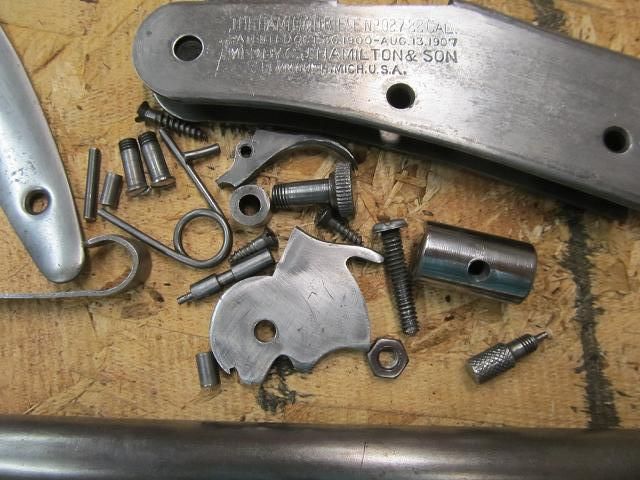
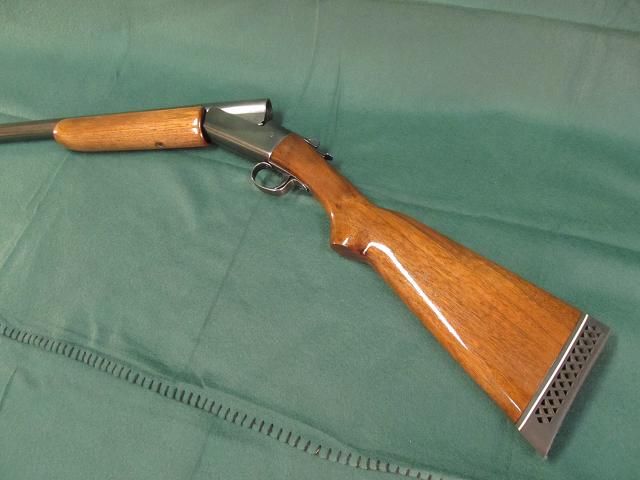
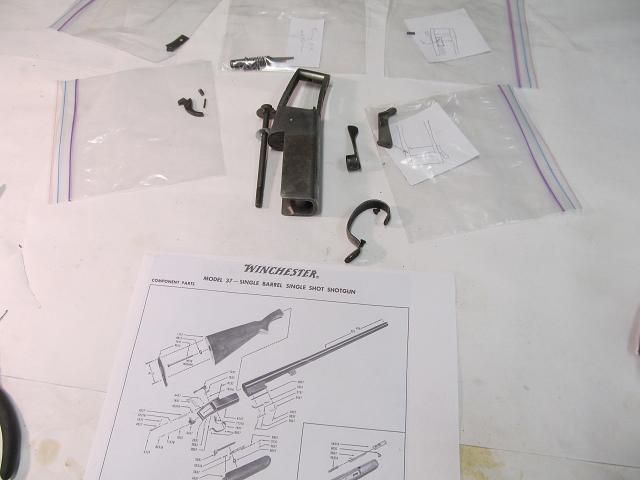
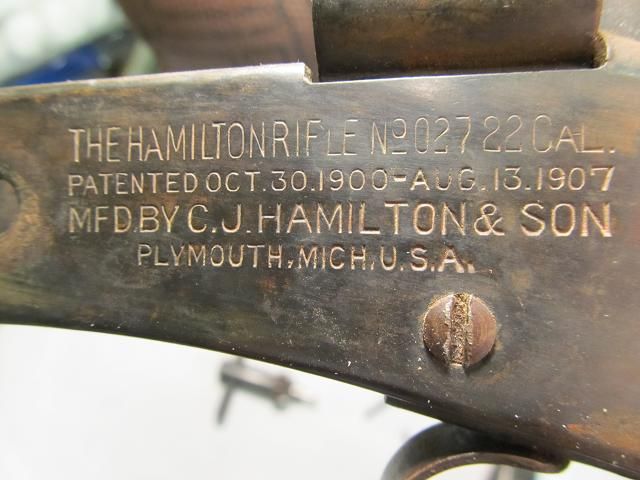
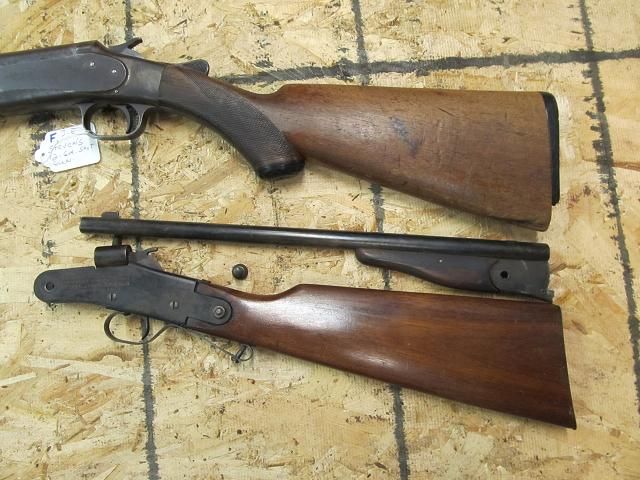
This particular Hamilton model 027 belongs to a co-worker. It was an attic discovery in his Grandfather?s house after the passing of his grandmother. My plan is to fix what needs fixing (and a lot needs fixing), make what is missing and restore the gun for him. There is not a lot of info available on the web in terms of the firearms internals to help me and I cant find a schematic so I will take lots of pics as I disassemble.
s
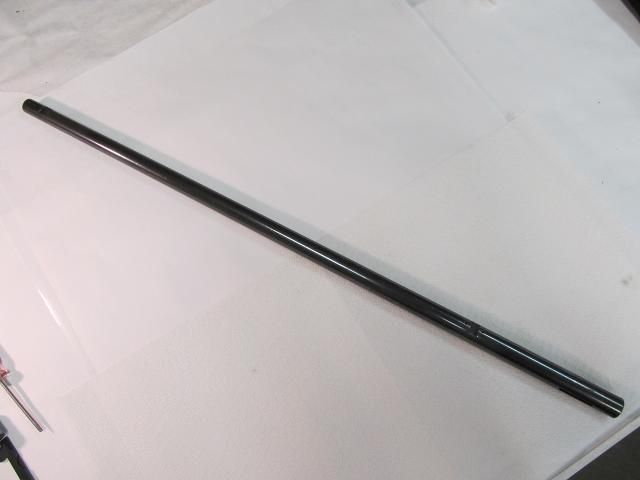
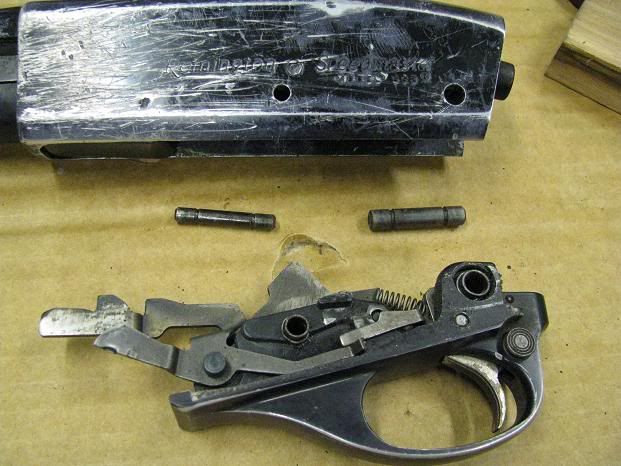
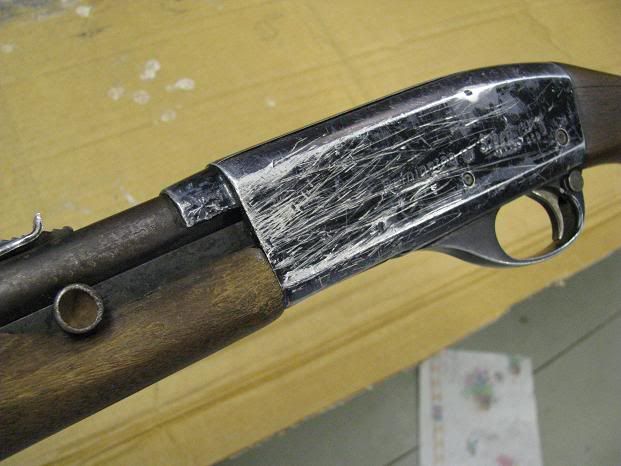
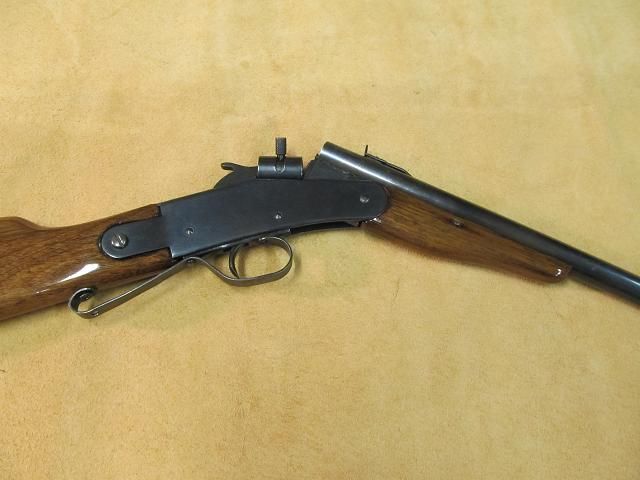
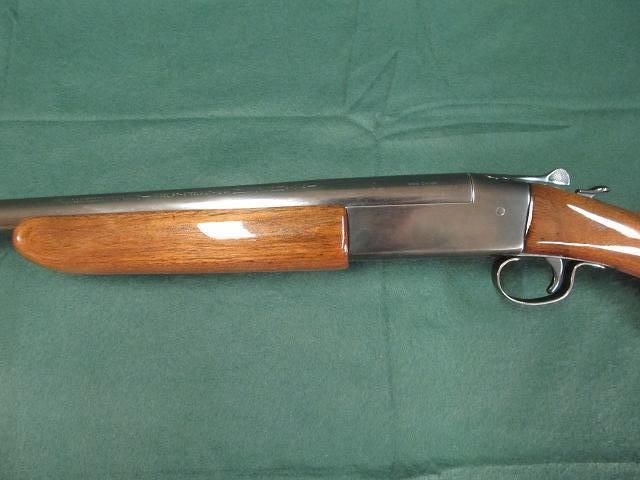
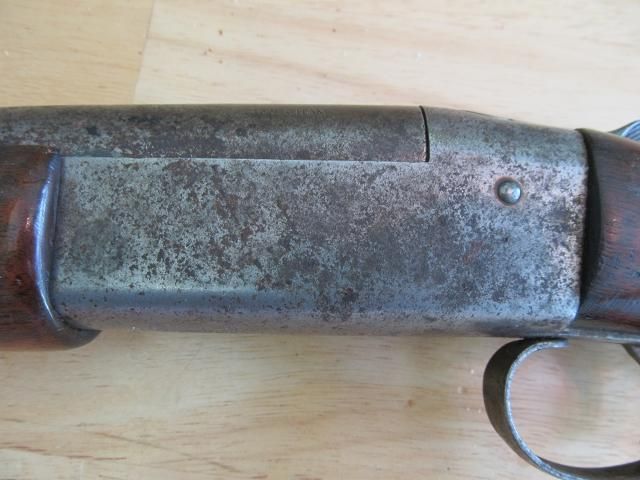
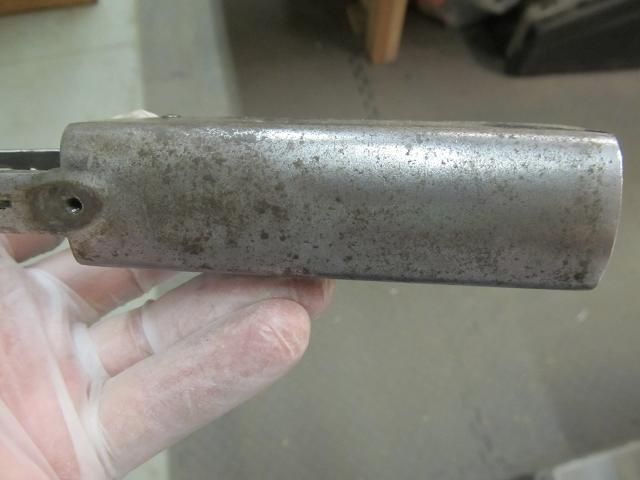
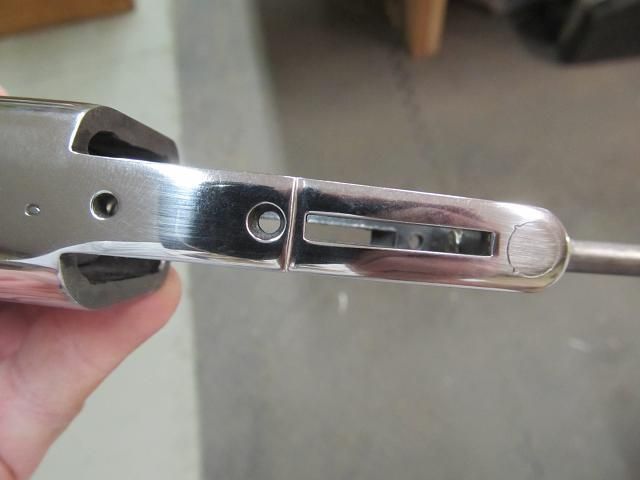
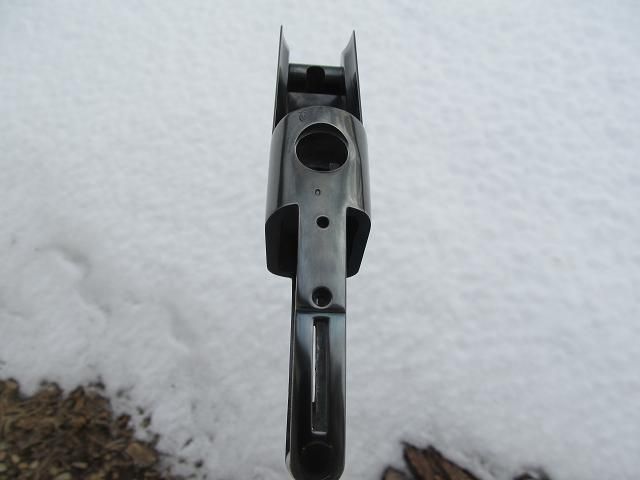
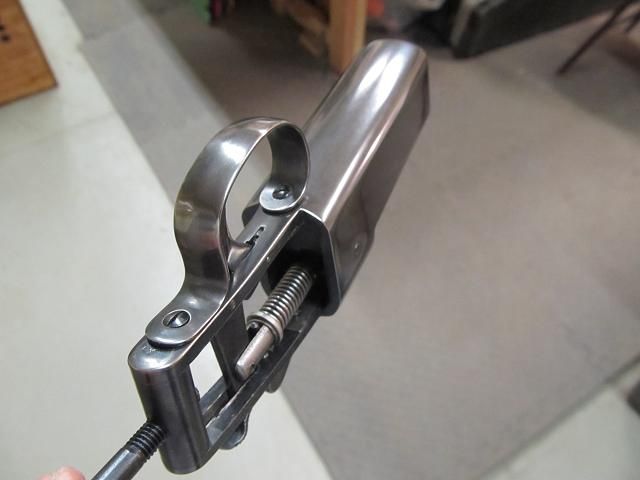
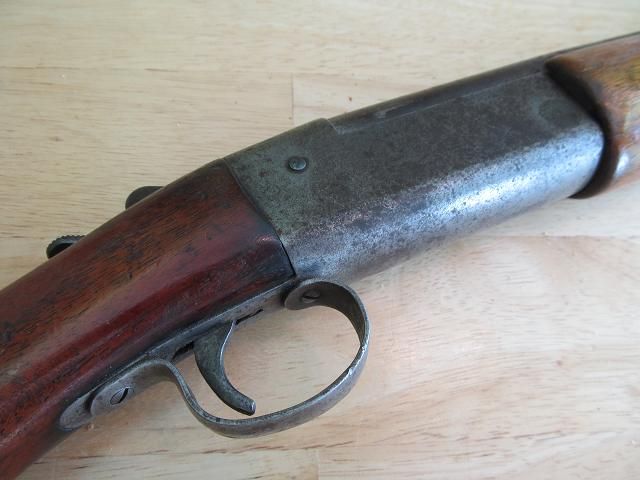
On thing of note about this gun. It made up almost entirely of sheetmetal and the barrel is brass. Not something you would think of when making a rifle but again this was essentially  equivalent to a happy meal prize. If they sold them for a $1.50, you can imagine how much they cost to make (perhaps .20 or .30 cents). The parts were cookie cutter stamped and formed and assembled with pins, screws and rivets (no welding) and there are only a few machined parts.

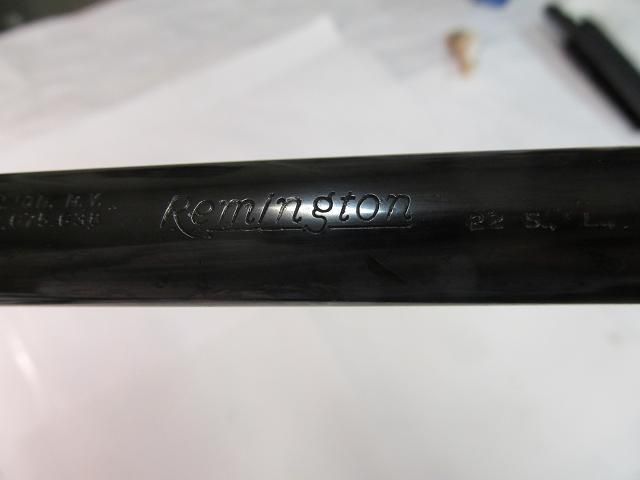
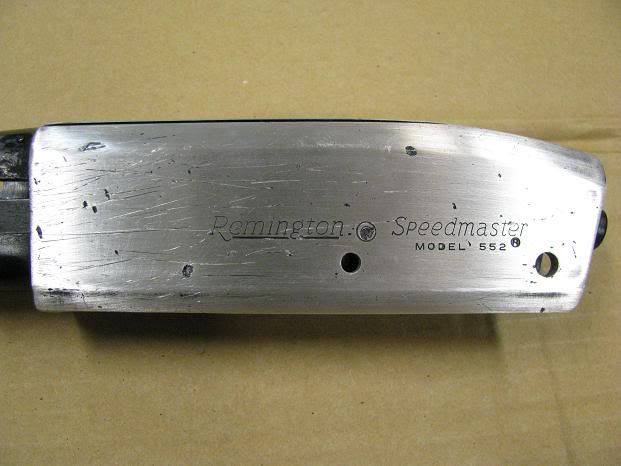
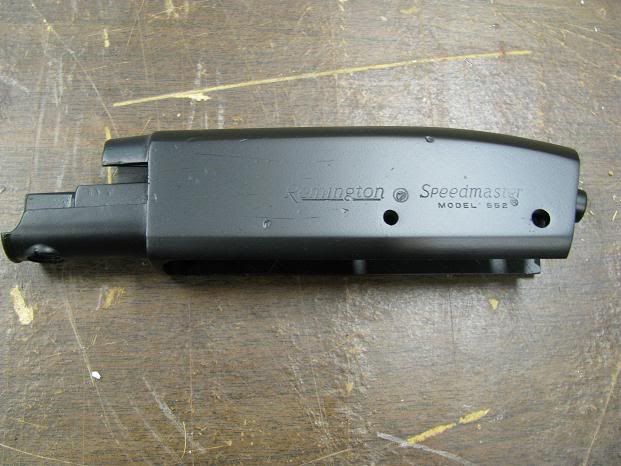
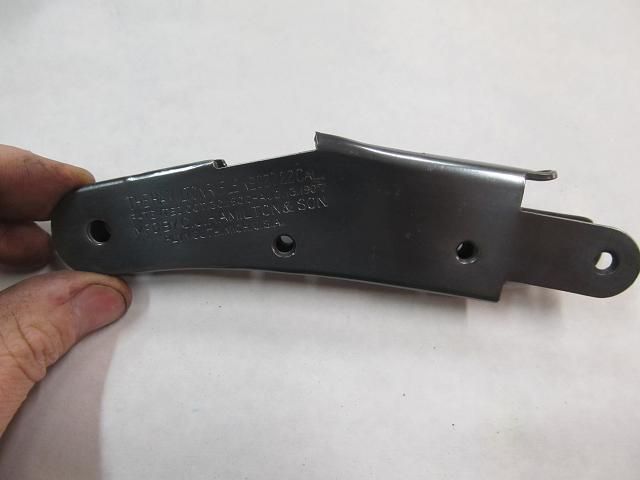
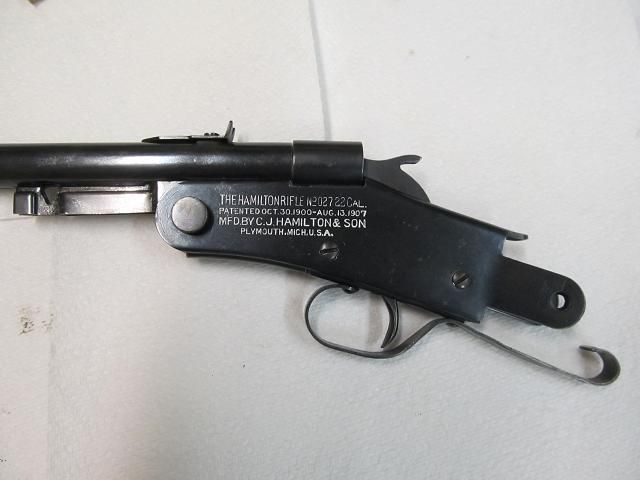
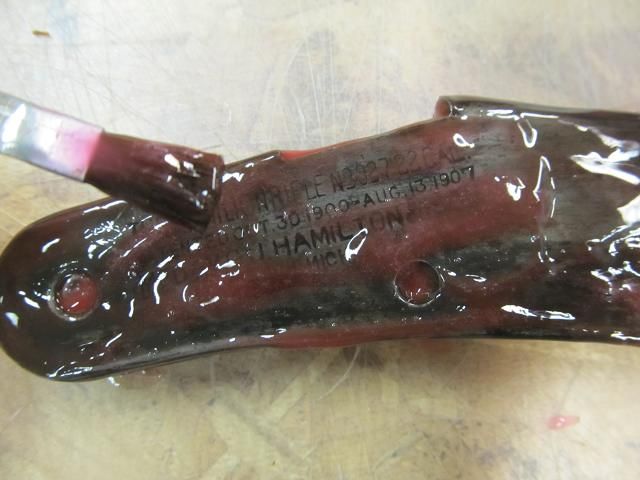
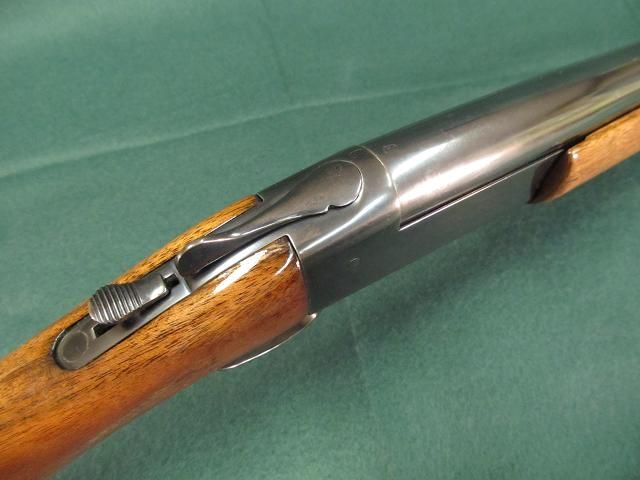
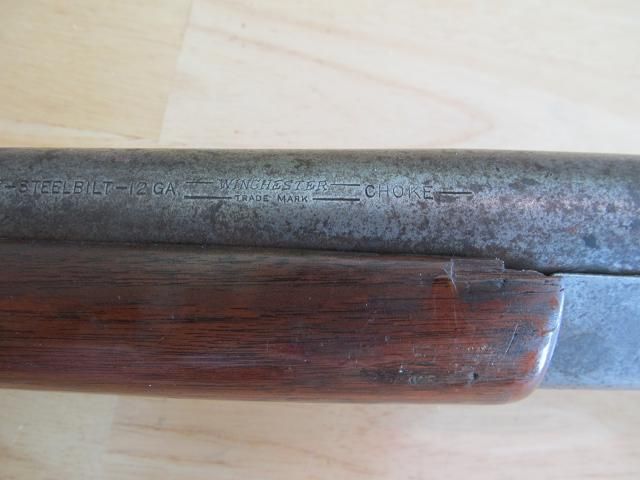
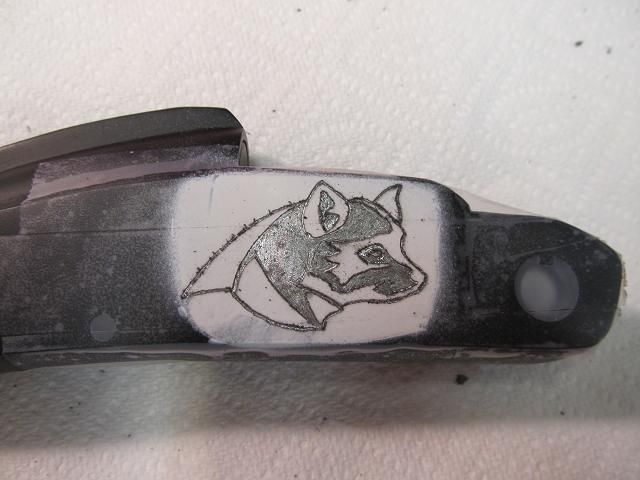
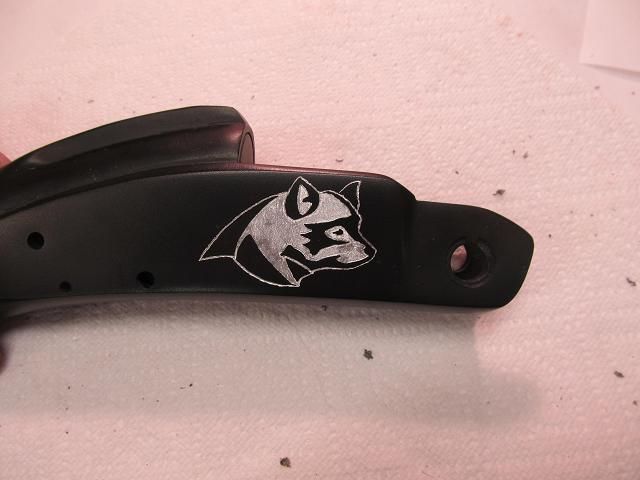
Clearly they took pride in their name and the guns info. They used up the whole receiver with the stamping.


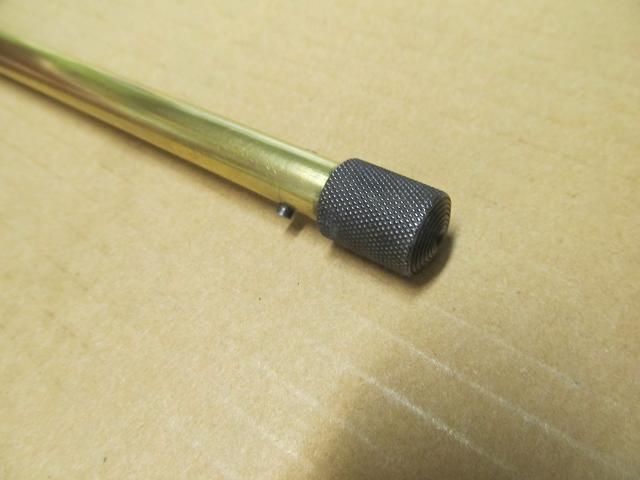
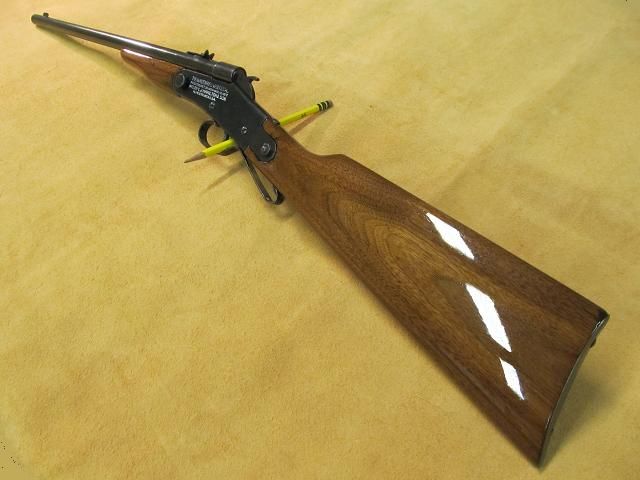
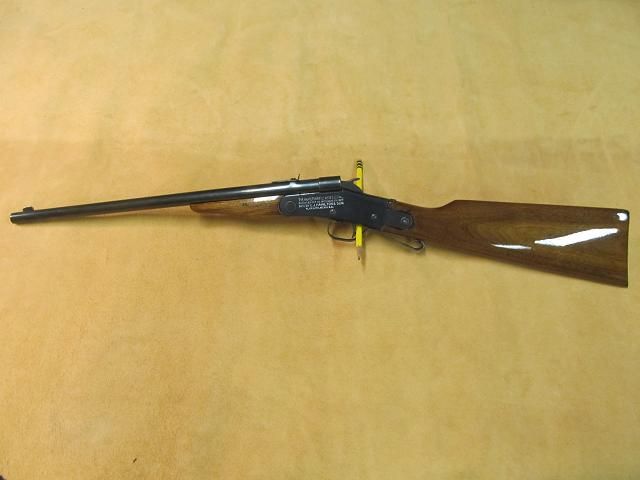
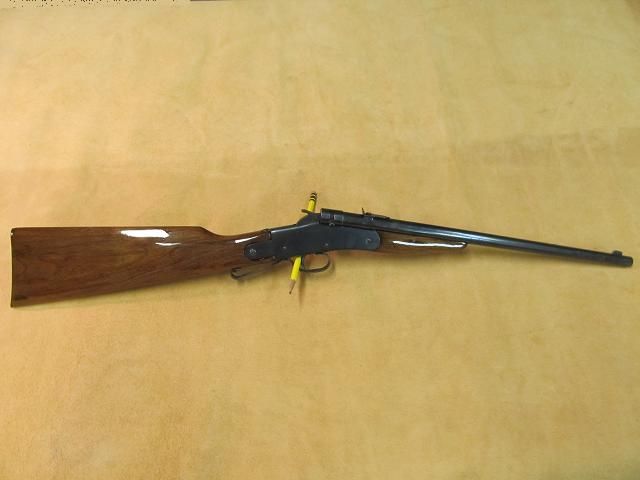
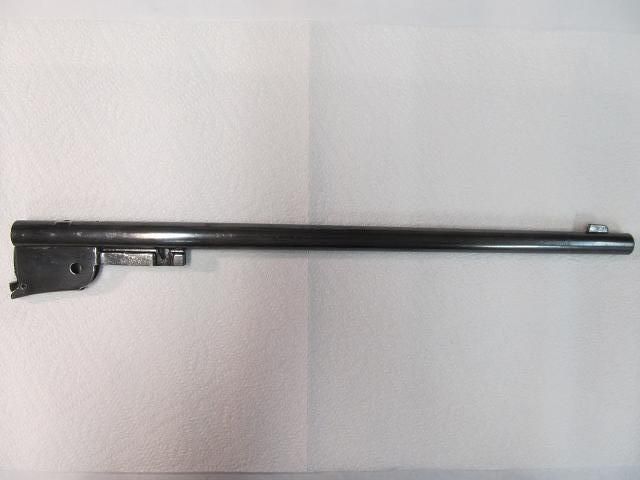
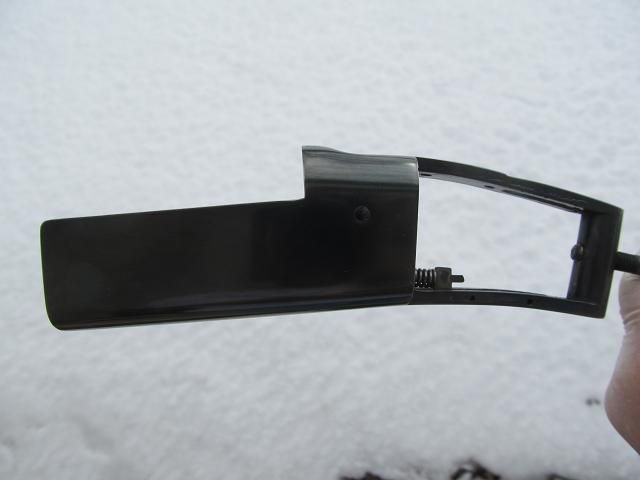
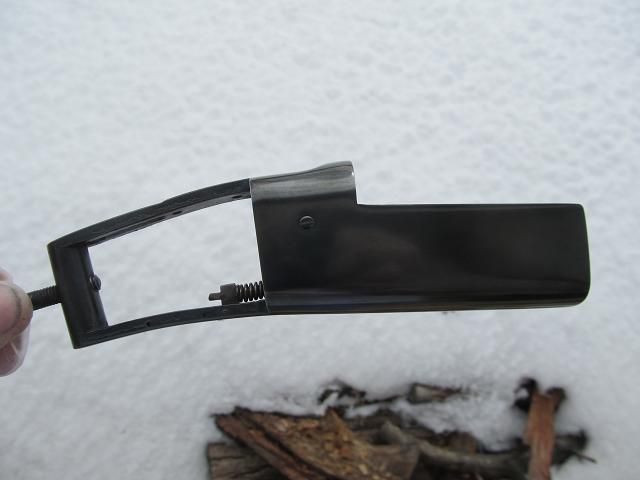
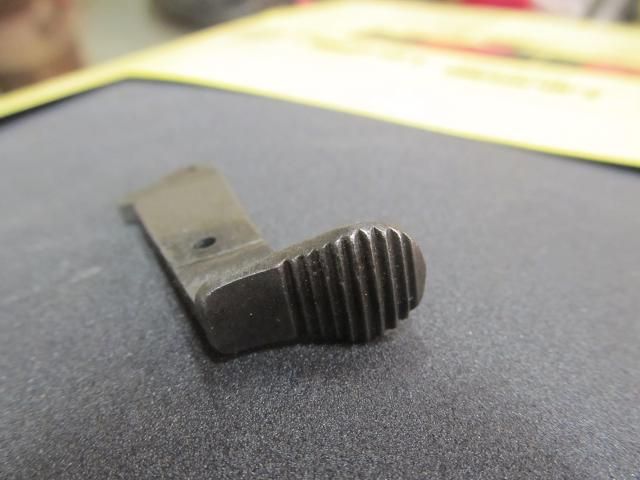
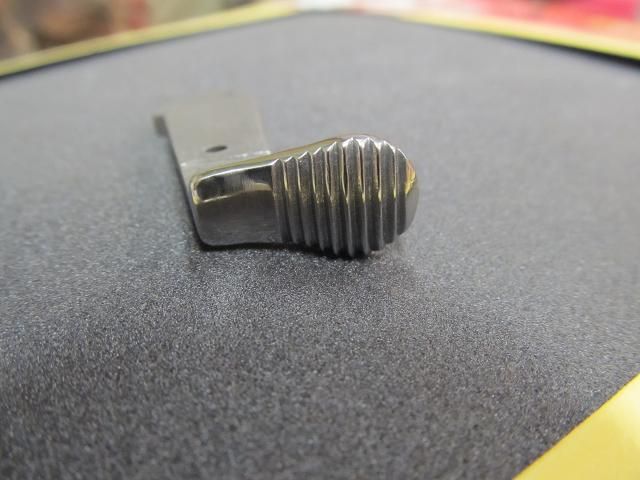
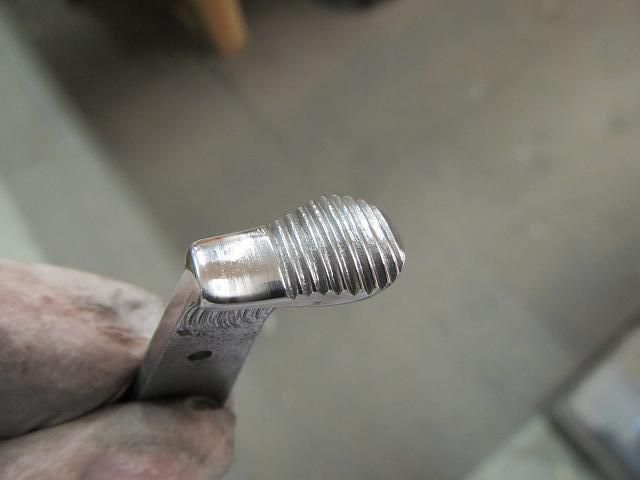
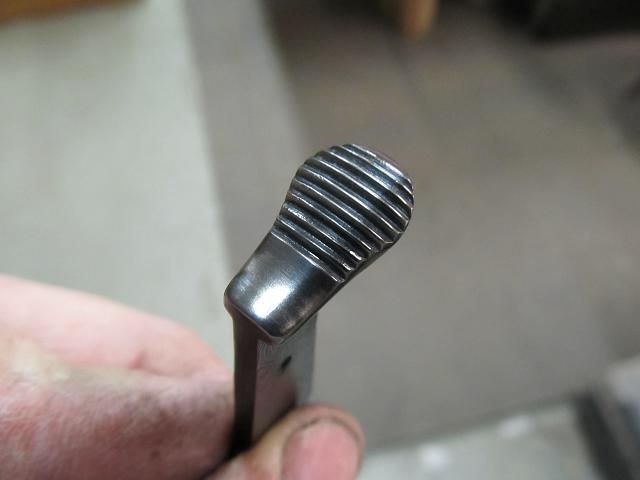
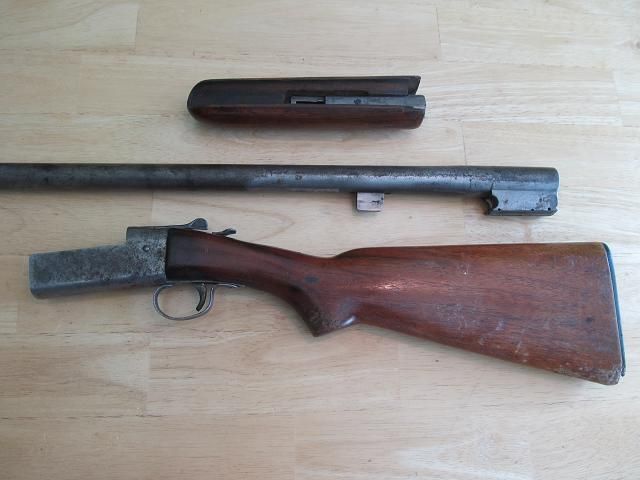
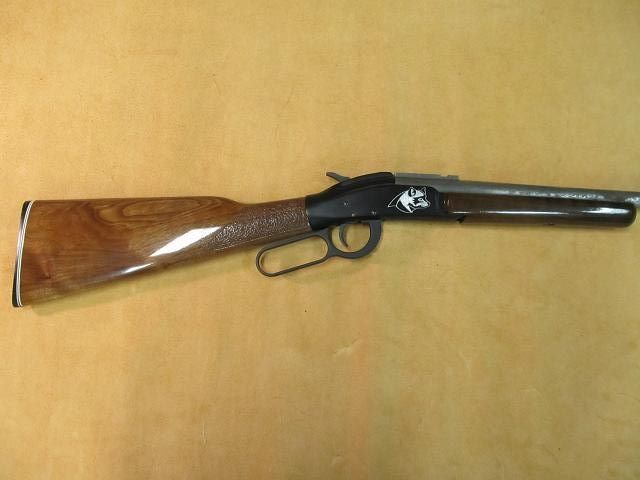
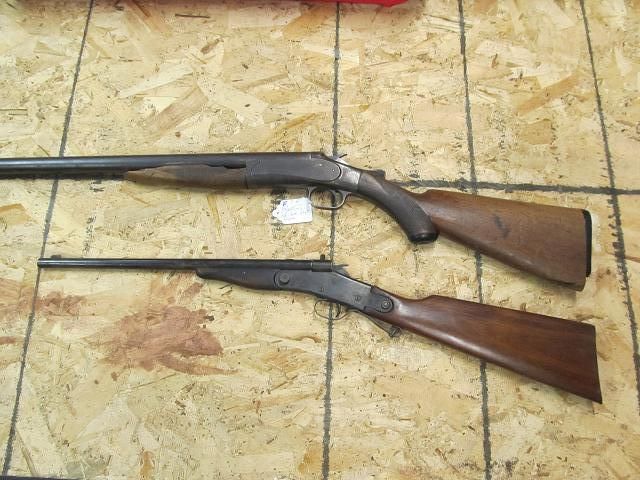
As you can see, this is a tiny little gun when compared to a regular sized shotgun of the same period. The large thumbscrew allowed for fast disassembly down to 2 easy to pack pieces you could carry on your bicycle to plink squirrels.


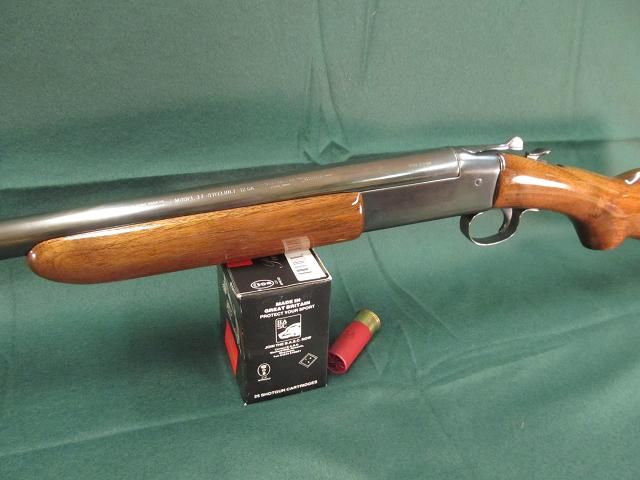
If you know anything about rifles you might think this gun is not legal due to its overall size and barrel length but the BATF has exempted this antique as a curio or relic so its short length does not make it illegal to own or use.

Currently this firearm is not in usable condition. It has several issues that need to be corrected if its ever to be fired and shooting this old 22 with his son is the goal of the owner.

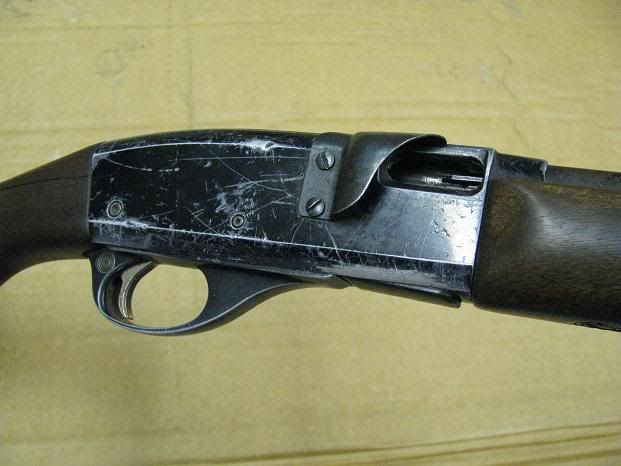
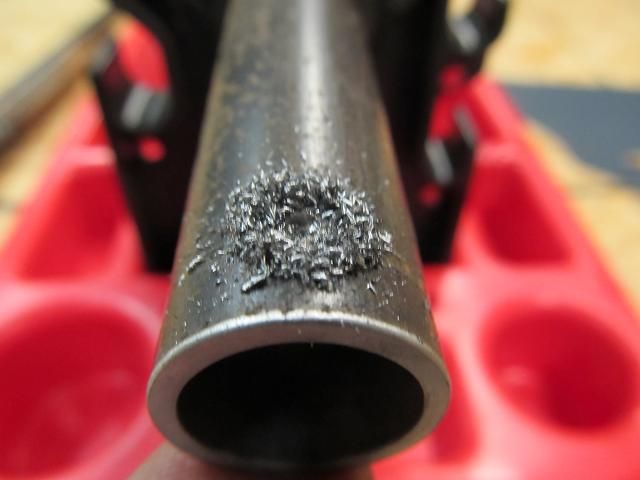
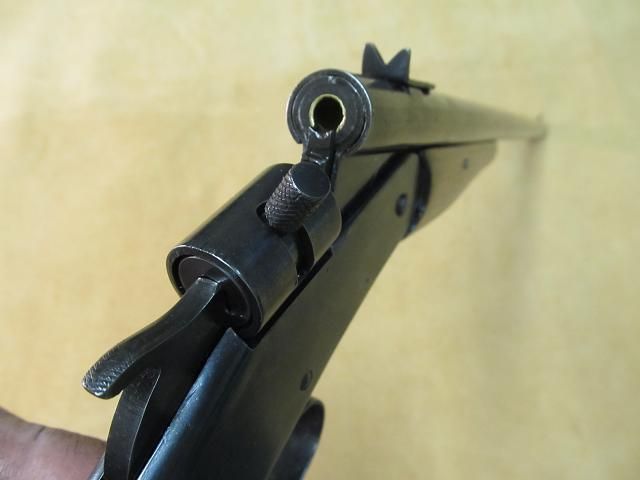
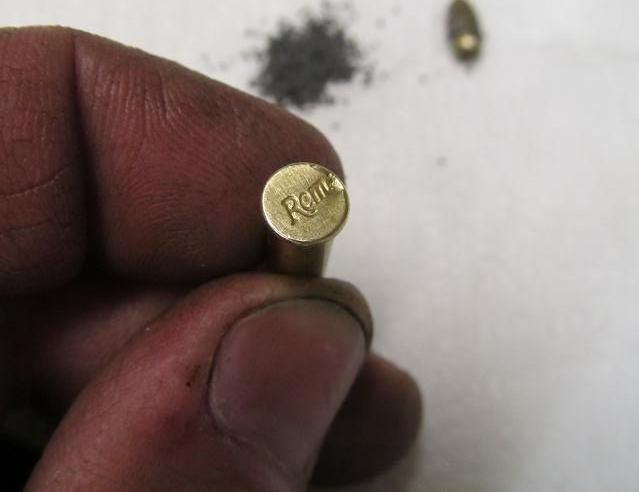
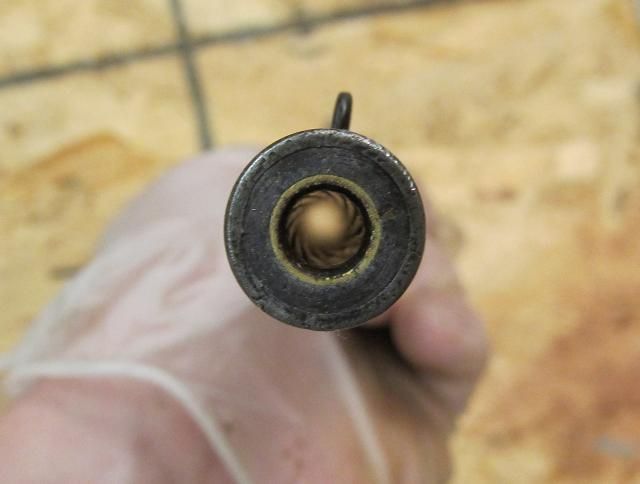
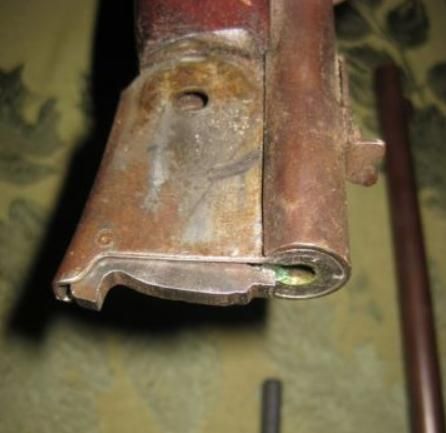
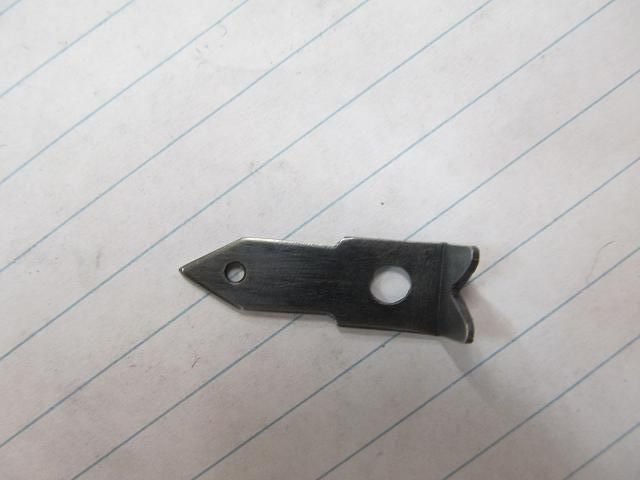
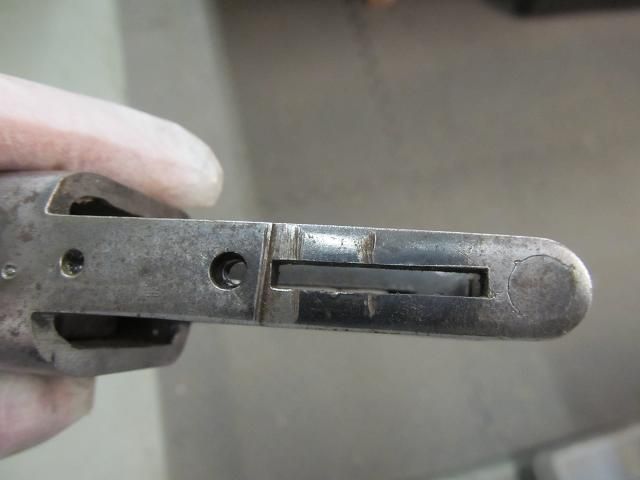
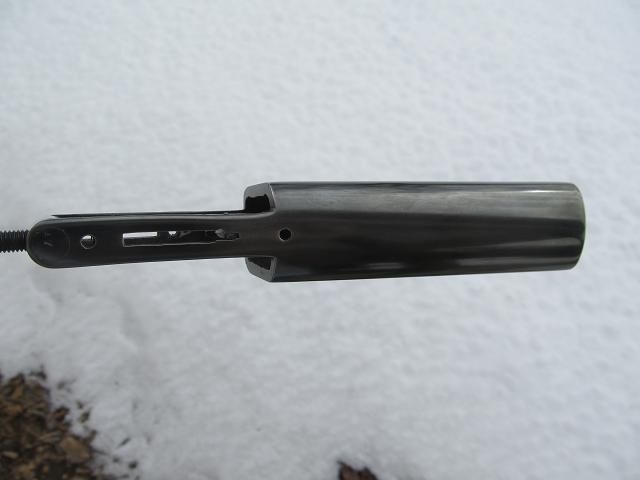
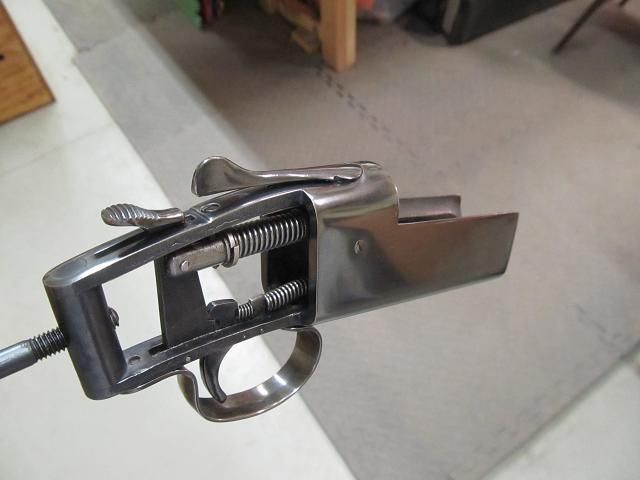
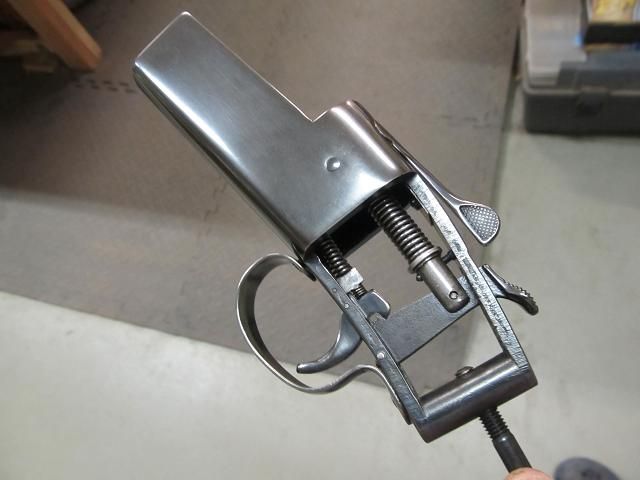
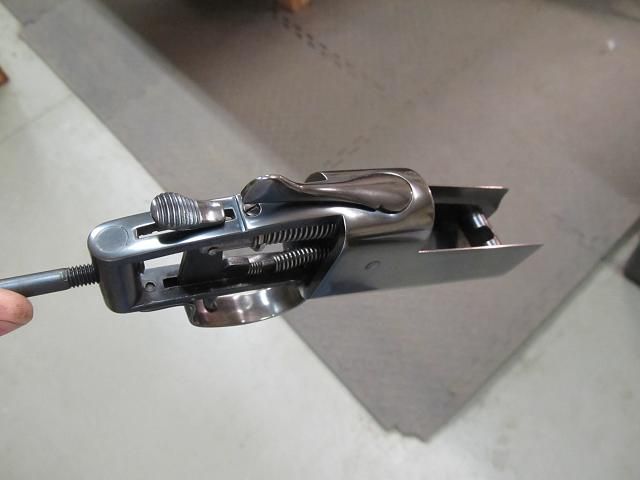
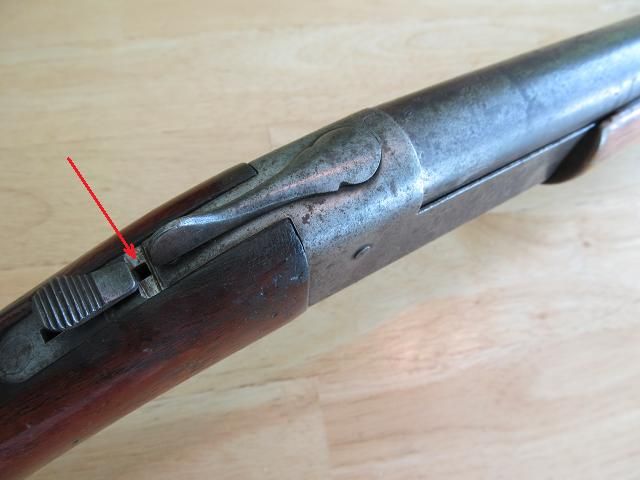
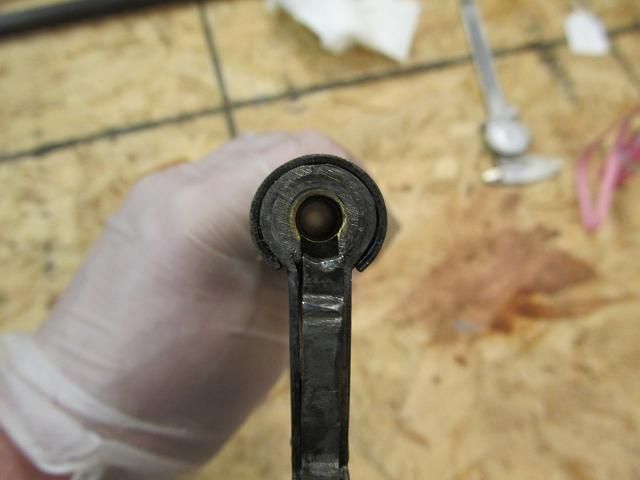
First off I cant fit a 22 caliber bullet in the breech. Something is preventing insertion. Even with the extractor moved out of the way, a shell wont go in. I removed the lead and powder from a round and still could not insert it beyond what you see in the picture.


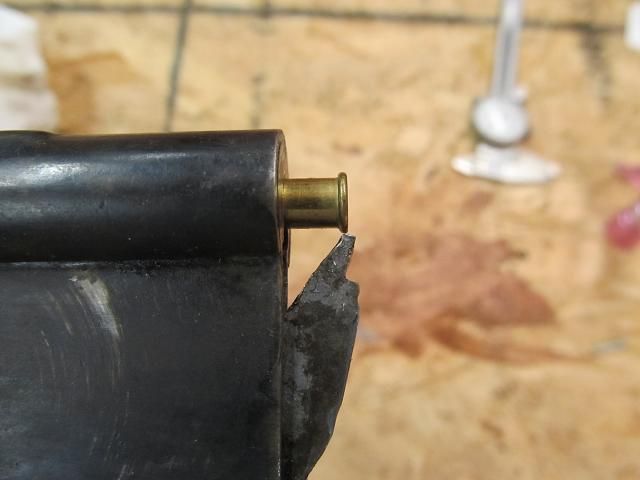
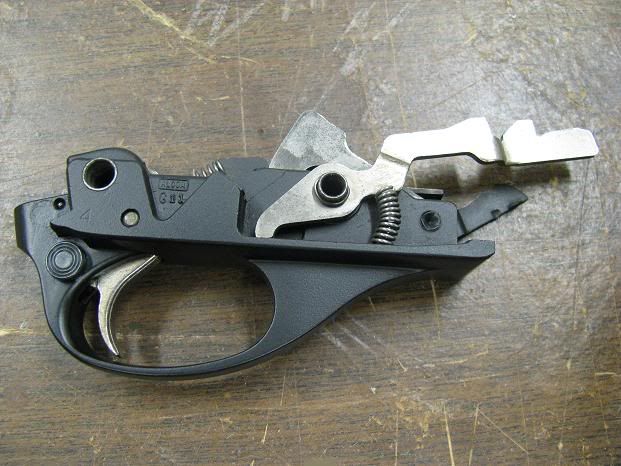
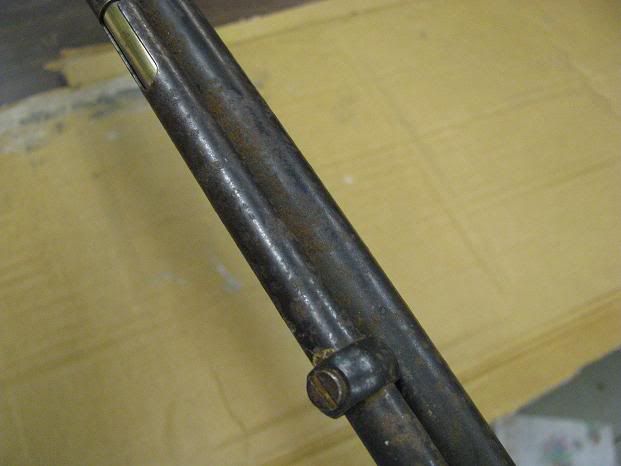
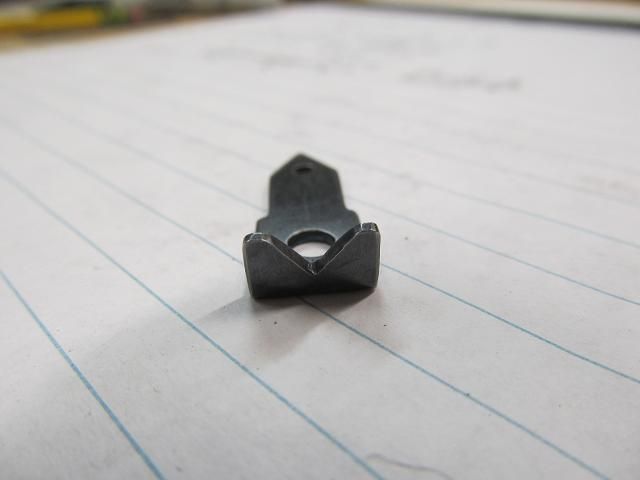
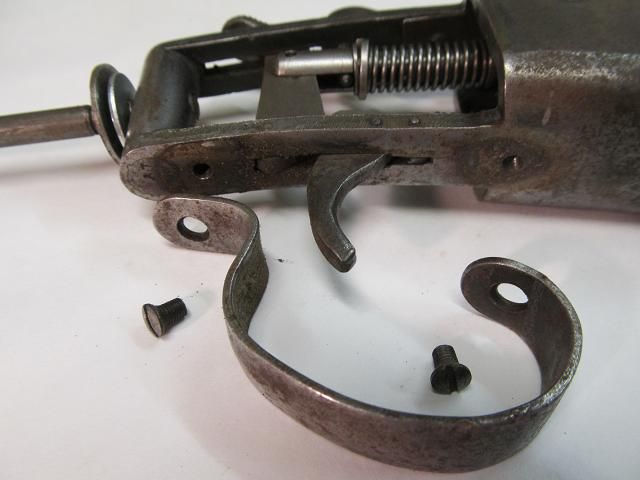
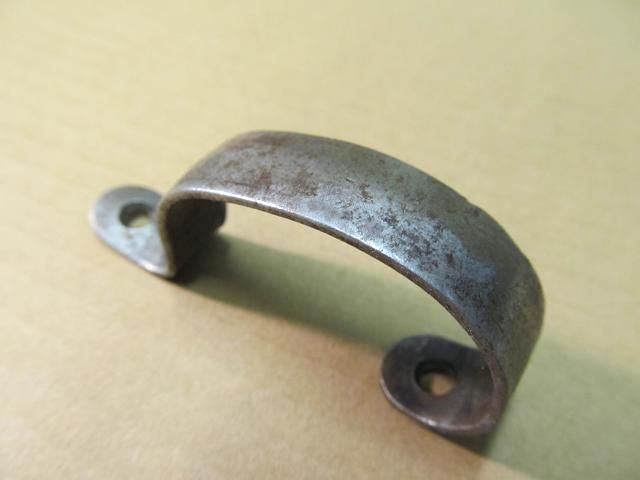
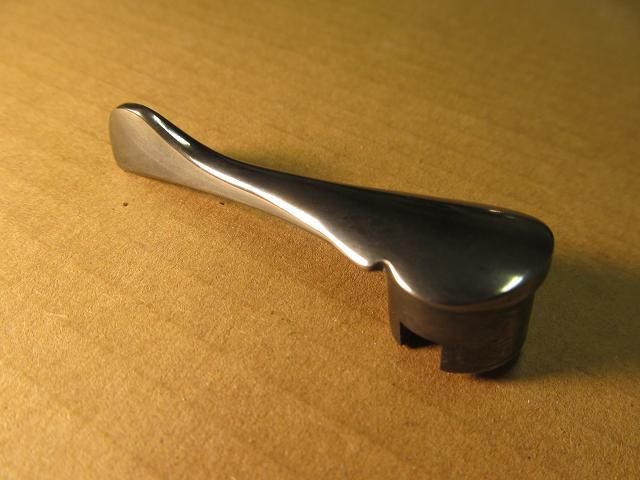
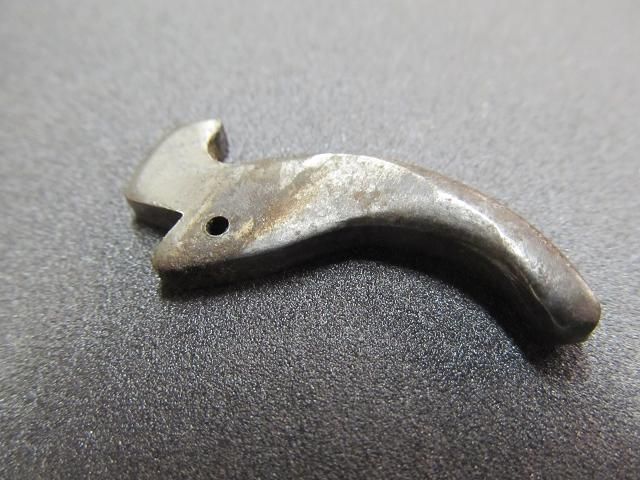
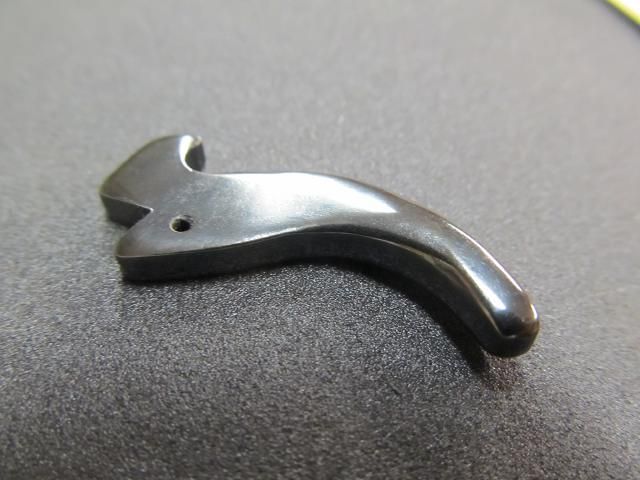
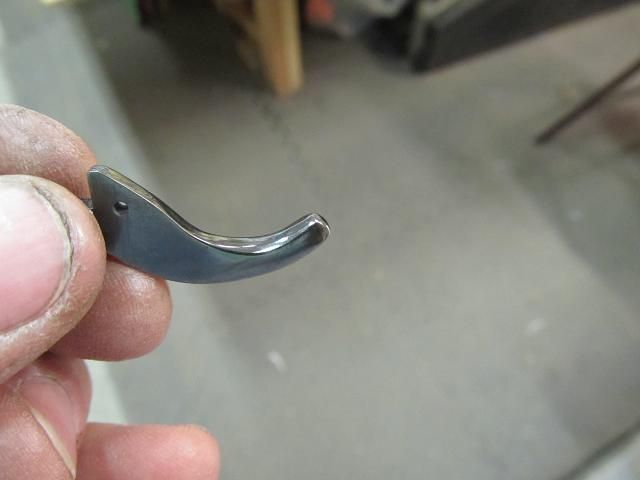
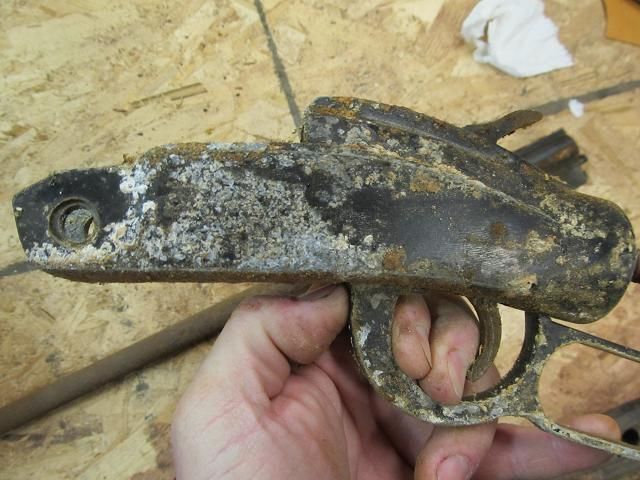
The extractor (when closed) will not allow a shell to be inserted at all. It misformed/bent.


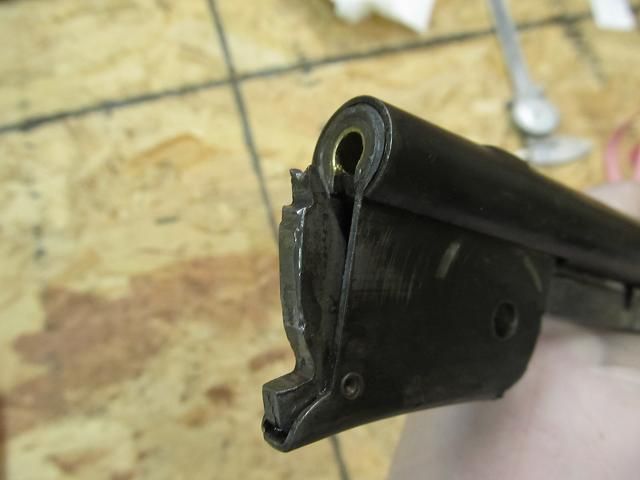
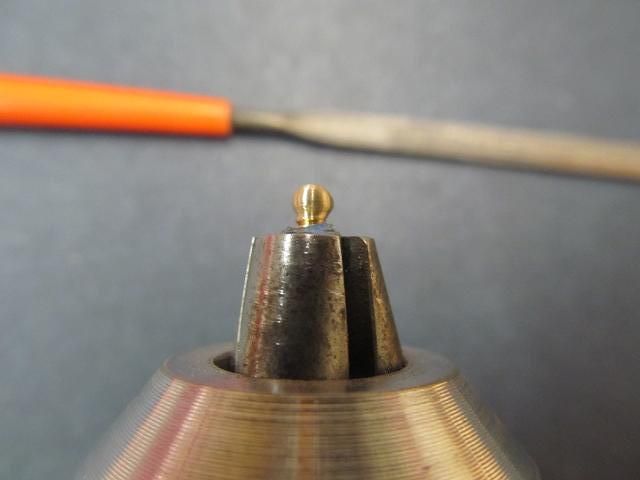
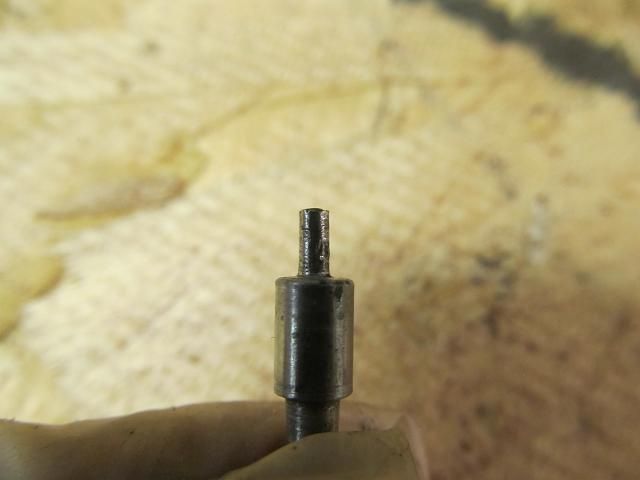
Even if the first two problems are corrected, the firing pin is badly bent and needs attention.


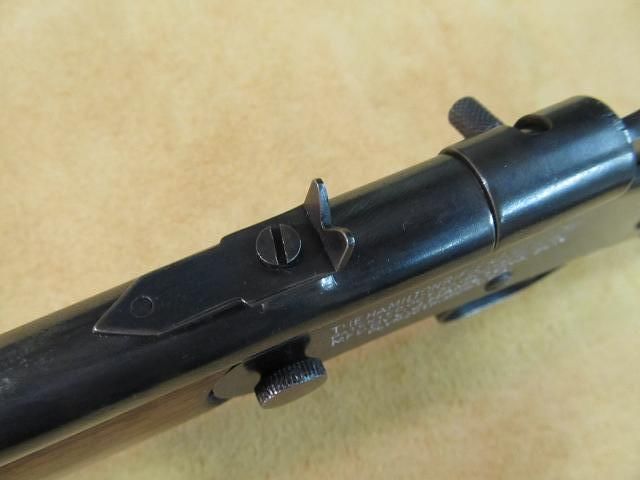
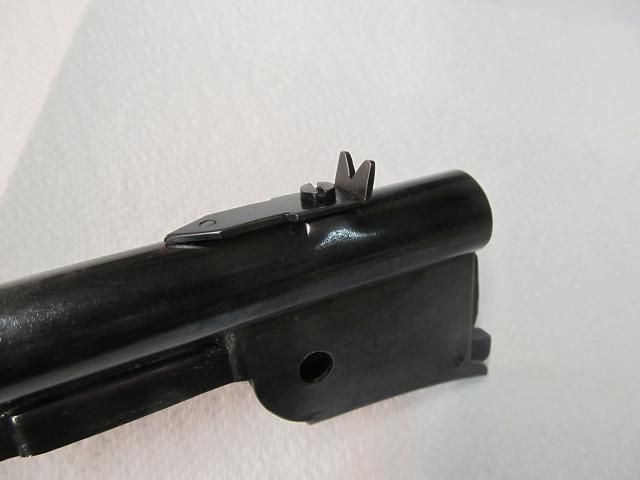
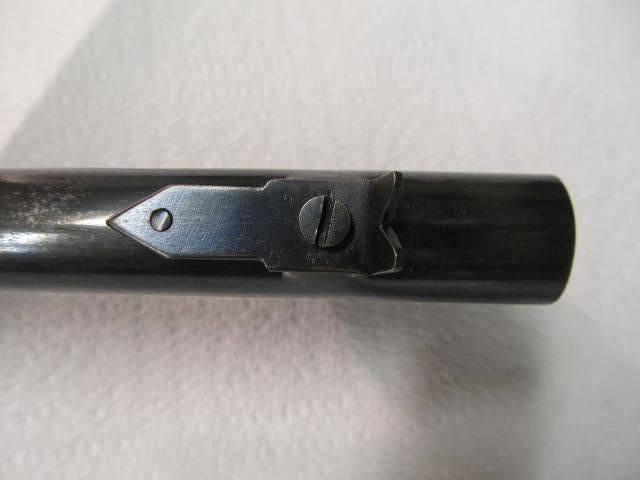
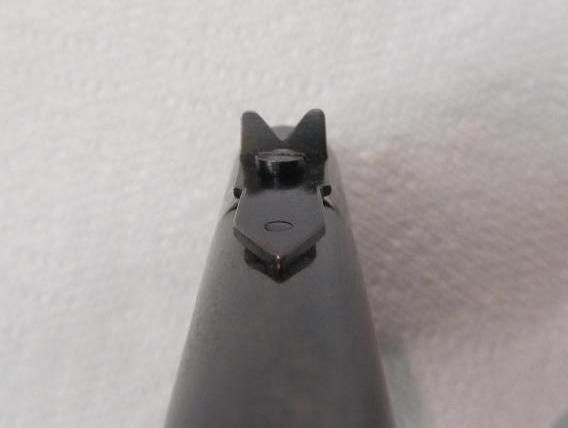
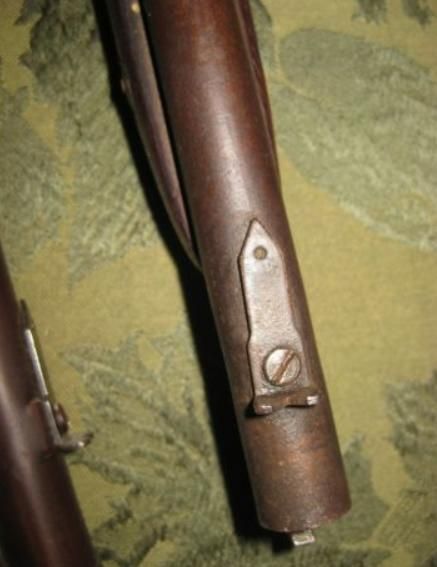
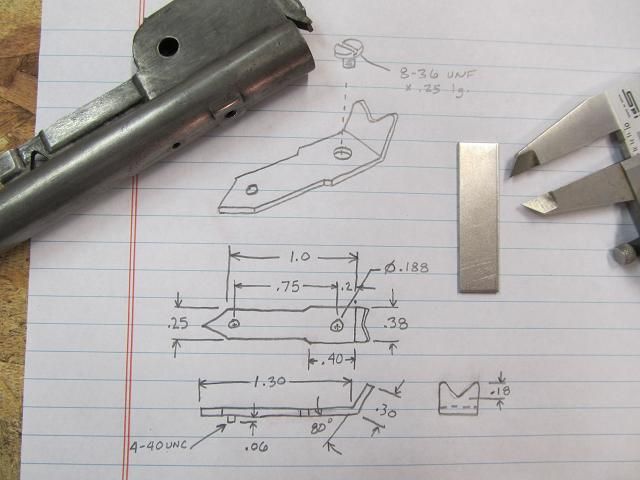
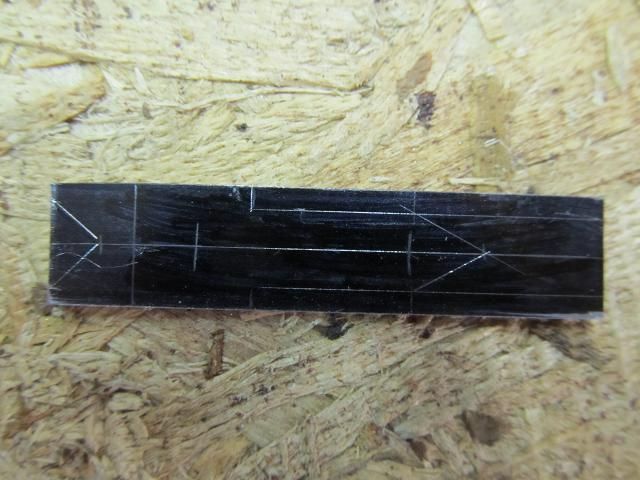
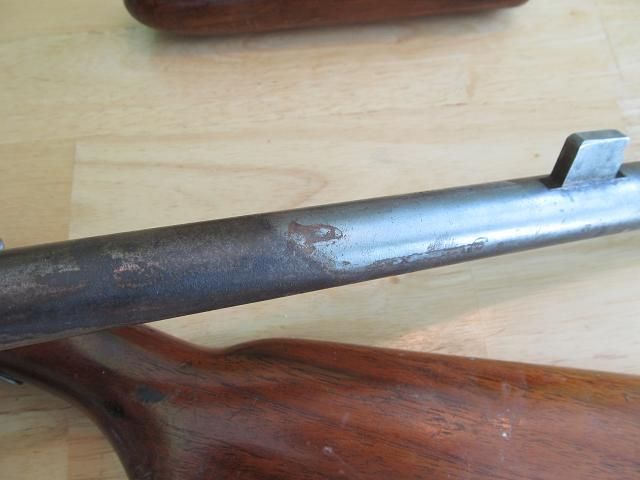
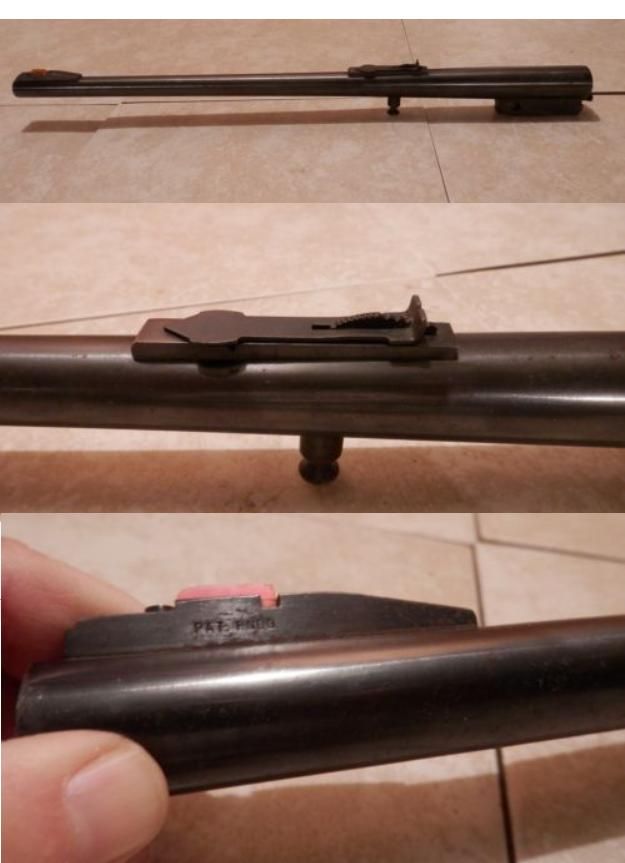
If I correct all the mechanical issues the firearm won?t be able to be accurately fired as its missing the rear sight. I will need to make one since buying one is not an option.


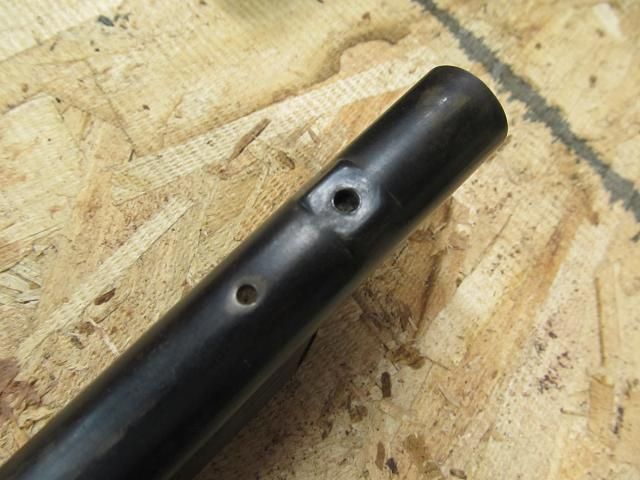
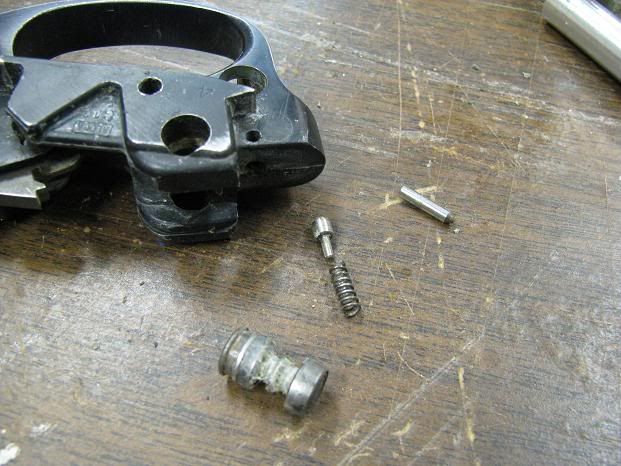
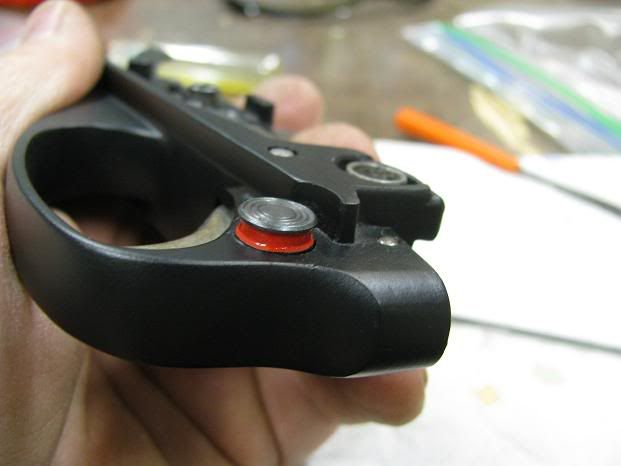
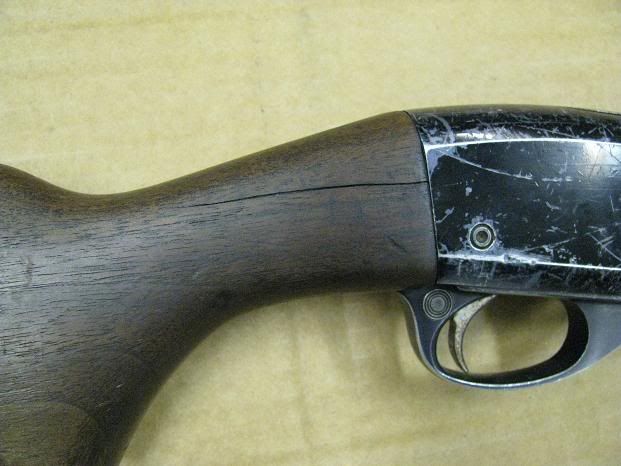
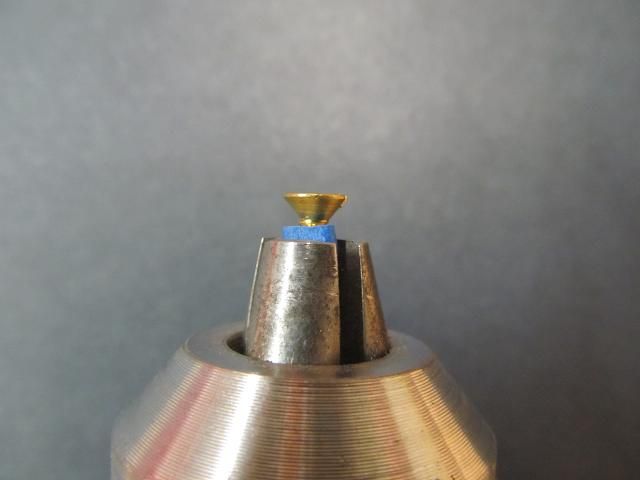
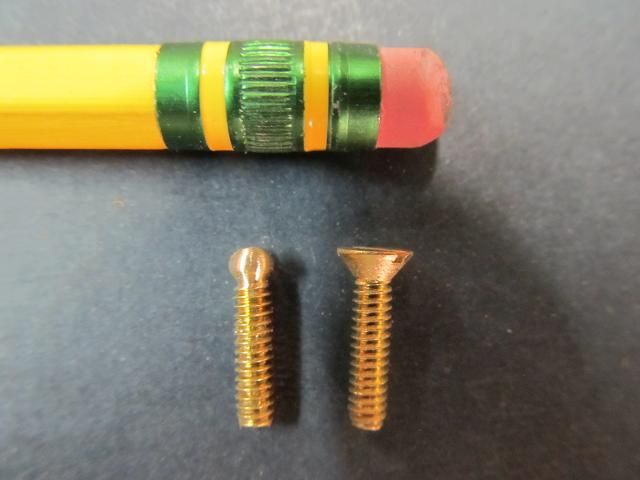
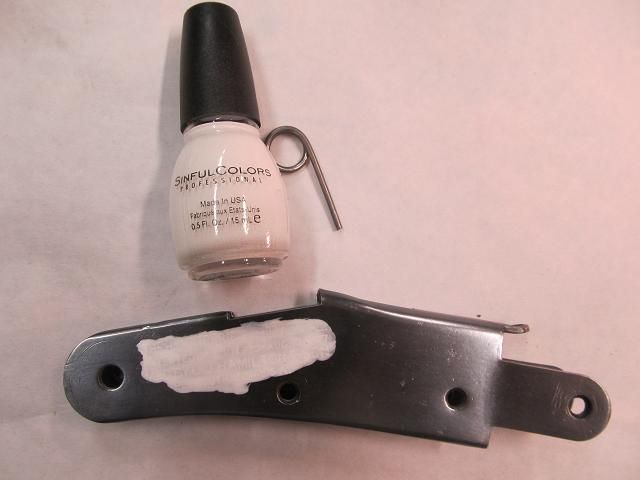
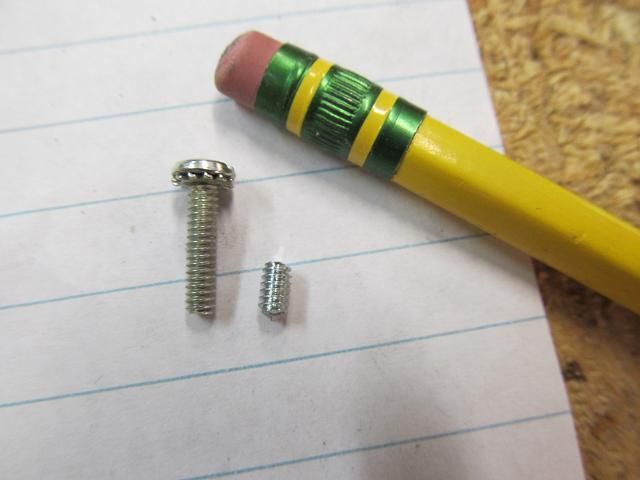
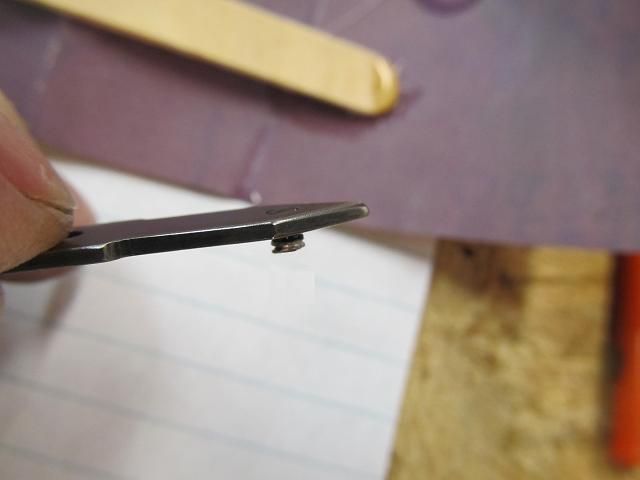
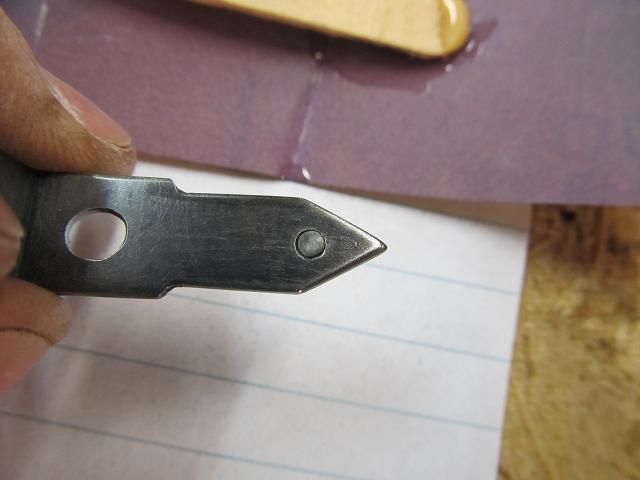
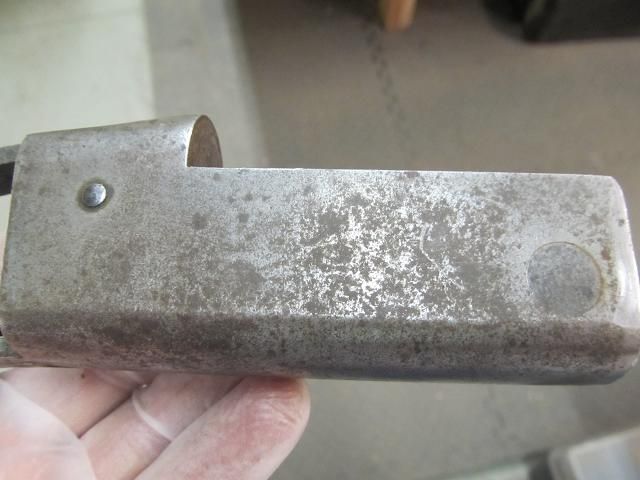
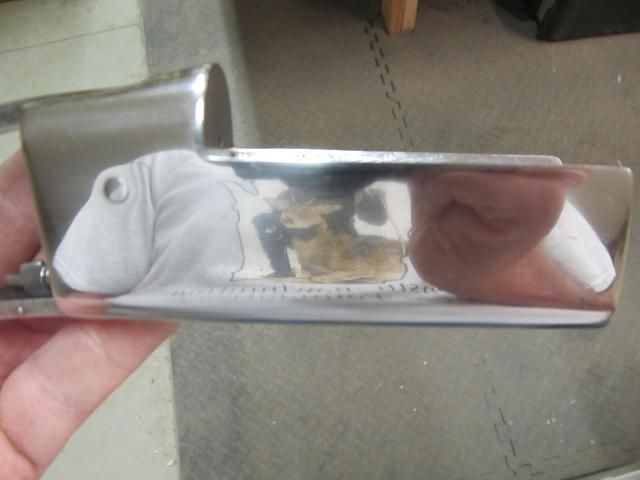
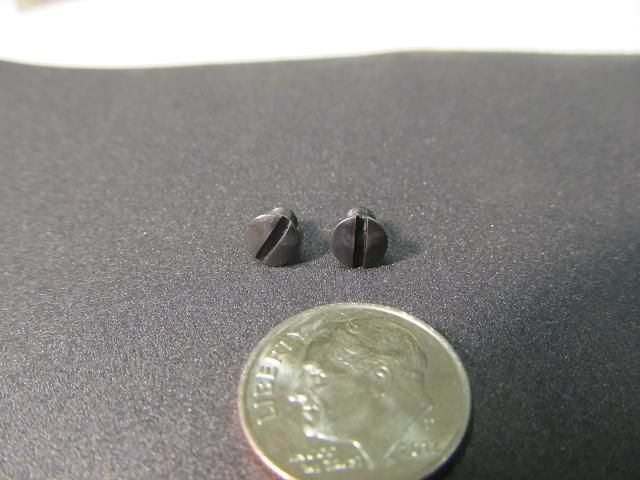
While this is mostly cosmetic, this is the wrong screw. The original had a much shorter screw that did not go through both layers of steel. The hole in the outside was for access for the screwdriver, not the screw. At least this will be an easy fix.


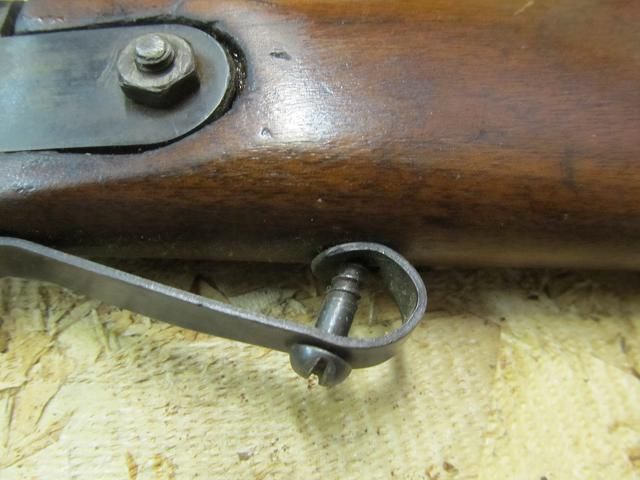
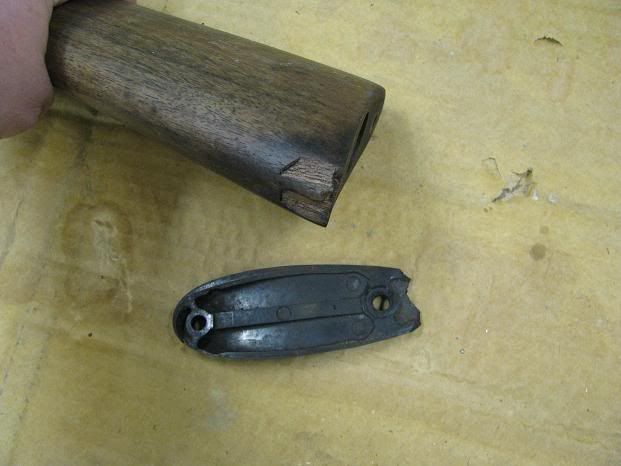
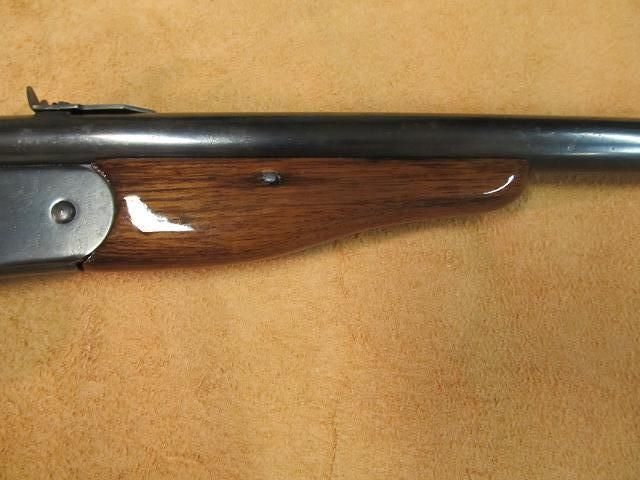
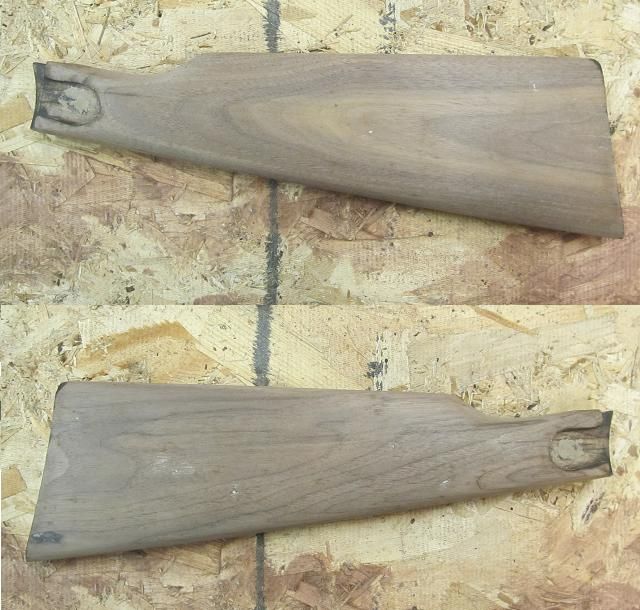
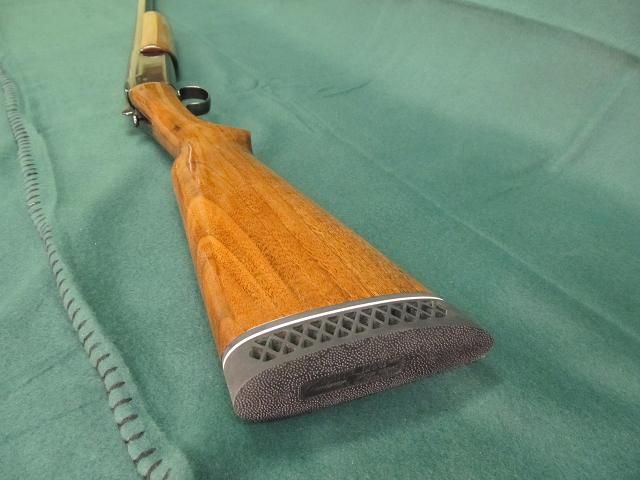
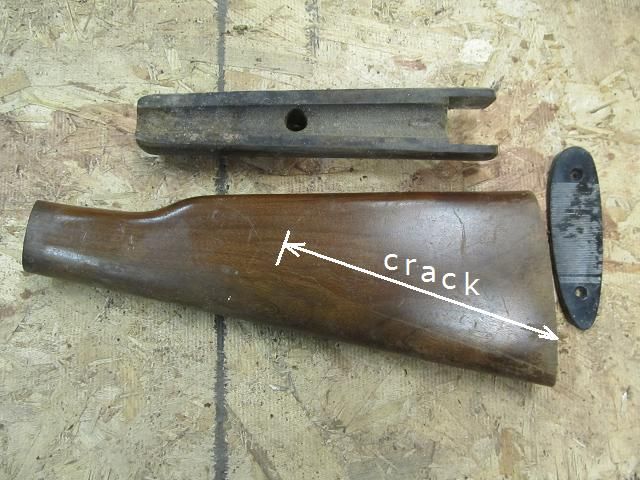
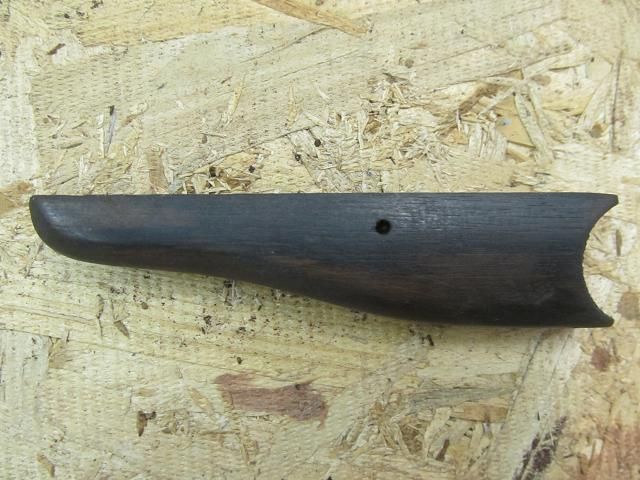
There are several issues related to the wood in terms of cracks, lots of black oil staining, slopped out holes and general ill fitting but again the gun was a very cheaply made product and is over 100 years old.

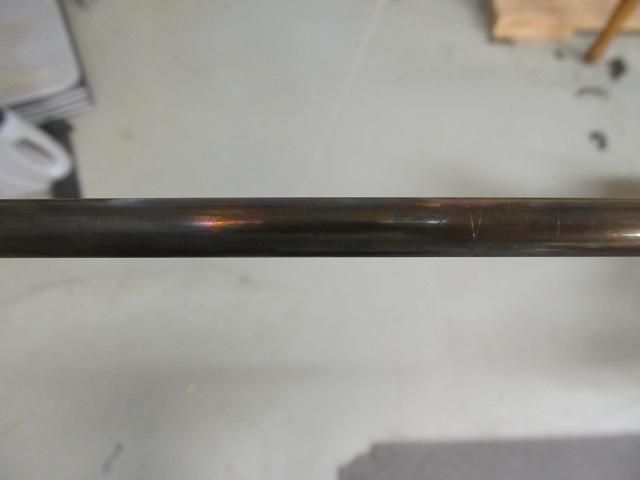
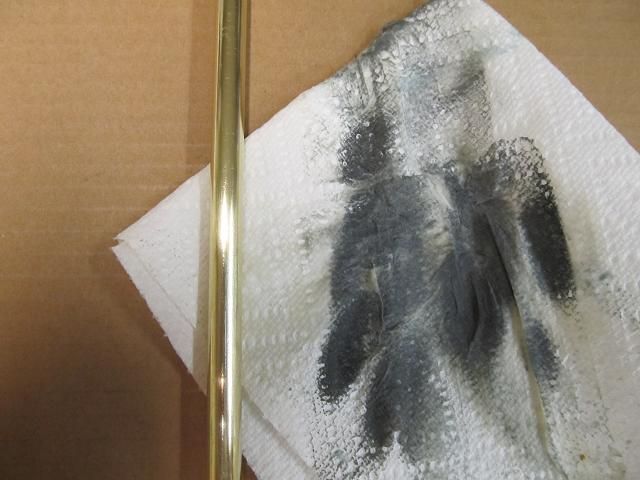
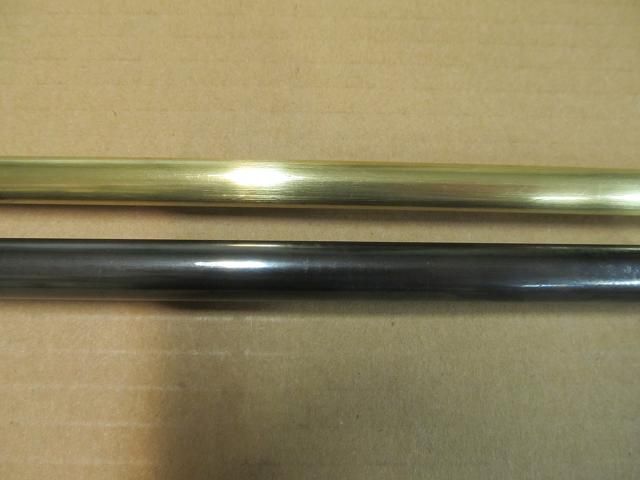
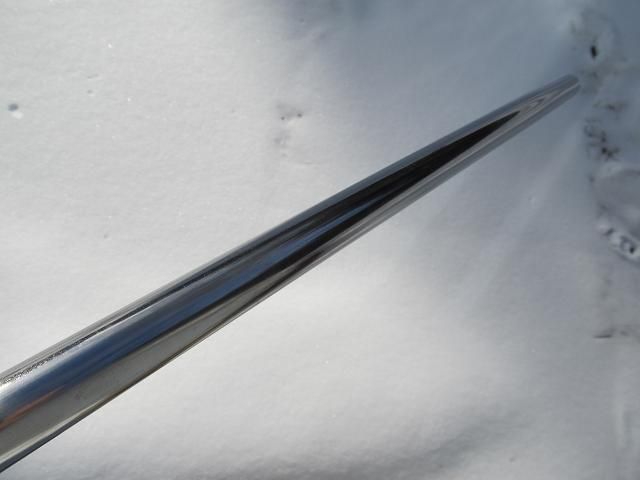
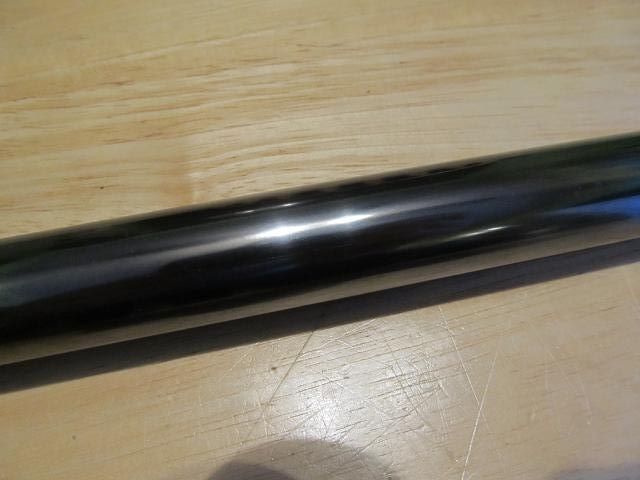
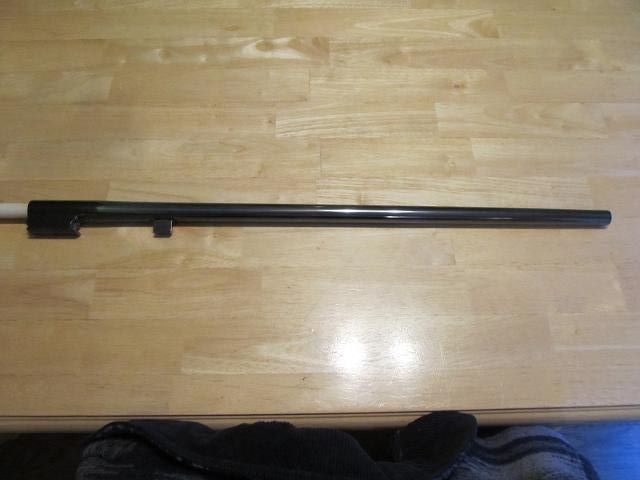
To top it all off, this guns barrel is lined with a brass tube. I don?t know how many shots these guns could take before the barrel gave out and the rifling disappeared. It was easier (and cheaper) to rifle a brass tube than hard steel so they rifled the brass liner and fit it inside a steel pipe/tube and then wrapped a piece of sheetmetal around it all and blued the sheetmetal.The bore on this gun is very very fouled (which is why I cant load a shell) The old school powder and the brass tube didnt mixt well. It will take a lot of cleaning to see if there is any rifling left in the barrel.


While this is the smallest firearm I have rehabbed (and the fewest parts) its represents some real challenges if its ever going to be fired again and if it is fired again I will strongly suggest that only CB or sub-sonic ammo be the only thing fired and always in conjunction with eye protection.

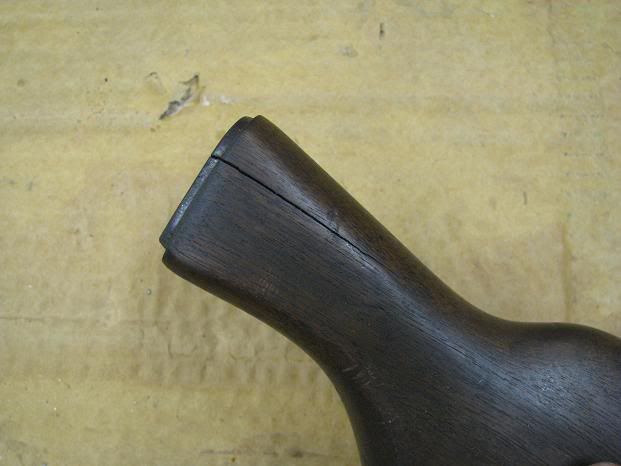
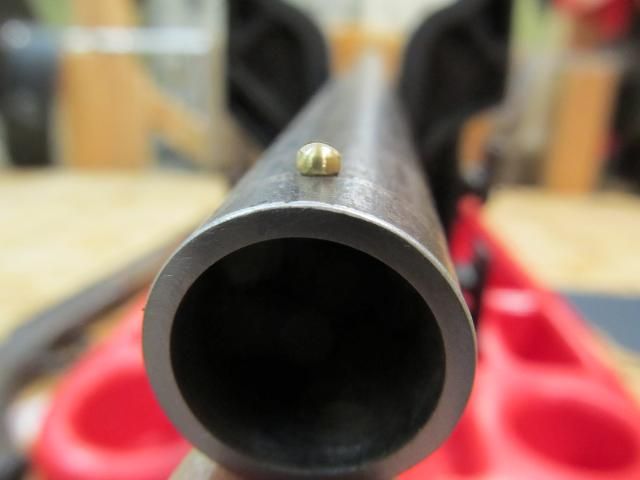
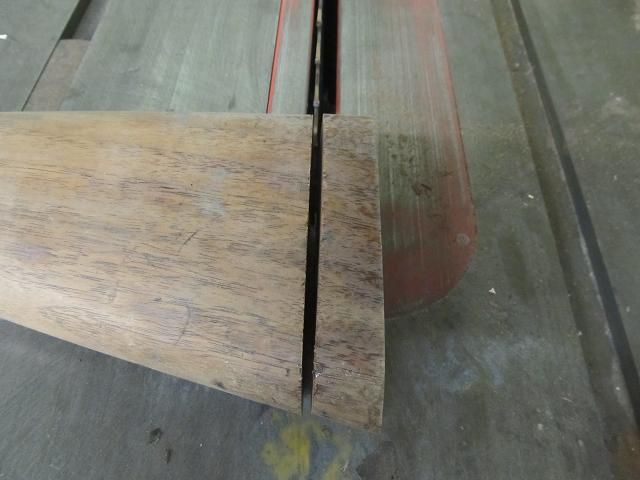
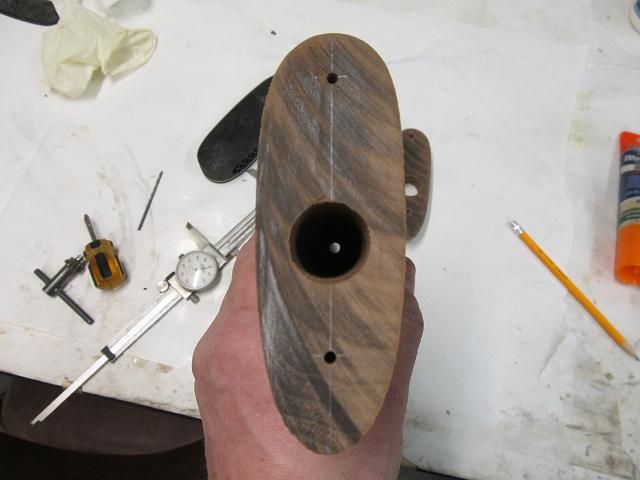
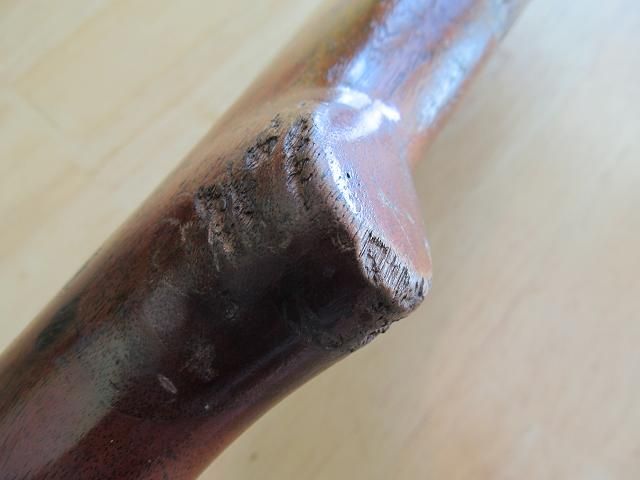
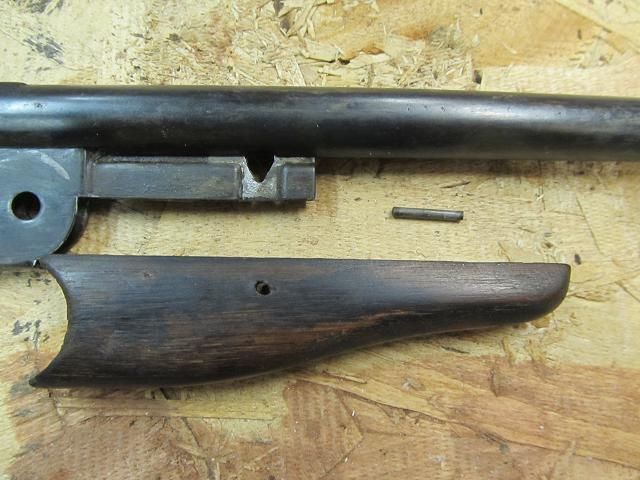
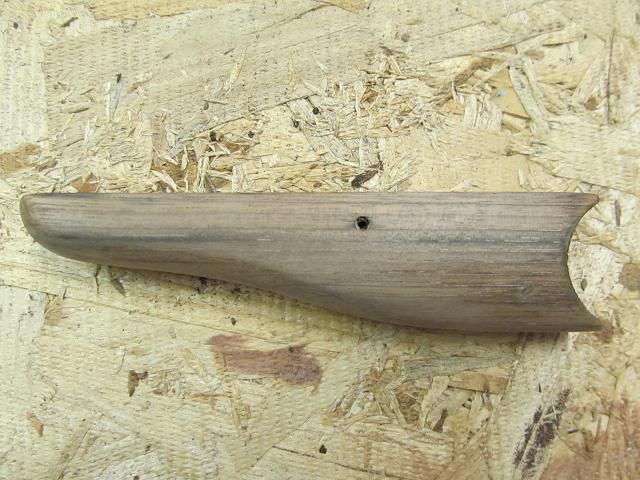
Like all the firearms I rehab, I start with the wood since there is such a lag time in drying the finish. The only thing holding the foregrip to the firearms is a tiny steel pin. Over time, that hole gets larger and larger until the owner drills it out and runs a bolt and nut through the whole thing. This one was spared that but the hole in the wood is so loose that I could get the pin to fall out by shaking the firearm. How it remained together is a mystery.


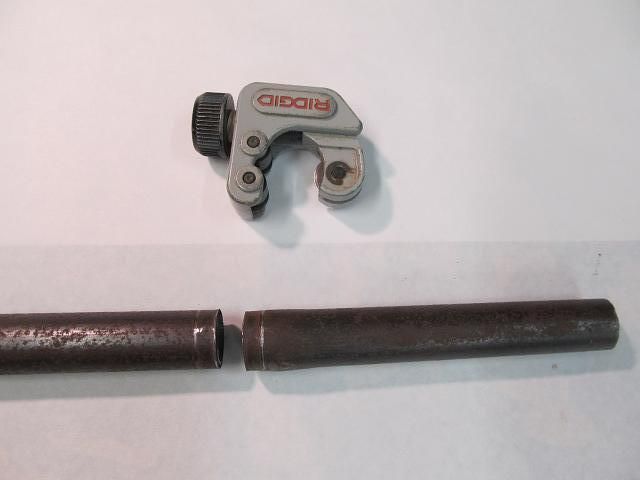
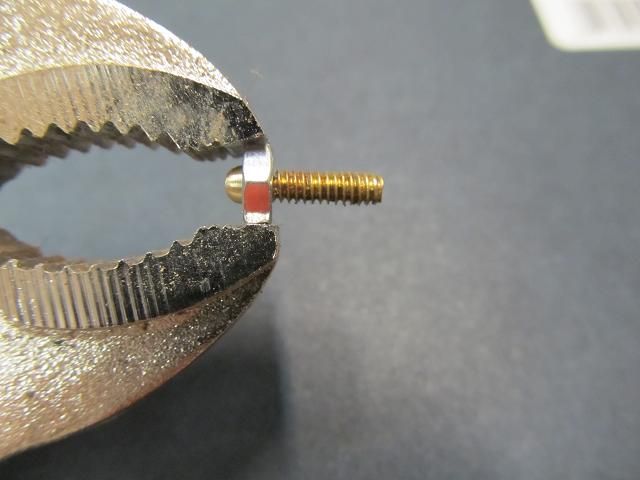
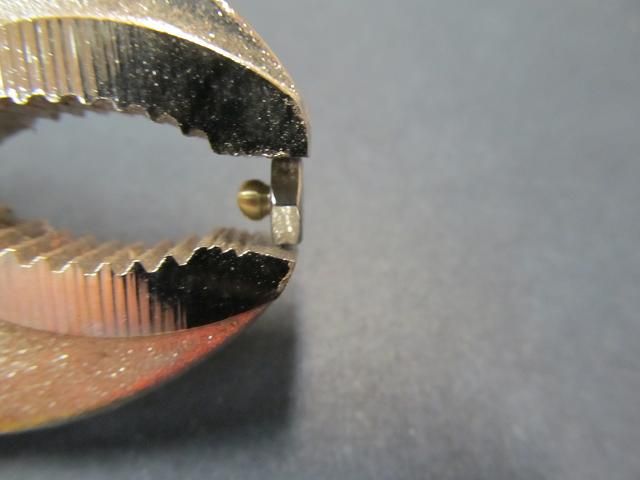
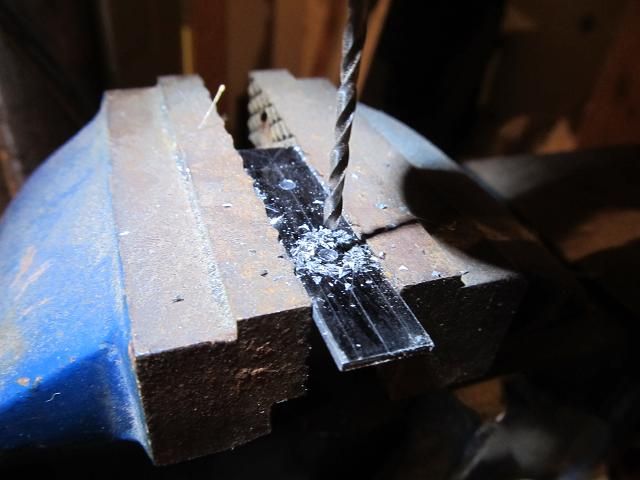
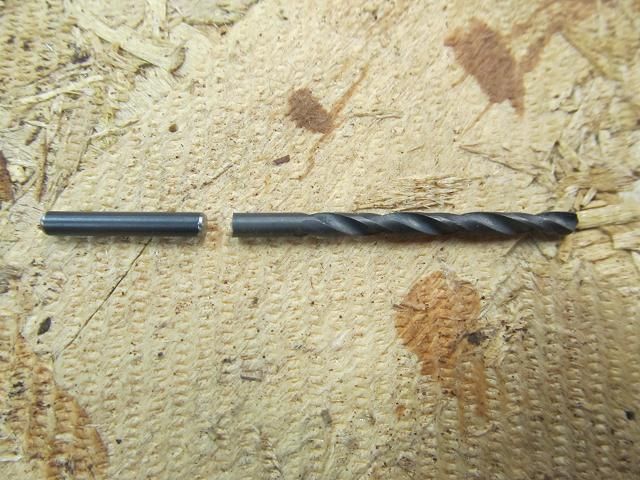
I cant put wood back in the hole so I will go up a size in pin but only just enough to make it tight again. Sadly, I don?t have pin material (music wire) in the needed size but I do have hardened steel in just the right diameter  but first I have to use it to drill out the wood. Then I used my Dremmle to cut the back of the drill bit off to convert it into the exact size pin I need.


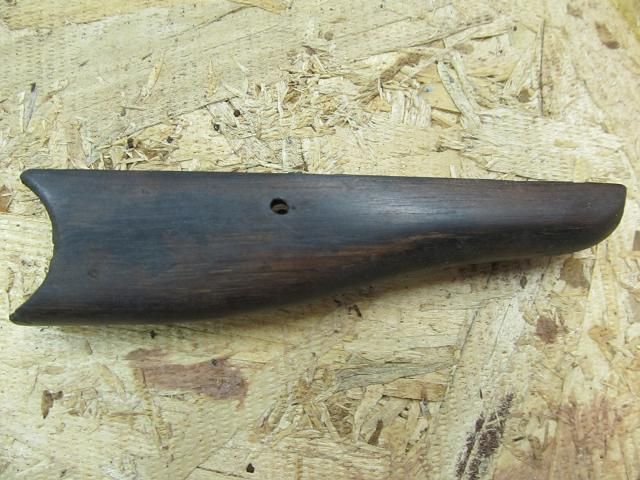
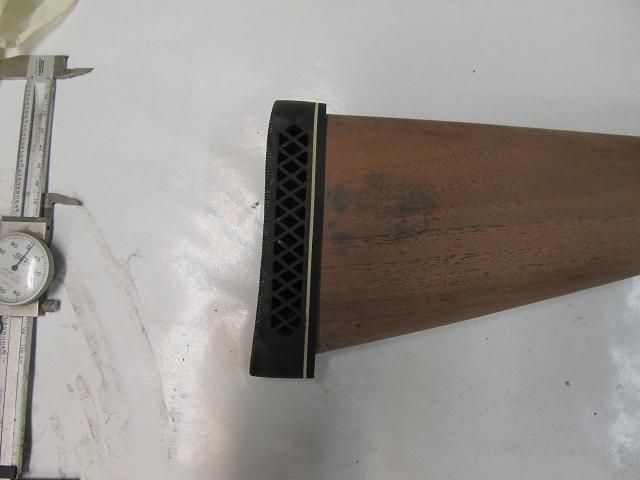
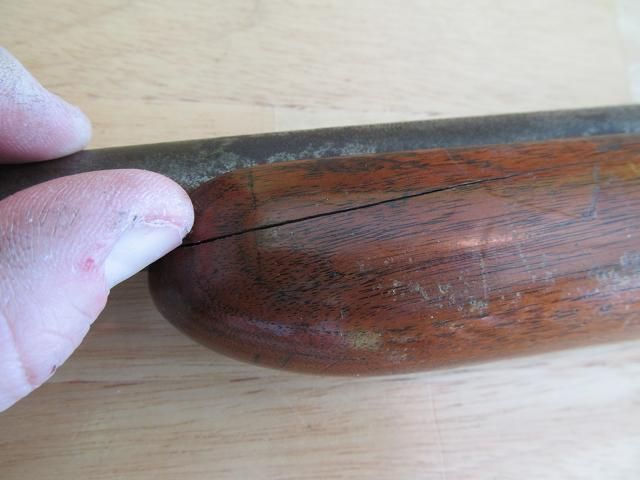
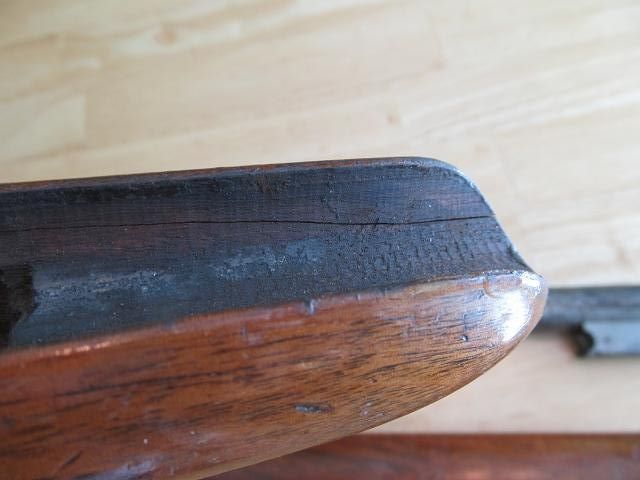
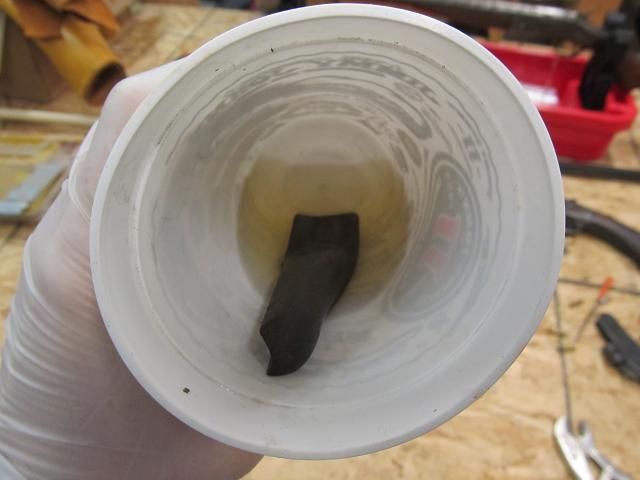
I epoxied the crack running lengthwise from the nose to the middle of the grip and then addressed the oil staining in the wood. Dirty hands and gun oil really darkened this piece of wood. In order to draw out the oil staining and soften that old school shellac I soaked the wood in acetone.  As soon as it hit the acetone it started leeching out and turning the clear liquid dark. Sadly some of the stains followed the grain so deep there is no way to get all of the stains out and the piece is so small there is no margin for sanding. There is also a chip/nick in the wood that cant be sanded away


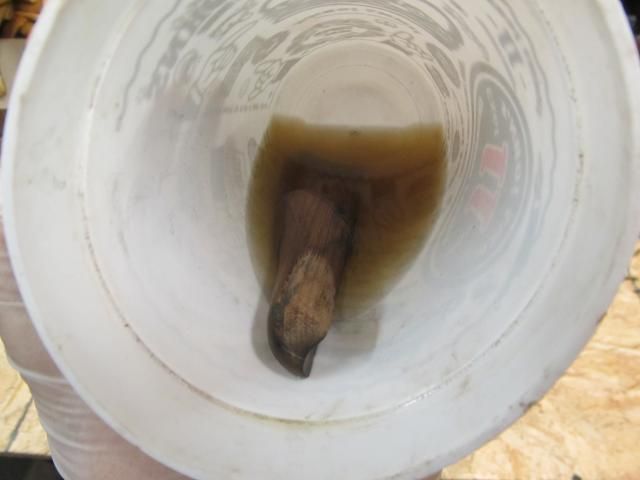
I was able to get rid of nearly all the stains but some remain that run all the way through the small piece of wood.


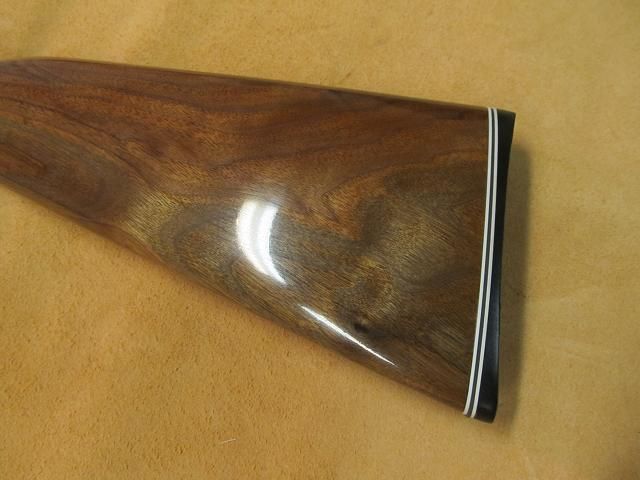
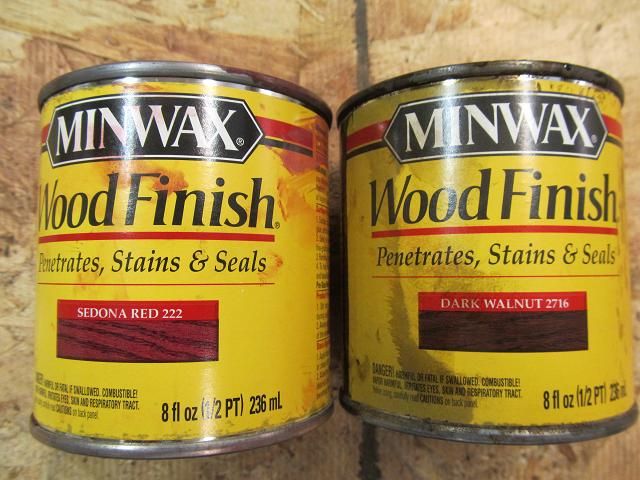
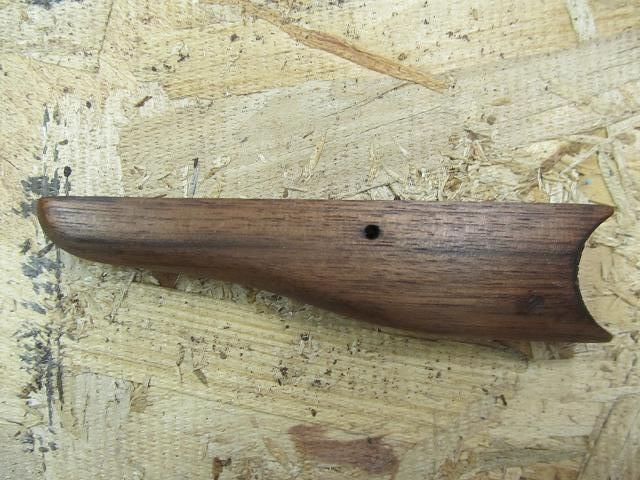
After viewing a lot of 100 year old guns it appears that most have wood that even though is walnut has a reddish hue to it. I don?t know if that was how it looked over 100 years ago or if that is how the shellac aged but I want to restore that reddish color so Im mixing red and brown stain together as the acetone bleached out some of the color in the wood while removing the stains.


The end result is a real improvement. Once the stain has a day to dry I can apply the spar urethane.


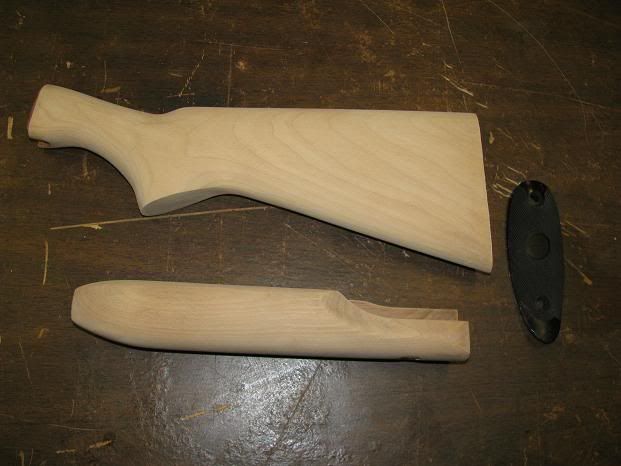
Now its time to deal with the butt stock

To be continued??

100
The next step is restoring the barrel. Most of the rust is surface rust but there are a few areas with pitting. Deep pits can't be done away with as it would remove too much metal. Some pits will remain, its just a fact of life.


Before I submerge the barrel in naval jelly I Use a lot of 320 grit and steel wool then the barrel spent a half hour in the jelly. Once the barrel is rinsed under hot water I use 400 and then 600 grit and 0000 steel wool to clean it up. Lastly I polish the barrel on a flannel buffing wheel with red rouge. The results are a real improvement.


This video does a better job of showing the polish job on the barrel.

https://www.youtube.com/watch?v=kgOKW2rzH7s

The next step is bluing the barrel. I start by plugging both ends of the barrel with wood plugs that act as handles. Then the barrel is scrubbed with acetone to remove any oils that would prevent the blue from taking. I used Dicropan cold bluing. Here are results.


Here is a video of the blued barrel.

https://www.youtube.com/watch?v=oRh4BA-aRO0

Even though there are still at least 3 more applications of tung oil for the wood, I think its time to put the entire gun together and take some pics and video of the restoration so far. I can always take it apart to finish the finish.


And here are some videos of the gun.

Right side

https://www.youtube.com/watch?v=qedHSOsPVTo&feature=youtu.be

Left side

https://www.youtube.com/watch?v=pdNmKF2QJno&feature=youtu.be

After 2 or 3 more applications of tung oil I will buff the finish to a glass-like smoothness and give it a few coats of paste wax and this gun should be good for a few more decades and with a lot less kick. When the weather improves I will give it a shot to see if it still makes me cry like it did 40 years ago.

101
The receiver is a real mess. Lots of surface rust but only a little pitting


The main problem here is that somebody did a real doozy of a file job on the tang of the receiver where the cocking lever slides forward.


I cant put the metal back but I can clean up and finish the job somebody else started. Fast forward after lots of time cleaning up the receiver and polishing it and then brushing it with 0000 steel wool and this is what is looks like.

**Disclaimer*** Photographing polished metal means the metal will look like whatever your shirt looks like and your hand and your camera are going to reflect back at you.


And that nasty filing job is all cleaned up.


To get a better look at the polished receiver I have a video where unlike the stills you can see the pitting.

http://www.youtube.com/watch?v=Zhn0QEyXQ1I&feature=youtu.be

Then it was onto bluing. The same procedure except I use a cotton ball (several of them) to apply the dicropan. The receiver was blued 7 times and steel wooled after  each application.


Here is a video of the blued recevier that shows it a little better.

http://www.youtube.com/watch?v=Q297W8MvWh4&feature=youtu.be

Then it was time to reassemble all the metal parts.


And a video of the assembled receiver.

http://www.youtube.com/watch?v=N27h7j5x32M&feature=youtu.be

The barrel is the last item to be restored.

To be continued ...................

102
This old shotgun does not have a lot of metal parts but the ones it has are in need of some TCL. Rebluing parts isn?t hard and doesn?t take long. What take the most time (and its time well spent) is cleaning and polishing the parts. With a good polish comes a good looking blue. For those that are afraid of cold bluing because they heard of bad results or that cold blues are streaky or blotchy are from people who are doing it wrong. Cold bluing can look like a factory hot blue but you have to put forth the effort.

With the gun disassembled and all the parts tagged and bagged I can get to work.


 I'll start with the trigger guard. It?s a little dinged and dented and there are some knicks in the edge and there is overall surface rust. If I were to hit it with some sandpaper or steel wool and then try to blue it I would end up with a crappy finish. Extra time spent polishing pays off in great end results.


Several grades of sandpaper, then steel wool and some time on the flannel buffing wheel and you can get a mirror finish. IF you dont have a bench grinder that you can mount a buffing wheel, you can substitute a drill or drill press with a flannel wheel. The finish work you put into the part shows up through the blue. The bluing doesn?t hide anything, in fact it exposes defects in finish. Spend the time polishing.


I use Dicropan cold blue. Its inexpensive and easy to apply (in this case I used a Qtip). I blue 5 times using 0000 steel wool to buff the part after each application. Steel wool wont remove the blue. It actually makes it shine. The final application of the cold blue is aplied with steel wool.


Before and after.


Then its onto the action latch.


After bluing


Other small parts.


Even the tiniest of screws (like these that hold on the trigger guard) that can be seen on the outside of the gun get the treatment.


Interior parts that cant be seen dont get polished. They simply get cleaned and reblued if they were once blued or they stay unblued if thats how they were on the gun originally.

These many pictures are not really for this blog. there is another reason I take this many photos. Its a tip I will pass along. My eyesight is not that great so I will photograph the parts after polishing and then view the parts on my computer at 10 times their actual scale. It helps me find even the slightest blemish allowing me to see it and correct it. The same thing after blueing. The jumbo sized computer images really help me see the parts and blemishes better. The pictures that make it here are only 2 or 3 times larger than actual scale. Also, you are only seeing a fraction of the pictures I take.

To be continued......

103
The first step was to spread the crack in the foregrip and syringe some titebond glue into the crack and clamp it. While that dries I can shorten the stock and install a recoil pad. Im using a Pachmayr 325 field recoil pad because I like the vented (ribbed) look vs the sims which just looks too modern for this old gun. The Pachmayr has the old school look with a white spacer so it will be more ?period? looking.

http://www.pachmayr.com/home/recoil-pads.php

The recoil pad is just over an inch thick so the stock needs to be shortened by the same amount. This solves the problem of recoil and the broken plastic butt plate and the chipped wood on the heel.


Then I drilled the holes for the screws.


Then the oversized recoil pad is screwed on so it can be ground to fit the size and slope of the stock.


The end of the stock is wrapped with two layers of painters tape to protect the wood and then the pad is ground on a belt sander to fit the stock. I start with 80 grit and then 120 grit belt and then hand sand with 220, 320 and finally 400 grit. After peeling off whats left of the tape.


The screws on this pad are hidden. The rubber is self healing after a small slot is cut to insert the wood screws. It?s a good look and will look even better once it washed and polished.


Then the foregrip is final sanded and both will get several applications of tung oil rubbed into the old wood.

To be continued?..

104
Im beginning the restoration of the first shotgun I ever fired. If memory serves that was when I was 9 or 10 years old. My Dad bought this Winchester model 37,single barrel, break action,shotgun used in 1958. The first owner sold it because it kicked too hard. He sold it to another guy who only briefly owned it and then sold it to my dad in 1958 for $20 because it kicked too hard. These were rugged adult males, farmers/hunters, that didn?t want the 12 Ga because of the recoil so when my dad had me and my 2 brothers shoot the gun as little boys you can imagine the result. My two older brothers (then aged 11 and 12) went first and after just one shot ran into the house crying. The end result was tears and black and blue shoulders. Over the next 56 years that old shotgun sat leaning in the corner of the farm house with very little use as everybody was to intimidated to fire it.

The Winchester model 37 was produced from 1936 to 1963. During that time slightly more than one million were made. During World War II, the National Guard soldier used Winchester Model 37, 12 gauge shotguns. When my dad bought the gun used in 1958, the shotgun sold new for $29.95. Here are some ads from the past. This first ad mentions how the light weight would make it good for women and kids and even mentions the model 37 would be a boys first love. Love? If love means getting knocked on your arse.


I doubt Santa understood the pain and terror he was placing beneath Christmas trees. Look at the words they used to describe the model 37. ?hard shooting? At least this ad was factual. Santa must have fired the 37 as it looks like his right arm doesn?t work and he lost the sight in his left eye from the recoil, it appears (by the droopy mouth) that it caused a stroke and it screwed his back up so badly he cant stand upright.


Winchester did not serialize these guns so the exact date of manufacture is not known but I will assume it was made in the mid to late 1940's. During my last visit to the farm I collected the old model 37 so I could do the restoration. Like a lot of 60 and 70 year old guns, this one is in need of some TLC. The butt stock is broken as is the butt plate. The foregrip is cracked and both stocks finish is missing in some areas. There are many dings and scratches and a few burns (im guessing cigarette). Im not too concerned about the broken heel on the butt stock since Im going to shorten the stock and install a recoil pad (something this shotgun sorely needs) and the cracked wood will be easy to repair. A recoil pad should make this gun tolerable to fire.

Here is the shotgun in the condition I got it in.


The stock it chipped away and the butt plate broken. It looks like either water damage or sun (uv) damage to one side of the stock as the finish is gone and the wood is very grey.


The grip is pretty chewed up as well.


The fore grip is cracked.


And chipped away at the back end.


The metal is a bit rusted and tarnished but only a small amount of pitting. I can see there are a lot of deep oil stains (almost black looking wood) near the receiver. Not sure how to get rid of that.


My dad said a prior owner did some filing on the receiver to keep the hammer from sticking when it came forward. Its a pretty crappy file job.


This one is going to be fun to restore because I have a history with the gun. I'll start with the wood and recoil pad since all the coats of tung oil take so long to dry and I can then work on the metal parts while applying the tung oil.


105
Last night was a banner night for this old shotgun. A few things of note took place. First of all since this gun was destroyed by a raccoon and it pitted the receiver and lever (and raised hell on the wood) I opted to mark the history of the gun into that same receiver. I  was originally going to mark both sides but opted for just one side.

I masked off an area and sprayed it with flat, white spray paint.


Then I placed tape over the paint and drew in the image I wanted on the receiver. I painted the receiver white so I could see the pencil lines.


I used a fine pointed diamond bit in my dremmel to take away the black baking lacquer and shine up the aluminum underneath.


Then I peeled away the tape and washed away the white paint with acetone leaving the tribute to the masked bandit etched into the metal.


I assembled all the metal parts and attached the finished wood. For now I have the pitted barrel on the gun just for the pictures.


The stippling worked out very well.


The cracked stock is repaired and looks a bit better than before.


This gun has come a long way from the coffee can.


Also last night I won an Ebay Auction for a replacement barrel for this gun in the buckbuster configuration (with front and rear rifle sights) So this old gun can once again take to the deer woods. (once I recondition the barrel and reblue it) The barrel set me back $128 but since I got the gun for nothing, It all works out in the end. Here are the images from the Ebay Auction.


With this one done its time to move onto a gun with some sentimental value to me. A 1940 Winchester model 37. Its my father?s gun and the first shotgun I ever fired. Time to start a new restoration thread for this rusty mule kicker.


Pages: 1 ... 5 6 [7] 8 9 ... 26
Google
Web http://www.wisconsinoutdoor.com